Church-Ops Africa: Complete Church Workspace Training Manual
Audience: Pastors, church owners, administrators, secretaries, ministry leaders, finance workers, care teams, communications teams, worship teams, volunteers, and trusted staff
Training level: Beginner friendly
Delivery format: Facilitator-led sessions with guided practice
Product reference: The current Church-Ops church workspace, its routes, permissions, and working pages
Last system cross-check: 19 June 2026
Why this manual exists
Church-Ops should feel like relief.
It should reduce repeated writing, disconnected spreadsheets, forgotten follow-ups, missed assignments, scattered church records, and the pressure of keeping everything in one person's memory. This course teaches church teams how to let the system carry the administrative load while people continue to carry the ministry.
This is not a Control Tower or platform-owner guide. It teaches the church workspace used by a church's own authorized team.
Source-of-truth rule
This manual follows the current Church-Ops system itself:
- the live church sidebar;
- current routes and pages;
- current forms and validation;
- current role and plan restrictions;
- current member-portal handoffs;
- current privacy and approval flows.
Older guides may help with background, but they do not overrule the current system. If a label changes later, trainers should follow the label shown in the church workspace and update this manual.
Presentation companion: facilitators can use the quick browser-ready slide deck at /training-slides/church-ops-admin-training-slides.html, or the deeper product presentation and full training deck at /training-slides/church-ops-full-product-presentation.html.
Part One: How to Use This Course
Recommended course plan
| Session | Topic | Suggested time |
|---|---|---|
| 1 | Welcome, sign-in, navigation, security, and the Dashboard | 75 minutes |
| 2 | People Operations, Members, and Profile Shares | 120 minutes |
| 3 | Households, Guests, Ministries, and Small Groups | 120 minutes |
| 4 | Children Ministry and child-safety workflows | 90 minutes |
| 5 | Care Command, Pastoral Care, and Prayer Wall | 150 minutes |
| 6 | Tasks, Devotionals, Reading Plans, and Care Reports | 120 minutes |
| 7 | Events, Smart Event Import, and Attendance | 150 minutes |
| 8 | Sermons, Service Planning, Song Library, and Volunteer Teams | 150 minutes |
| 9 | Smart Composer, Conversations, Message Assets, and Message History | 150 minutes |
| 10 | Campaigns, Opportunities Queue, and Communication Reliability | 120 minutes |
| 11 | Forms from building to responses and workflows | 180 minutes |
| 12 | Giving, transactions, budgets, reports, and signatories | 180 minutes |
| 13 | Member Portal, Website Builder, Blog, Public Forms, SEO, and Domains | 180 minutes |
| 14 | Automations, Assets, Documents, Import Center, and Offline Desk | 180 minutes |
| 15 | Church Assistant, Insights, Reports, and Knowledge Sources | 120 minutes |
| 16 | Church Settings, Branding, Users, Security, Audit Logs, and Billing | 150 minutes |
| 17 | Connected workflows and the member/staff experience | 120 minutes |
| 18 | Capstone: run one complete week of church operations | 150 minutes |
The sessions may be delivered on separate days. Do not rush people through all modules at once. A person only needs the sessions connected to their responsibility.
What the facilitator needs
Before training begins:
- Use a safe training church or records that may be edited.
- Give each learner their own account. Never share one administrator password.
- Assign the smallest role that lets each learner practise their real work.
- Confirm which plan and feature overrides the church has. Hidden sections may be intentionally unavailable.
- Prepare a phone and a computer if possible.
- Prepare one harmless sample member, guest, event, task, form, and transaction.
- Never demonstrate with confidential counseling notes, children's medical details, private prayer requests, or real payment credentials.
- If WhatsApp, email, SMS, push, online giving, or AI is not configured, explain the workflow without sending a live message or payment.
A simple teaching rhythm
Use this pattern in every session:
- Explain the relief: What burden does this page remove?
- Show the page: Point out only the areas needed for today's task.
- Do one example: The facilitator completes one safe example slowly.
- Let the learner repeat it: The learner completes the same type of task.
- Check the result: Open the detail page, member portal, report, or history where the result should appear.
- Undo training data where appropriate: Archive or delete only the test record, never real church history.
How to use the visual guides
Screenshots in this manual are teaching tools, not decoration. Use them in this order:
- Callouts: Start with the numbered points below the image. They tell the learner what to click or notice first.
- What you should see: Confirm the page has the expected title, controls, list, detail panel, or status before continuing.
- Try it yourself: Let the learner complete one safe sample task.
- Common mistake: Name the one mistake most likely to cause confusion before the learner makes it.
- Result check: Confirm the result in the page, detail view, history, report, or member portal.
Images use a safe training church and avoid private prayer details, counseling notes, child records, financial identities, passwords, and personal contact information. A learner's colors or totals may differ, but the page structure and workflow remain the same.
Facilitator tip: On a phone, let the learner zoom into one working area at a time. On a computer, keep the sidebar visible so the learner always knows where the page belongs.
Visual teaching cards used throughout
Use these cards any time a screenshot appears:
Numbered callouts
- Start from the sidebar section shown in the screenshot.
- Confirm the page title matches the lesson.
- Find the main action button before opening forms.
- Find the list, table, queue, or canvas where saved work appears.
- Find the status, filter, preview, or history area that proves the work succeeded.
What you should see The learner should see the correct church name, the correct module title, the expected controls, and no error page, login page, or unrelated module. If the page looks different, check role, plan capability, sidebar section, and browser zoom before teaching the step.
Try it yourself Use only a safe training record. Create, edit, send, import, or publish only when the learner has permission and the action can be undone or clearly labeled as a test.
Common mistake Do not create duplicate people, households, categories, forms, events, campaigns, or tasks just because search was skipped. Search first, then create.
Result check Every exercise must end by opening the saved record, list, status, report, outbox, timeline, response detail, or member-portal page where the result is visible.
Language used in this manual
- Church workspace: The administrative area for the church's authorized team.
- Member portal: The church-branded app used by members and assigned staff or volunteers.
- Record: One saved item, such as a member, event, task, form response, or transaction.
- Assignment: Work given to a person or team, normally with a due date and a response flow.
- Capability: A feature enabled by the church's plan or a platform-approved override.
- Sensitive data: Information that should only be seen by authorized people, such as giving, child, care, counseling, or prayer details.
What to do when a menu item is missing
Do not assume the system is broken. A menu item can be hidden because:
- the church's plan does not include that capability;
- the current user's role does not have permission;
- a church setting has not been enabled;
- a required setup step is incomplete.
Ask a church owner or authorized administrator to review Administration > Users & Roles, Security, or Billing & Plan. A lower-plan user should not be sent to an unavailable page.
Session 1: Welcome, Navigation, Security, and Dashboard
The promise
By the end of this session, the learner can sign in safely, find any area they are allowed to use, understand the home dashboard, search the workspace, open notifications, and work confidently on phone or computer.
What this helps the church do
The Dashboard gives the team one starting point. Instead of opening many notebooks before knowing what needs attention, leaders can see important people, giving, attendance, care, celebrations, events, and quick actions from one place.
Pages and controls covered
- Sign-in and two-factor security prompt
- Church Dashboard
- Top search
- Notifications and notification details
- Sidebar sections and show/hide control
- Language control when enabled
- Light and dark mode
- PWA installation
- Low-bandwidth and offline indicators
Teach it step by step
1. Sign in to the correct experience
- Open the Church-Ops sign-in page.
- Enter the learner's own email and password.
- If entering the church workspace, confirm the page opens the church Dashboard.
- If entering the member portal, confirm it stays in the member portal. The two experiences are related but independent.
- If the system requests an authenticator or email security method, explain that this protects church records. Sensitive areas may remain restricted until setup is complete.
2. Read the top bar
Show:
- the sidebar show/hide button;
- the global search box;
- language selection, when available;
- the notification bell;
- the church identity or workspace switch area;
- install and appearance controls;
- the profile menu.
Use global search to look for a member, household, event, ministry, or another supported record. Explain that search is faster than opening every section.
3. Use the sidebar without fear
The sidebar is grouped by church work, not by technical terms:
- People
- Care & Discipleship
- Worship & Gatherings
- Communications
- Forms
- Stewardship
- Digital Presence
- Operations
- Intelligence
- Administration
Open one section, then close it. Hide the entire sidebar on desktop and restore it. On mobile, use the menu button and tap outside the drawer to close it.
4. Read the Dashboard
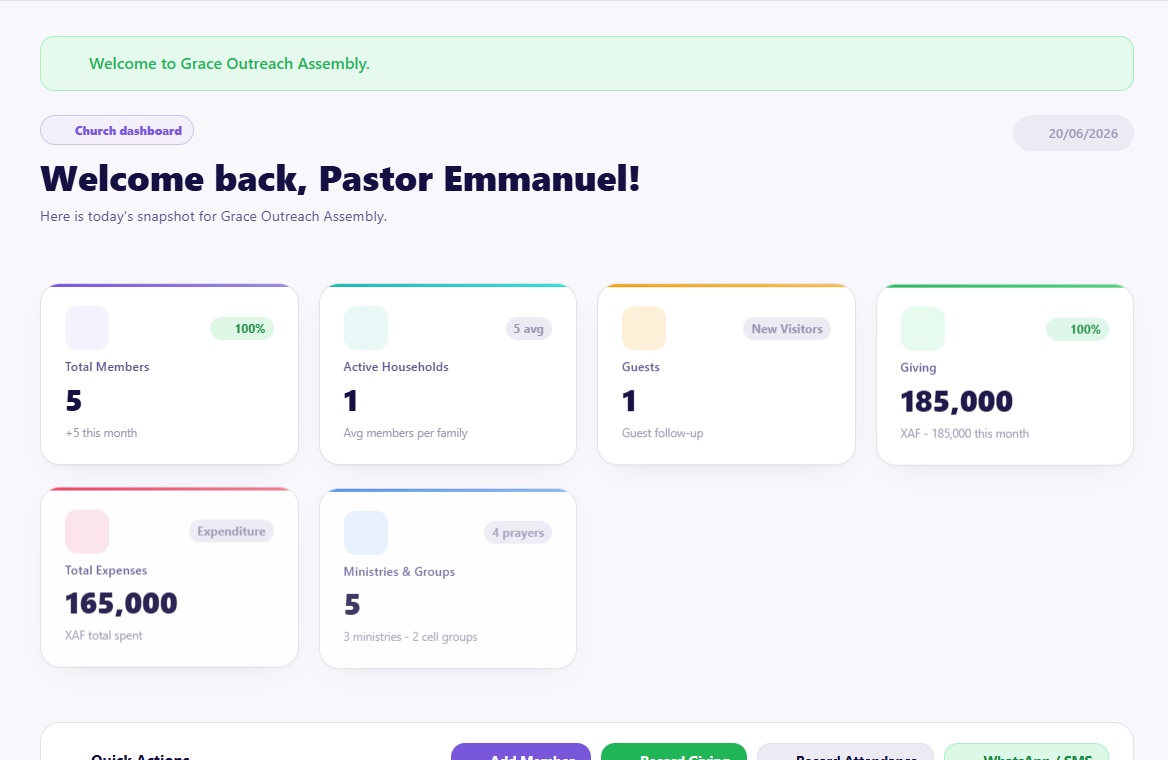
Visual checkpoint: Point to the page title, the summary cards, the quick actions row, and the main charts before asking the learner to click anything.
Point out the current summary cards, celebrations, next steps, quick actions, and charts that the learner is permitted to see. Explain that a blank card usually means there is no matching data yet; it is not automatically an error.
Use a Quick Action only when the learner has permission. Examples may include adding a member, recording giving, recording attendance, or opening communications.
5. Use notifications properly
- Open the notification bell.
- Open one notification on its own detail page.
- Return to the list.
- Mark one as read.
- Use Mark all as read when the learner has reviewed the feed.
Chat notifications belong in Chat; general church and system notifications belong in the Alerts or Notifications area.
6. Install and work on a weak connection
Demonstrate installation if the browser offers it. Explain:
- the admin install uses Church-Ops branding;
- a member portal install uses church branding;
- a low-bandwidth notice is informational and should dismiss;
- cached pages may remain available offline;
- saved offline actions must sync when connectivity returns;
- payment, live messaging, and other server-dependent actions still need a connection.
Guided practice
The learner must:
- Sign in.
- hide and restore the sidebar;
- find the Members page using the menu;
- return to Dashboard;
- search for a safe test member;
- open and mark a notification as read;
- switch appearance mode and return it to their preference.
Safety and common mistakes
- Do not share login credentials.
- Do not leave a finance or care screen open on a public computer.
- Do not use browser Back repeatedly when a page provides its own return link.
- Do not interpret missing features as data loss; check role and plan access.
- Never approve a browser prompt or file download you do not understand.
Completion check
The learner can explain the difference between the church workspace and member portal, find a module, use search, open notifications, and say who should help when access is missing.
Session 2: People Operations, Members, and Profile Shares
The promise
By the end of this session, the learner can keep one trustworthy member record, find missing information, update a profile, use bulk actions safely, and create a controlled public profile share when permitted.
What this helps the church do
People records are the foundation of Church-Ops. When names, contact details, households, roles, and membership status are accurate, attendance, care, communication, giving, tasks, groups, and reports work with less repeated entry.
Pages covered
- People Operations: the data-health and people-work hub
- Members: searchable member directory and bulk actions
- Member Profile: the person's full church record and timeline
- Profile Shares: controlled public profile pages and share links
People Operations
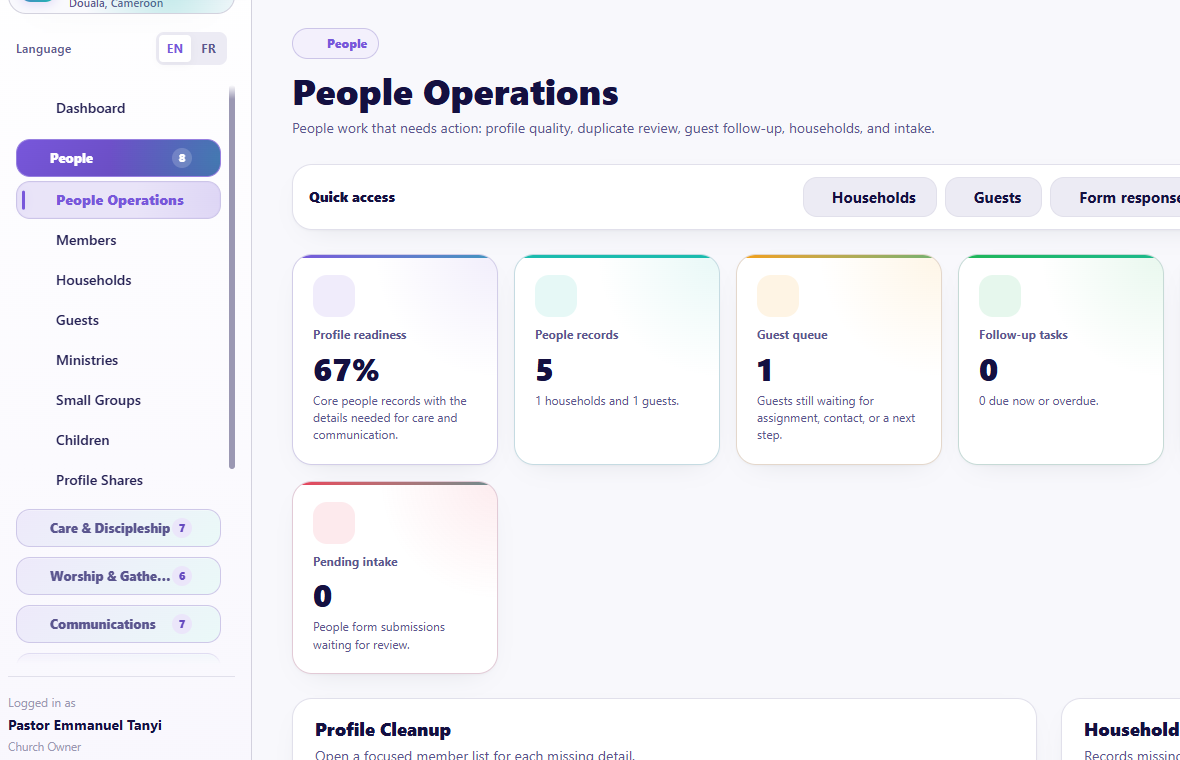
Visual checkpoint: Ask the learner to identify the missing-data cards, the member cleanup list, and the household review area.
Use this page to see where church records need attention. It can show missing contact details, household links, neighborhoods, birthdates, photos, household heads or spouses, and recent imports.
Workflow
- Open People > People Operations.
- Read the summary counts before editing anything.
- Choose one incomplete record.
- Open its profile instead of guessing missing information.
- Correct only information the church has permission to keep.
- Return and confirm the data-health issue is reduced where applicable.
Use cases
- prepare the directory before a communication campaign;
- find people who need household links;
- locate records created by an import that need review;
- identify missing contact methods before assigning follow-up;
- check households without a head or spouse designation.
Members
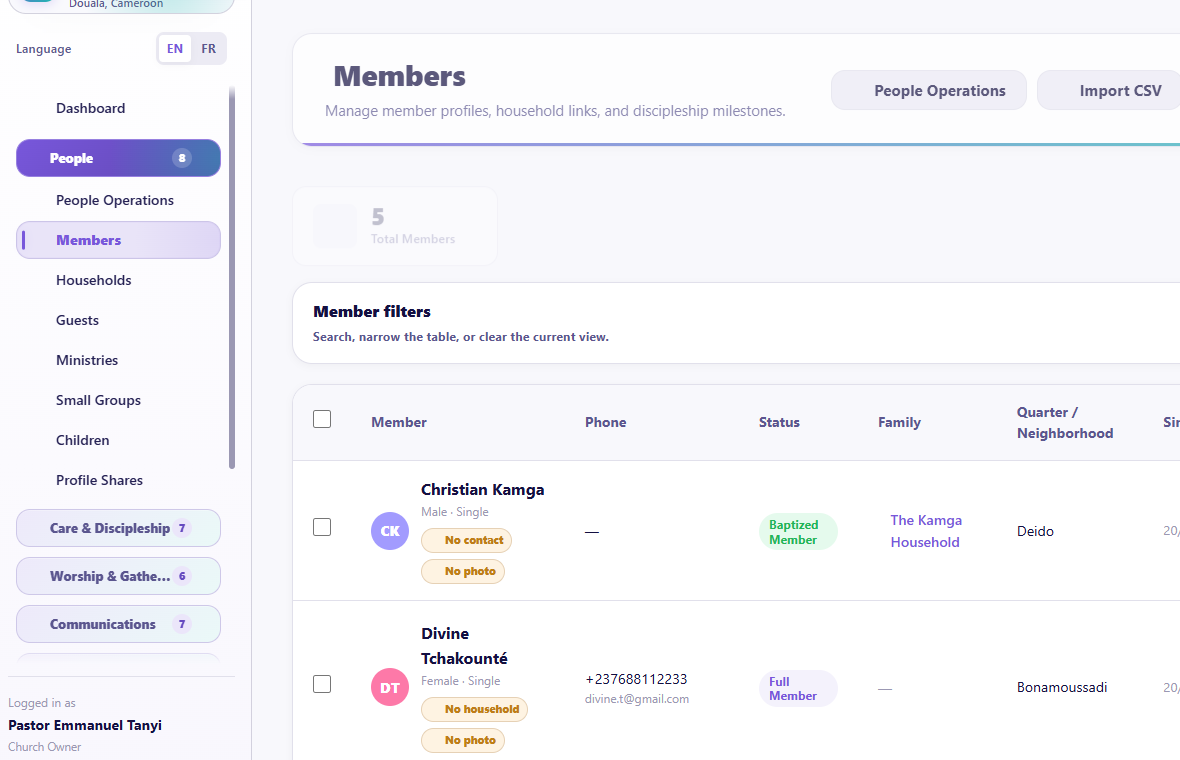
Visual checkpoint: Find the search/filter area, the member list, profile actions, and bulk-action controls.
Numbered callouts
- Click People in the sidebar.
- Open Members.
- Use search or filters before pressing Add Member.
- Open View profile for the correct person.
- Use bulk actions only after selecting the intended records.
What you should see A searchable member list with profile actions. If the learner sees People Operations, Guests, or Households instead, they are in the right section but the wrong page.
Try it yourself Search for one safe test member, open the profile, return to the list, and explain what would happen if the wrong member was selected for a bulk action.
Common mistake Adding a new member before searching by name, phone, and email creates duplicate records that later affect attendance, communication, care, and households.
Result check The same person should open from the member list, household link, care timeline, and communication history without becoming two records.
Find and filter people
- Open People > Members.
- Search by the available name or contact fields.
- Use filters to narrow the list instead of scrolling through everyone.
- Open the member's profile for full details.
Add a member
- Select Add Member.
- Enter the person's names carefully. Use the church's respectful-title policy when applicable.
- Add only known contact and demographic information.
- Connect a household if it already exists; do not create a second household just to finish quickly.
- Choose the correct membership status.
- Add a profile photo only with church permission.
- Save and open the new profile to confirm it.
Update a member profile
The member detail page may contain identity, contact, household, attendance, ministries/groups, tasks, care, communication, documents, and other authorized history.
- Confirm the member name and church before editing.
- Select Edit.
- Change only the necessary fields.
- Save.
- Check the profile page and any related household or group link.
Flag a member for care
Use the care action when a person needs intentional pastoral attention. Do not write confidential counseling details in a general profile field. The care workflow belongs in Pastoral Care, Prayer Wall, or a protected task.
Merge duplicates
Only authorized users should merge records.
- Compare both profiles carefully.
- Confirm they are the same person using safe identifiers.
- Choose the record that should remain.
- Review connected household, attendance, giving, care, and communication data.
- Complete the merge only when the result is clear.
Never merge merely because two names look similar.
Bulk actions
Bulk actions are powerful. The current system may allow selected records to be updated, connected, moved to children where appropriate, grouped, communicated with, or otherwise processed.
- Filter the list first.
- Select only the intended page of members, or intentionally choose all matching records when that option is shown.
- Read the action and affected count aloud.
- Preview or confirm the result.
- Never use a bulk action to bypass consent, permissions, or careful review.
Profile Shares
Profile Shares create a deliberate public link for approved information, such as a family-of-the-week profile.
Numbered callouts
- Open People > Profile Shares from the sidebar.
- Choose whether the share is for a member, household, or approved story.
- Review exactly what will become public before copying the link.
- Return to People Operations later to watch for missing household or profile data.
What you should see A profile share should never feel like an uncontrolled export. It should be a deliberate public page with a clear purpose, a limited set of approved details, and a way to disable access.
Try it yourself Create a draft share for a safe demo household, preview it, then disable it before copying any link into a message.
Common mistake Do not publish phone numbers, addresses, children's details, giving information, or pastoral notes in profile shares.
- Open People > Profile Shares.
- Review active, scheduled, or previous shares.
- Create or edit a share.
- Select the intended person or household.
- Include only approved public information, prayer points, or content.
- Set availability and status.
- Preview the public page before sharing its link.
- Disable or remove access when the share should no longer be public.
Guided practice
Using a test record, the learner must:
- find one data-health issue;
- open the member profile;
- update a harmless field;
- connect or verify a household;
- filter the directory;
- explain when a bulk action is unsafe;
- preview a profile share without exposing private data.
Completion check
The learner can maintain one accurate person record and explain why duplicate, household, privacy, and permission checks matter to every other module.
Session 3: Households, Guests, Ministries, and Small Groups
The promise
The learner can represent how people belong together, welcome a guest without losing follow-up, and organize ministry or small-group communities without duplicating people.
Households
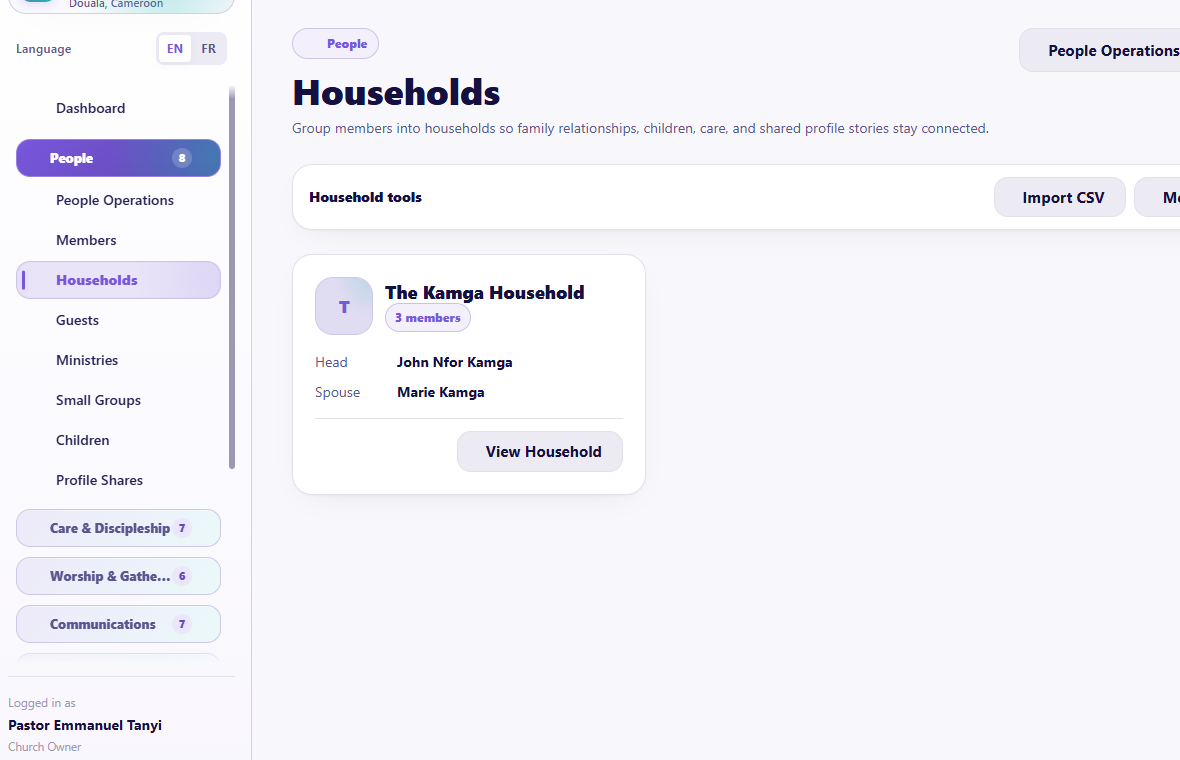
Visual checkpoint: Show household records, member/child counts, head/spouse badges, and household action buttons.
Households connect adults, members, children, external relatives, family roles, shared care, attendance, and authorized giving context.
Pages
- Household list
- Household 360 detail page
Create or update a household
- Search first to ensure the household does not already exist.
- Create the household using a clear family name.
- Add existing church members from church records.
- Add a child through the child flow when appropriate.
- Add an external person only when they do not need a full member record.
- Assign head, spouse, child, dependent, or another relationship accurately.
- Add address or neighborhood information only when known and permitted.
- Save and review the full household page.
The Household 360 page may bring together members, children, attendance, care, small group, visits, communication history, and permitted giving summaries. Finance details must remain hidden from unauthorized roles.
Good uses
- family pastoral visits;
- household attendance context;
- family celebrations and prayer;
- avoiding duplicate contact records;
- understanding guardianship and child relationships;
- connecting a member who created a portal account to an existing church record.
Guests

Visual checkpoint: Point to guest intake, assignment, follow-up status, and the guest list before recording a new guest.
Numbered callouts
- Click People.
- Open Guests.
- Press Add Guest only after checking whether the guest already exists.
- Record visit and contact details.
- Assign follow-up from the saved guest record.
What you should see The page should show guest intake actions, guest names, service attended, assigned caregiver, and follow-up state.
Try it yourself Record one safe test guest with a phone number, service attended, and follow-up need. Assign the follow-up to a safe test user.
Common mistake Assigning follow-up without a clear due time or channel makes the task easy to miss.
Result check The guest should appear in the guest list, the assignee should receive a protected assignment, and the follow-up state should be reviewable later.
Guests are visitors or people being followed up who are not yet maintained as full members.
Record a guest
- Open People > Guests.
- Select Add Guest.
- Record the information actually provided: name, contact, address, invited by, service attended, decision, follow-up status, prayer or counseling need, and configured custom fields.
- Avoid forcing unknown information.
- Save.
Assign guest follow-up
- Choose church staff/users first when the task belongs to staff.
- Choose a member only when the church intentionally assigns that member.
- Set the preferred communication channel.
- Choose an assignment template or use the approved default message.
- Set a clear due time, normally within the church's follow-up standard.
- Send the assignment.
Private contact details and the full guest brief should remain hidden in the notification until the assignee accepts the protected task. After acceptance, the assignee can view the information needed for follow-up in the portal task page.
Create connected care
Where the guest record presents these options, use the same intake to create:
- a Prayer Wall request;
- a counseling or pastoral-care case;
- a pastoral appointment;
- a follow-up task.
Do not create all four automatically when one clear action is enough. Choose the record that matches the person's need.
Ministries
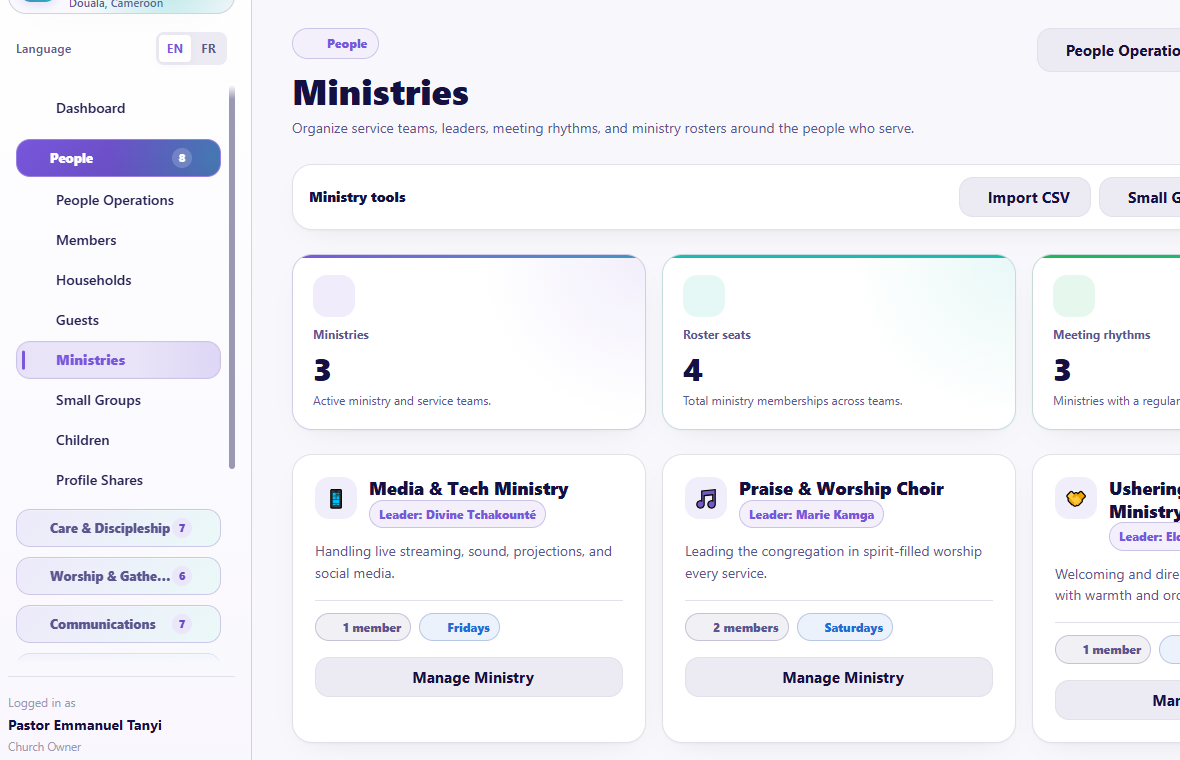
Visual checkpoint: Identify ministry records, leaders, members, and the buttons used to manage ministry structure.
Ministries represent organized areas of service, such as Music, Women, Men, Youth, Children, Media, or Prayer.
- Open People > Ministries.
- Create or open a ministry.
- Set its name, description, leadership, and status.
- Add existing members instead of creating new member profiles.
- Review the ministry detail page and roster.
- Use the ministry context for teams, communication, tasks, events, or chat where enabled.
Small Groups
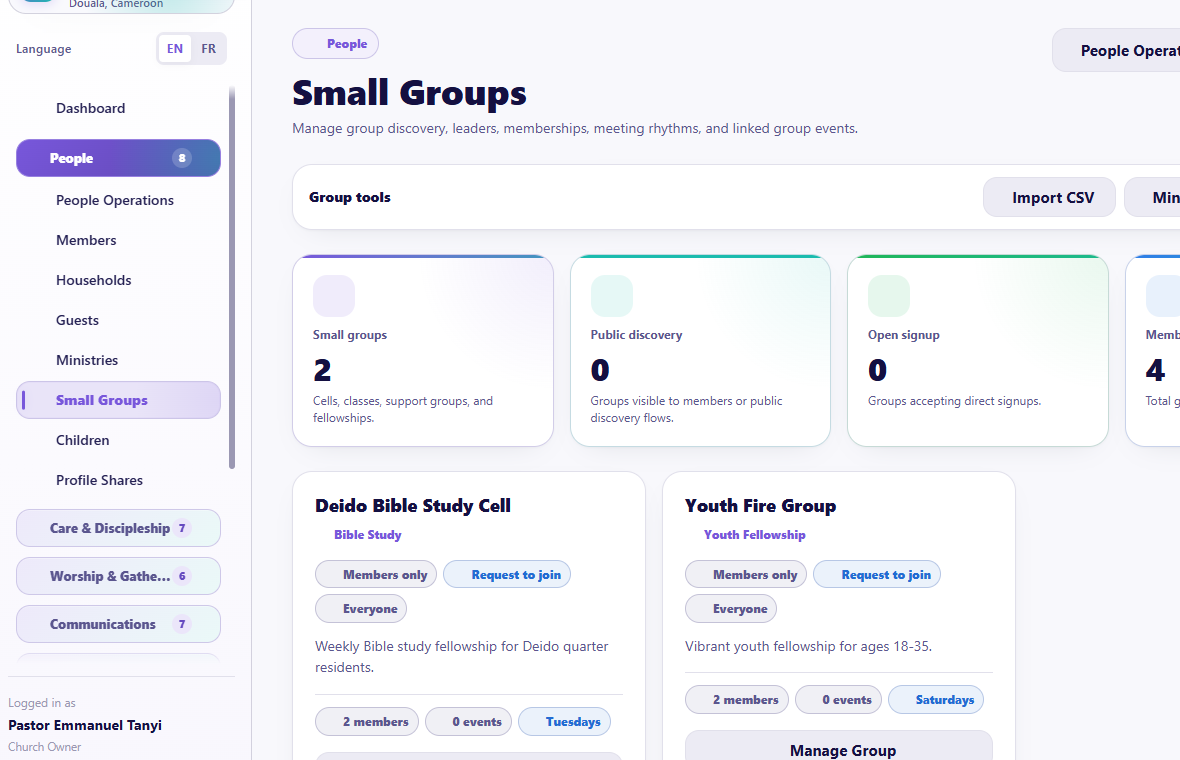
Visual checkpoint: Show how groups are listed and where leaders, membership, meeting context, and actions appear.
Small Groups organize cell groups, fellowship groups, classes, or local communities.
- Open People > Small Groups.
- Create or open a group.
- Set the name, type, leaders, meeting details, location, and status.
- Add members from the existing directory.
- Review the group roster.
- Use the group for events, care, communication, prayer sharing, or chat where supported.
Guided practice
The learner must:
- add an existing test member to an existing household;
- explain when to use Child, Church Member, or External Person;
- record a test guest and assign safe follow-up;
- add an existing person to a ministry;
- add an existing person to a small group;
- find each result without creating a duplicate person.
Completion check
The learner can explain the difference between a member, household member, guest, ministry member, and small-group member, and can move between those records without entering the same person again.
Session 4: Children Ministry and Child Safety
The promise
Authorized workers can maintain child records and check-in activity while protecting children, guardians, emergency information, and pickup safety.
Why this area is different
Children's information requires stricter access than a normal directory. Not every administrator, leader, volunteer, or member should see it.
Page covered
- People > Children
Depending on the church's plan and permissions, this area includes child profiles, guardians, classes or ministry context, check-in/check-out, attendance, emergency details, pickup notes, and authorized worker actions.
Add or update a child
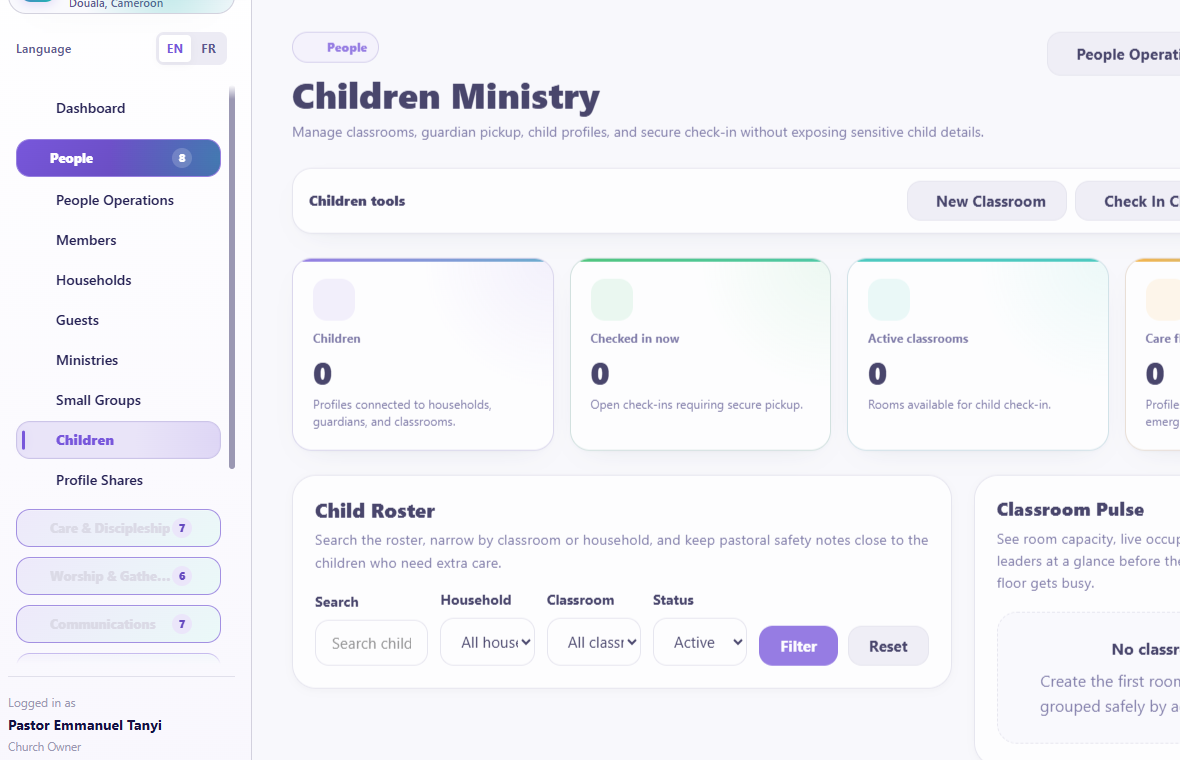
Visual checkpoint: Find the children list, guardian information, check-in context, and safety-related actions.
- Search first.
- Add the child through Children or the connected household.
- Link the correct parent or guardian.
- Add a photo only with church permission.
- Record emergency, medical, allergy, or pickup information only in protected fields.
- Assign the appropriate class or ministry context.
- Save and verify the household relationship.
Check in and check out
- Confirm the event or service.
- Find the child.
- Confirm the authorized guardian and any pickup rule.
- Record check-in.
- Keep generated codes, labels, or pickup information private.
- At pickup, verify the responsible adult before check-out.
- Record any incident through the approved protected process.
Child-safety rules
- Do not display children's names or photos publicly without explicit church control.
- Do not send medical or guardian details in ordinary notifications.
- Do not export child data for convenience.
- Do not let an unapproved volunteer use another person's account.
- Keep attendance and pickup history auditable.
- If a relationship is uncertain, stop and ask the authorized children ministry leader.
Guided practice
Use a safe test child and guardian. The learner must link the household, explain protected information, record a test check-in and check-out if available, and identify which roles should not access the page.
Completion check
The learner can complete the child workflow without exposing child or guardian information.
Session 5: Care Command, Pastoral Care, and Prayer Wall
The promise
The church can notice people, assign care, protect private details, follow through, and record an outcome without relying on one pastor's memory.
Care Command
Visual checkpoint: Point to the queue counts, filters, source labels, assignment status, and due-date information.
Numbered callouts
- Open Care & Discipleship.
- Click Care Command.
- Filter to actionable or overdue signals.
- Open the signal summary.
- Assign, defer, resolve, or connect it to the correct care record.
What you should see A queue of care signals with source, priority, status, due date, assignment, and outcome context.
Try it yourself Take one safe test signal, assign it to a test caregiver with a due date, then explain what private details should stay hidden until acceptance.
Common mistake Treating the queue as a message blast list. A care signal is a pastoral decision point, not automatic permission to send every detail.
Result check The signal should show an assignee, due date, status movement, and an audit trail of who handled it.
Care Command is the unified queue for care signals. Signals may come from guests, prayer, attendance patterns, celebrations, giving appreciation, bereavement, hospital or counseling needs, tasks, and other configured church activity.
Page areas
- care-signal queue;
- filters and status;
- assignment controls;
- due dates and channels;
- care reports link;
- activity and outcomes.
Process a care signal
- Open Care & Discipleship > Care Command.
- Filter by open, overdue, priority, type, or assignment where available.
- Read the signal summary. Do not assume the summary contains every private detail.
- Decide whether to assign, defer, resolve, or connect it to an appropriate care record.
- Choose the correct person or team and channel.
- Set a realistic due date.
- Send the assignment.
- Track acceptance, decline reason, progress, report, acknowledgment, and closure.
Privacy-sensitive care assignments should not expose the full brief in WhatsApp, email, SMS, or push previews. The assignee opens the protected portal task and accepts it before sensitive details are revealed.
Pastoral Care
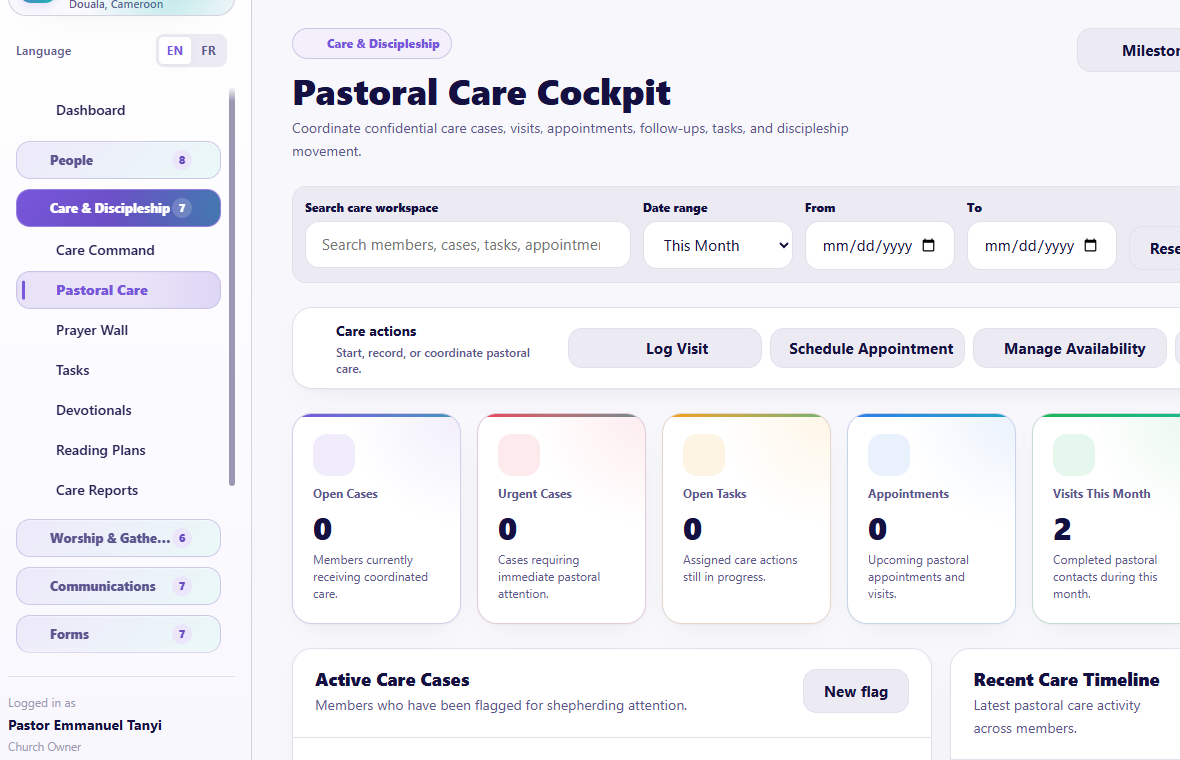
Visual checkpoint: Show the care action buttons, KPI cards, active care cases, care tasks, appointments, and timeline.
Pastoral Care brings together care cases, visits, appointments, tasks, availability, timelines, and discipleship milestones.
Pages
- Pastoral Care Cockpit
- Member care timeline
- Discipleship milestones
Create a care case
- Search for the member or relevant person.
- Create or flag a case.
- Set the care type, priority, owner, next step, and appropriate privacy.
- Keep the title useful but discreet.
- Put confidential details only in protected notes.
- Assign work through the standard task flow when action is required.
Log a visit
Record date, type, person, authorized notes, outcome, and follow-up date. A pastoral visit is not a place for gossip or unsupported conclusions.
Manage appointments and availability
- Authorized pastors or care leaders add available times.
- Members can request available appointments from the portal where enabled.
- Staff review, confirm, update, or complete appointments.
- If an appointment changes, choose whether to notify the assignee or participant.
Discipleship milestones
Use milestones to record meaningful steps such as salvation decision, baptism preparation, baptism, membership process, class completion, or ministry involvement according to church practice. Do not treat milestones as a spiritual score.
Prayer Wall
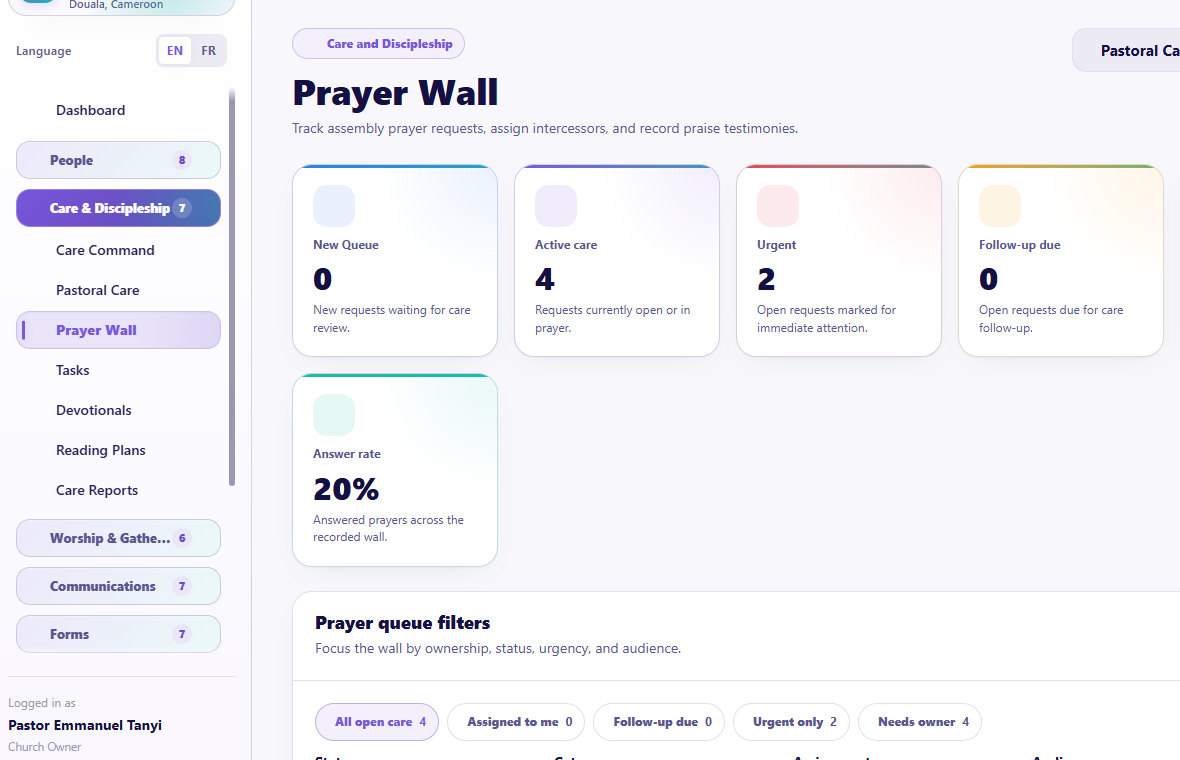
Visual checkpoint: Ask the learner to locate the prayer request text first, then the assignment and follow-up controls.
Prayer Wall manages requests, categories, audience, assignments, follow-up, testimonies, and team prayer.
Record or review a request
- Open Care & Discipleship > Prayer Wall.
- Read the request before opening action controls.
- Confirm category, status, audience, preferred response, and privacy.
- Assign an individual or configured prayer team where needed.
- Choose individual delivery or a group-chat handoff only when the request is approved for that audience.
- Set follow-up.
- Mark answered or record a testimony when appropriate.
Prayer categories
Authorized administrators can maintain the categories used by the church. Keep categories pastoral and understandable. Avoid categories that publicly reveal sensitive medical, counseling, abuse, or family details.
Team prayer
When assigned to a prayer team:
- members should receive only the information approved for prayer;
- a team leader may receive additional follow-up details when authorized;
- sending to a group chat must respect the request's audience and privacy;
- individual delivery should follow each approved channel;
- multiple guest requests may be summarized only when doing so does not expose private identities or details.
Guided practice
The learner must:
- identify an open test signal;
- assign it with a due date and safe channel;
- open a member timeline;
- log a harmless test visit or describe the fields;
- classify a test prayer request;
- explain what must not appear in a notification preview.
Completion check
The learner can move from a need to an accountable, privacy-aware care outcome.
Session 6: Tasks, Devotionals, Reading Plans, and Care Reports
The promise
The church can turn good intentions into clear assignments, support daily discipleship, and review whether care is being completed.
Tasks Manager
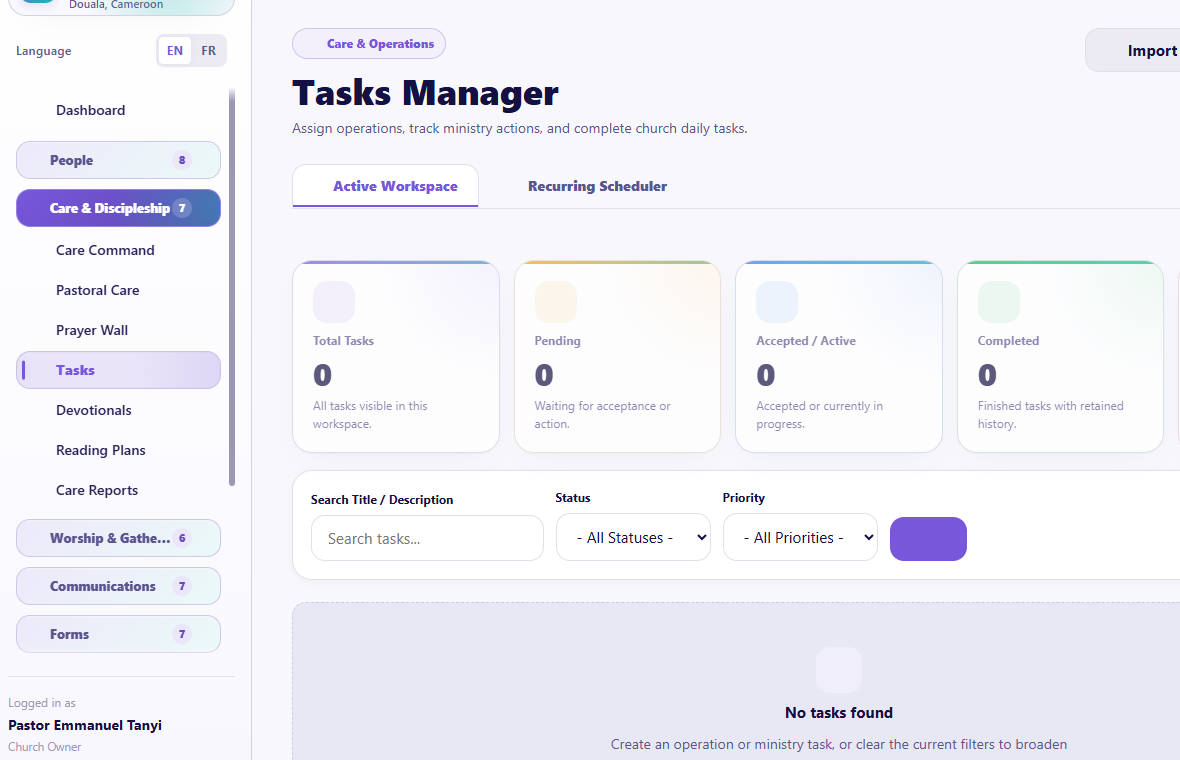
Visual checkpoint: Find task status, priority, assignee, due date, and the action path to a task detail page.
Numbered callouts
- Open Care & Discipleship.
- Click Tasks.
- Press New Task for a new assignment.
- Set assignee, due date, priority, and privacy.
- Open the task detail page to manage acceptance, progress, report, return, and closure.
What you should see Tasks should appear as actionable records, not only notification text. Each task needs a status and a detail page.
Try it yourself Create one safe test task, assign it to a test user, then open the task detail page and describe the next expected assignee action.
Common mistake Closing a task before reading or acknowledging the completion report hides accountability.
Result check The task should move through pending, accepted or declined, in progress, completed/report submitted, acknowledged, and closed or returned.
Tasks can support administration, care, guests, worship, facilities, children, forms, and other modules.
Pages
- Tasks Manager
- Task Details
- Recurring task schedules
Create a task
- Select New Task.
- Write a short action title.
- Add a clear description, not a vague instruction.
- Choose the assignee, priority, due date, and channel.
- Connect the member, family, or related record when appropriate.
- Mark privacy correctly.
- Save and check delivery status or any warning.
Standard task life cycle
- Pending: sent to the assignee.
- Accepted: the assignee agrees to handle it.
- Declined: the assignee gives a reason so it can be reassigned.
- In progress: work has started.
- Completed/report submitted: the assignee submits an outcome.
- Acknowledged: an administrator confirms receipt of the report.
- Closed: the administrator officially finishes the task.
- Returned: the report or work needs further action, with a reason.
The task detail page is the correct place for status, report, return, and closure actions. Do not manage serious work only from a notification preview.
Recurring tasks
Use recurring schedules for work such as weekly facility checks, monthly reporting, regular guest follow-up review, or recurring ministry preparation.
- Set the title, assignee, recurrence, channel, and due timing.
- Activate the schedule.
- Use a test trigger only with a clearly labeled test task.
- Pause or delete the schedule when the recurring work ends.
Devotionals
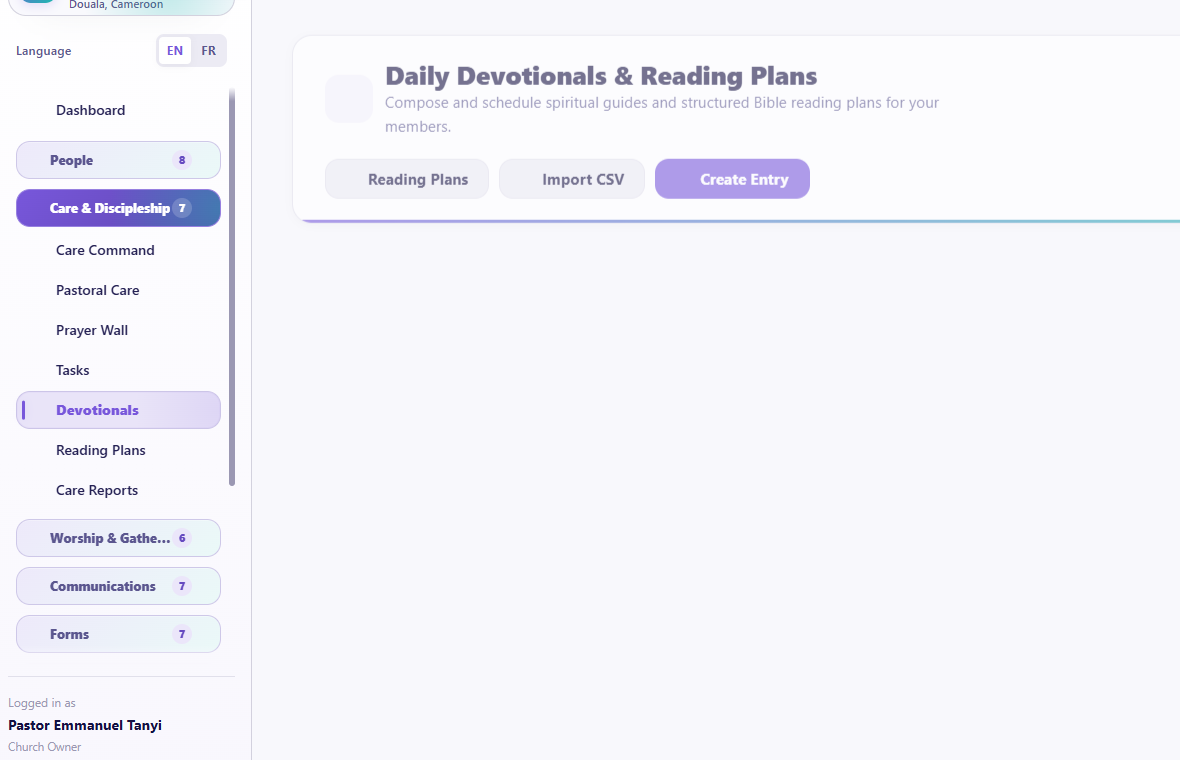
Visual checkpoint: Show published devotional cards, reading-plan links, reactions, reflections, and admin actions.
Devotionals provide church-approved spiritual content in the member portal.
- Open Care & Discipleship > Devotionals.
- Create or edit a devotional.
- Set the title, Scripture, body, date, image, action step, reflection prompts, and publication state as available.
- Attach the preferred active reading plan entry when applicable.
- Preview before publishing.
- Publish only reviewed content.
Members may read, react, reflect, and comment according to portal settings. Replies can notify participants. Admins can control devotional-comment notifications.
Reading Plans
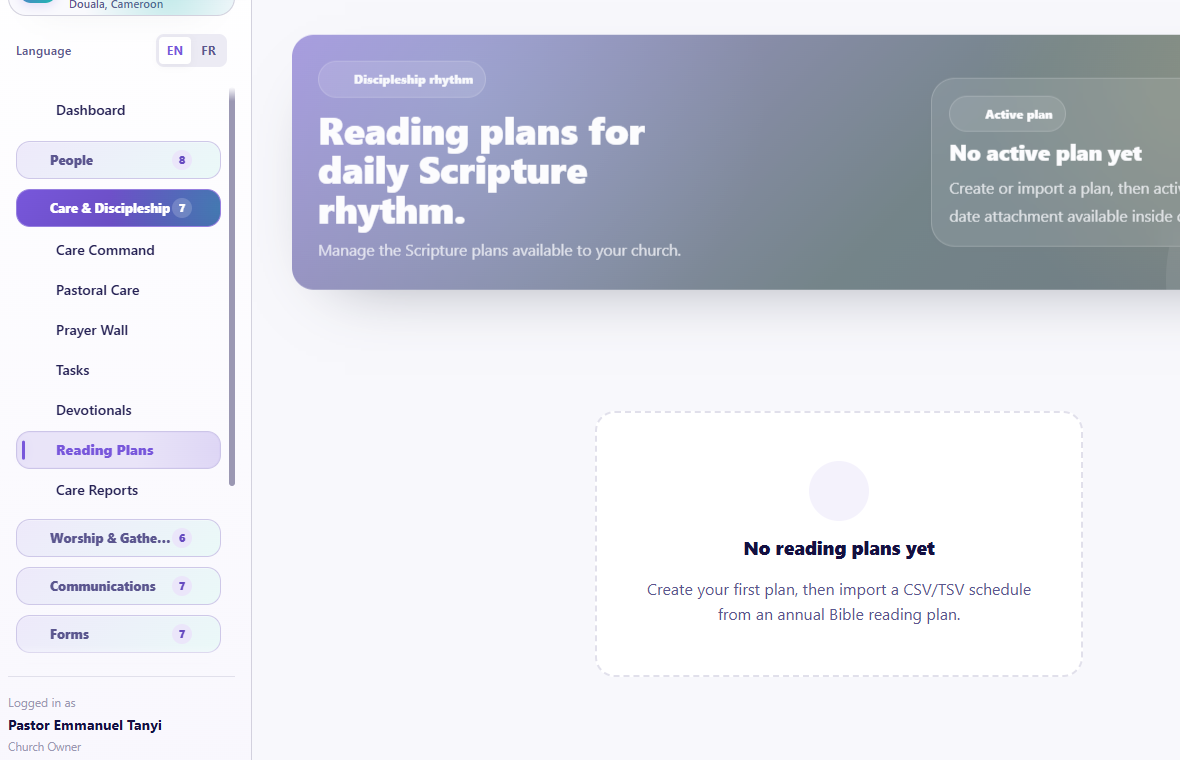
Visual checkpoint: Identify active plans, preferred plan controls, publish state, and reading resources.
Reading Plans can be church-created or platform-provided plans made available to the church.
- Open Care & Discipleship > Reading Plans.
- Review available plans and status.
- Choose the preferred active plan.
- Open plan details to review daily readings and resources.
- Publish or unpublish according to church control.
- Create or import a church plan only with valid Scripture and resource links.
Daily entries may include a main reading, Psalm, and linked resources. Links should open the exact passage when possible; for large reading ranges, the first chapter may be used as the opening destination.
Care Reports
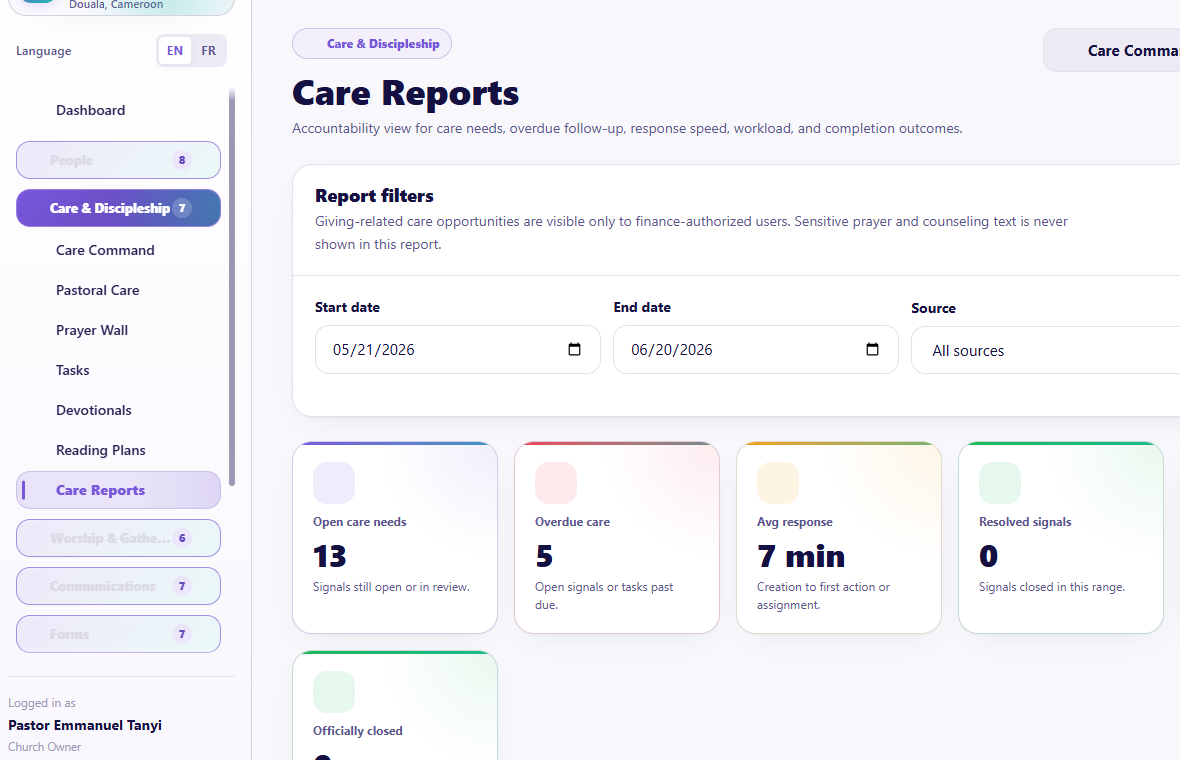
Visual checkpoint: Find open needs, overdue care, response-time measures, team workload, and resolved outcomes.
Care Reports summarize work such as open needs, overdue care, response time, resolved signals, team workload, assignment outcomes, and follow-up completion.
Use reports to ask:
- Are needs being noticed?
- Are assignments accepted?
- Which work is overdue?
- Is one team member overloaded?
- Are outcomes being recorded?
- Are tasks closed after review?
Reports support accountability; they are not a ranking of pastoral worth.
Guided practice
Create a safe test task, walk through acceptance and completion without using private data, review one devotional preview, open one reading-plan day, and identify one care-report question.
Completion check
The learner can explain the full assignment life cycle and can publish discipleship content only after review.
Session 7: Events, Smart Event Import, and Attendance
The promise
The church can plan one-day, multi-day, and recurring gatherings, bring in calendar information, remind the right people, and record attendance even when the connection is weak.
Events
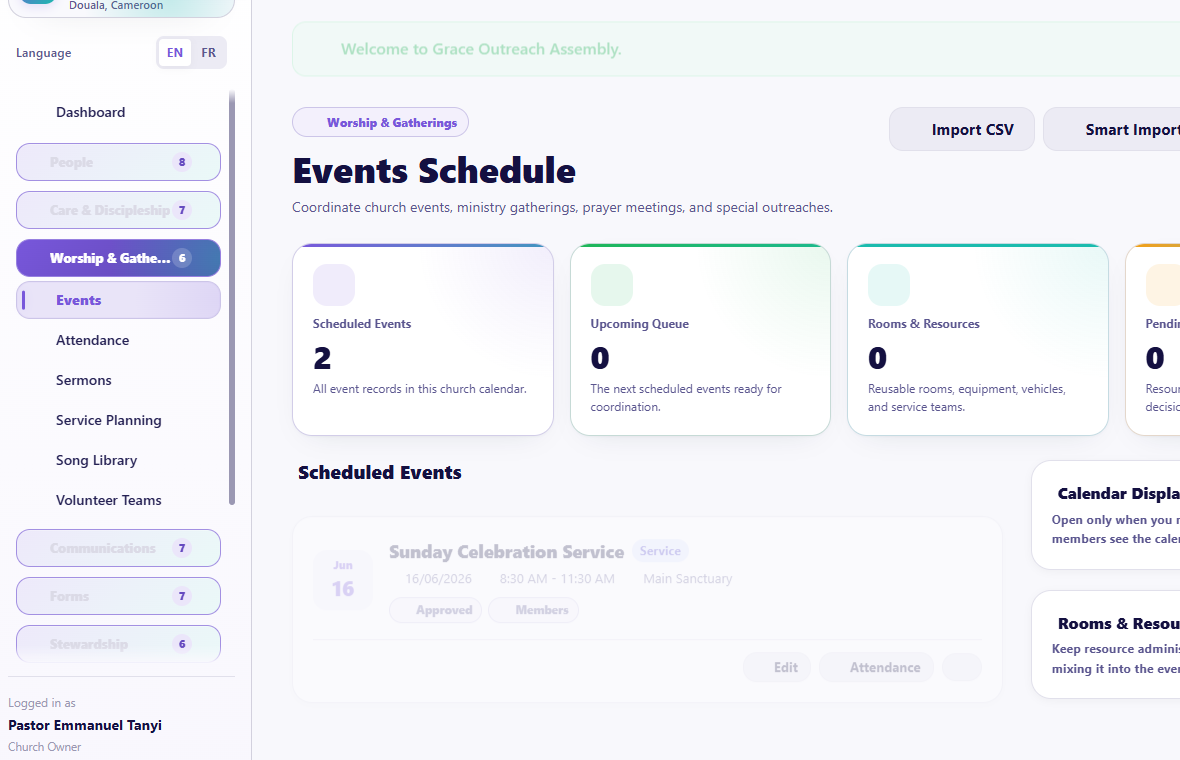
Visual checkpoint: Find upcoming/past controls, featured events, event actions, reminder settings, and import options.
Numbered callouts
- Open Worship & Gatherings.
- Click Events.
- Confirm the page is showing Upcoming before creating or reviewing current events.
- Use Create Event or Smart Event Import.
- Open the event detail page after saving.
What you should see Upcoming events should be separated from past events. Featured events, actions, reminders, and import tools should be visible without covering each other.
Try it yourself Create a short safe test event with a start and end time, then switch to the event detail page and find the reminder controls.
Common mistake Leaving an event without an end time can make it appear current after it has already finished.
Result check The event should appear in upcoming lists before it happens, move out of “next event†after its end time, and be available for attendance when appropriate.
Pages
- Events list with upcoming and past views
- Event detail
- Smart Event Import
- Import review, duplicates, history, and templates
Create an event
- Open Worship & Gatherings > Events.
- Select Create Event.
- Enter title, dates, start/end times, location, and description.
- Choose one-day, multi-day, or recurrence details.
- Connect a group, owner, manager, visibility, RSVP policy, capacity, rooms/resources, setup notes, and approval where relevant.
- Decide whether the event is featured.
- Configure reminders with target, interval, unit, date/time, and channel where available.
- Save and open the event detail page.
An event that ended earlier today should move out of the member portal's Next Event position once its end time has passed.
Event detail
Use the detail page for event information, registration/RSVP context, attendance handoff, reminders, resources, approvals, public/share links, and authorized actions.
Upcoming and past events
The page defaults to upcoming events. Use the past-event switch when reviewing history. Featured events can scroll horizontally when more than one is shown.
Smart Event Import
Use Smart Event Import to convert pasted schedules or uploaded event files into reviewed event drafts.
Numbered callouts
- Start from Worship & Gatherings > Events.
- Open Smart Event Import only when you have a schedule source to process.
- Use confidence warnings to decide which events need manual correction.
- Use bulk select carefully: current page first, all detected events only after review.
What you should see Smart Event Import should feel like a review desk, not an automatic dump. Detected events should be checked for dates, times, duplicates, and missing information before approval.
Try it yourself Paste a short sample schedule, approve one safe event, reject one duplicate, and leave one low-confidence item for manual correction.
Common mistake Do not bulk approve all detected events when the source has mixed formatting or uncertain dates.
- Upload or paste the source.
- Review detected events.
- Filter all, duplicates, low-confidence items, or missing-time items.
- Correct uncertain dates and times.
- Select only the current page, or deliberately select all detected events.
- Bulk approve or reject.
- Publish approved events.
- Review duplicate handling and import history.
Never publish all detected events without reviewing low-confidence and duplicate warnings.
Attendance
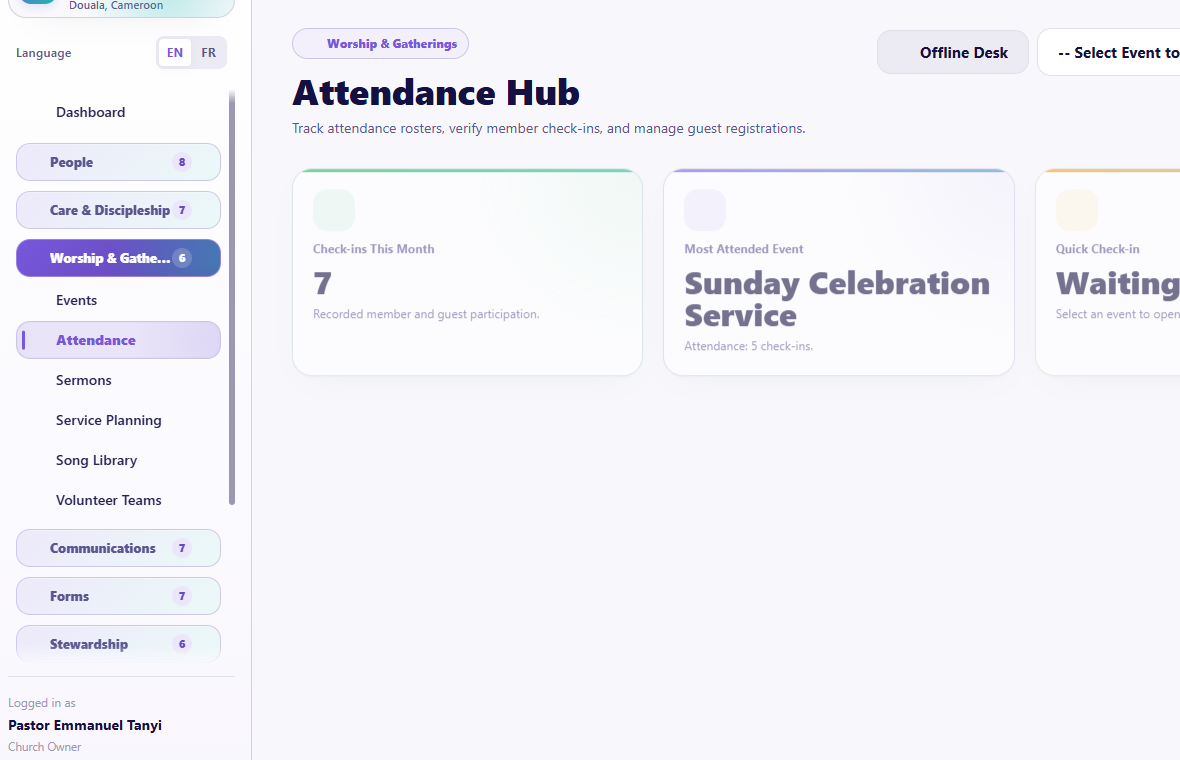
Visual checkpoint: Show event selection, check-in mode, roster, attendance counts, and offline desk status.
Pages
- Attendance Hub
- event-linked attendance view
- Offline Desk handoff
- attendance reports
Record attendance
- Select the event or service.
- Search for a member using the genuine search control.
- Check in the member.
- Use guest attendance for visitors who are not yet members.
- Review recent check-ins.
- Undo only a mistaken check-in.
Attendance should be attached to the right event. Do not create duplicate members just to record presence.
Weak connection
Use Offline Desk when the connection is unreliable. Refresh the offline dataset before the service when online, record supported actions offline, then sync and review when connectivity returns.
Guided practice
Create a test event, add a reminder, open its detail page, import two sample event lines and reject one duplicate, then check in one test member and one guest.
Completion check
The learner can explain the difference between creating an event, importing an event, registering a person, and recording attendance.
Session 8: Sermons, Service Planning, Song Library, and Volunteer Teams
The promise
Worship teams can prepare the service flow, coordinate the right volunteers, share only relevant song resources, and publish clear assignments without putting song details into the public run sheet.
Sermons
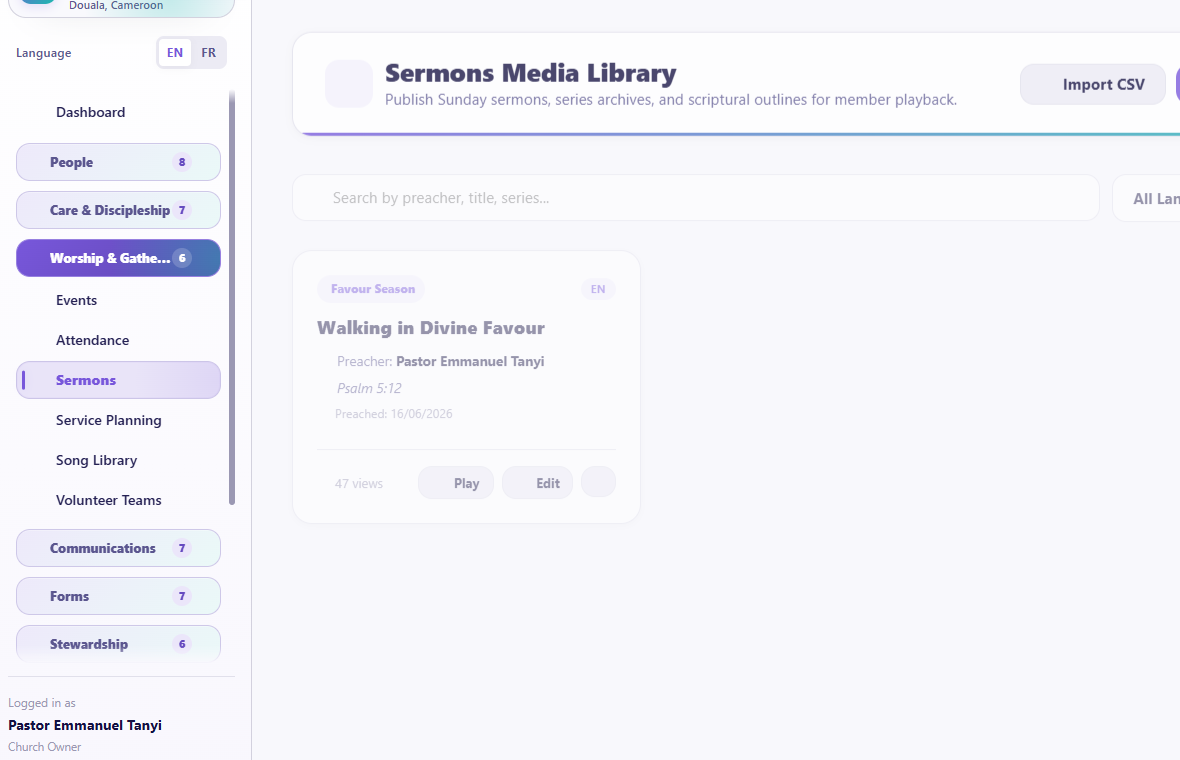
Visual checkpoint: Find sermon media, title, speaker/date details, publish state, and member-portal visibility.
- Open Worship & Gatherings > Sermons.
- Add or edit a sermon with title, speaker, Scripture, date, description, media, audio, video, or supported links.
- Add artwork or thumbnail where appropriate.
- Preview the member-facing presentation.
- Publish when ready.
Use direct media carefully on slow connections. External video URLs may be better than large uploads. Audio and video behavior still depends on the browser and media source.
Service Planning
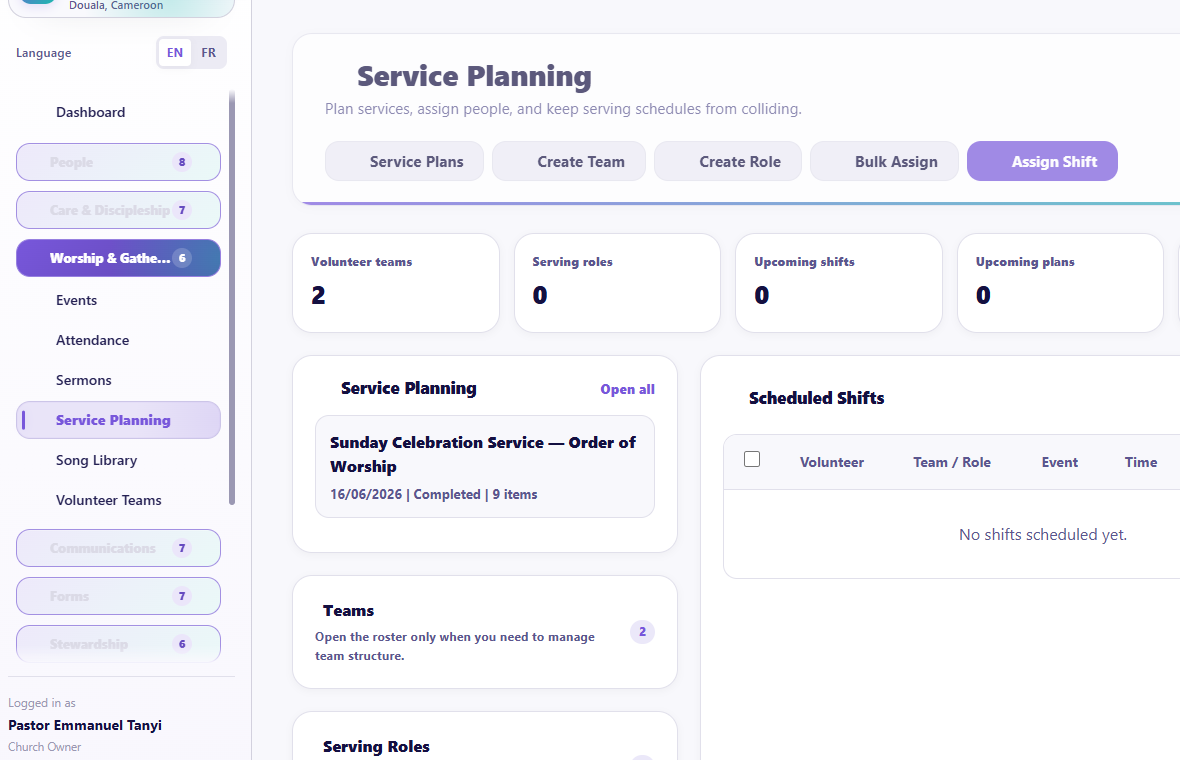
Visual checkpoint: Identify service plan items, roles, assignments, publish controls, song folders, and run-sheet actions.
Numbered callouts
- Open Worship & Gatherings.
- Click Service Planning.
- Open or create a service plan.
- Add service moments in order.
- Publish assignments only after reviewing roles, call times, and song folders.
What you should see The service flow should show the moment name and timing. Song folders should be connected to the relevant role assignment, not exposed as clutter on the run sheet.
Try it yourself Add one safe song-related service item, attach two songs to its song folder, assign one test volunteer, and send a test assignment to yourself.
Common mistake Putting the full song list into the run sheet makes the run sheet noisy and sends songs to people who do not need them.
Result check The run sheet should show the service moment, while the assigned volunteer receives only the song folder relevant to their role.
Pages
- Service Planning overview
- Service plans
- Plan detail
- Run Sheet
- volunteer assignment and response pages
Build a service plan
- Create a plan for the correct date and service.
- Add plan items in service order.
- Give each item a clear name, duration, type, lead, cue, and notes as needed.
- Add multiple songs to a song-related item through its specialized song folder.
- Reorder items until the flow is correct.
- Confirm the calculated start times. Mobile run sheets should show actual times rather than only cumulative minutes.
- Preview or share the run sheet.
The run sheet shows the service item name. Song lists and attachments belong in the song folder sent only to relevant assigned volunteers or people the administrator explicitly chooses.
Publish assignments
- Choose the team and role.
- Select only members of the chosen team.
- Add the assignee, call time, service moment, service role, and team.
- Choose channels.
- Review the assignment message.
- Send a test assignment to yourself when needed.
- Publish.
The message should present Service Moment, Service Role, and Team separately. Relevant song folders are included only for the people who need them.
Volunteer response
The volunteer can:
- accept;
- decline with a reason;
- open the assignment page;
- view relevant song folders and attachments;
- follow updated service information.
Admins review declines and reassign. Scheduled shifts can be bulk cancelled when a service changes.
Share for offline viewing
Use the run-sheet share action to create an offline-friendly mobile view. Test the link before sending it to the team.
Song Library
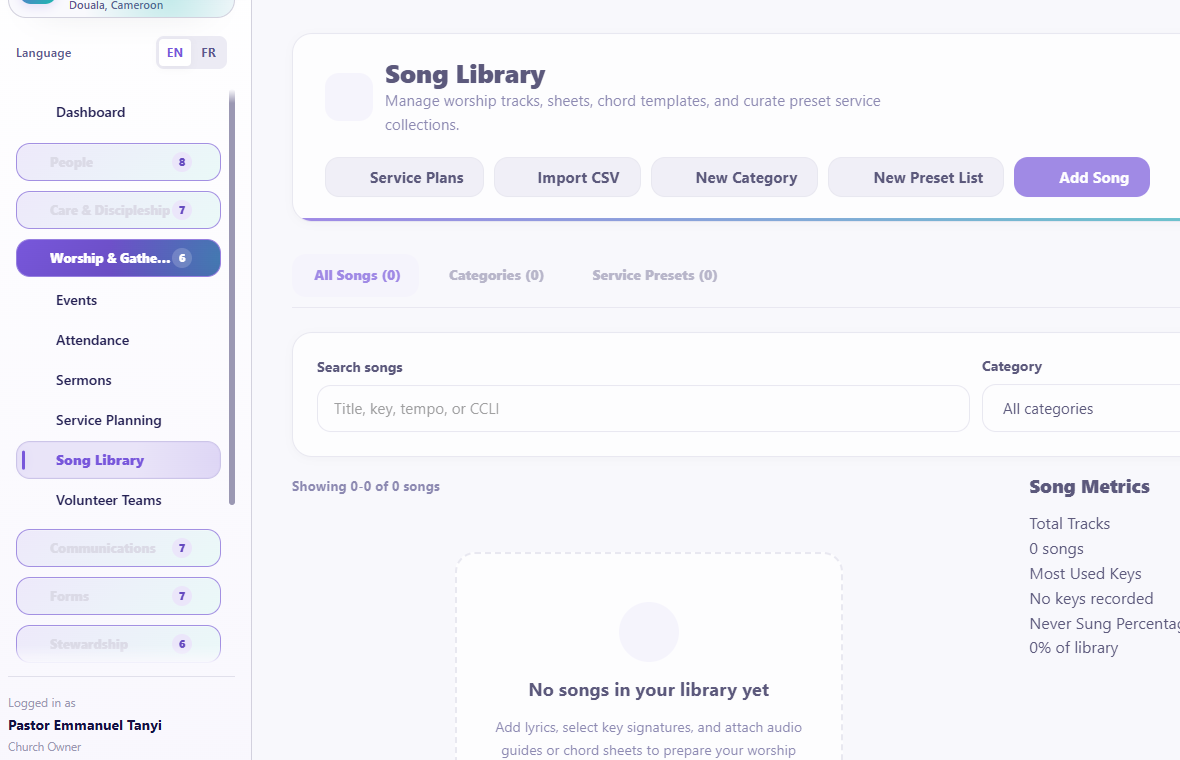
Visual checkpoint: Find search, song records, attachments/links, and the path for adding or editing a song.
The Song Library contains songs, categories, presets, source links, and attachments.
- Search before adding a song.
- Add title, key details, lyrics or notes, categories, and authorized source links.
- Add supported attachments, including approved audio/video files or URLs.
- Create categories and presets to reduce repeated setup.
- Use pagination instead of loading the whole library.
Respect copyright. A link to an authorized source is safer than uploading material the church cannot legally distribute.
Volunteer Teams
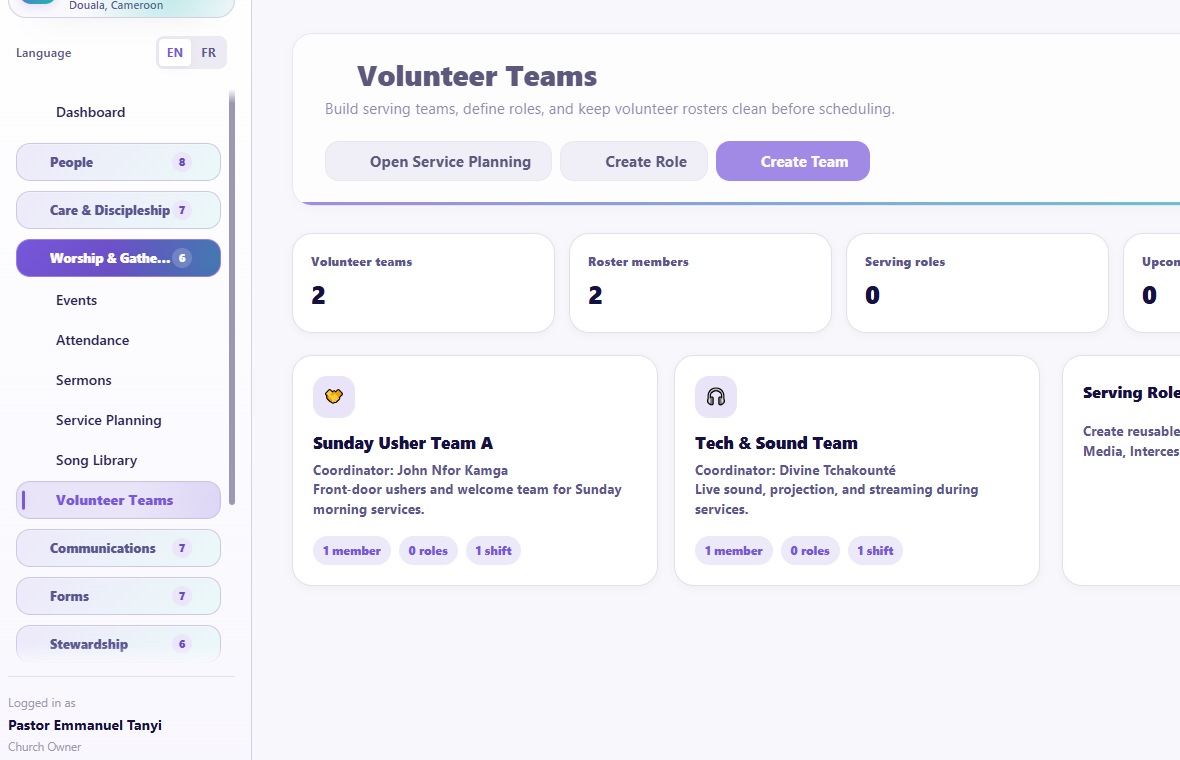
Visual checkpoint: Show team membership, leader/member separation, and where volunteers are assigned to service roles.
- Open Worship & Gatherings > Volunteer Teams.
- Create a team.
- Create serving roles.
- Add existing members to the team.
- Open the team hub to review roster and roles.
- Assign shifts from the team context.
Guided practice
Create a short test plan with three items, add two songs to one song folder, assign a test volunteer, preview the message, accept or decline the test assignment, and open the mobile run sheet.
Completion check
The learner can publish a clear service flow without exposing irrelevant song resources or assigning someone outside the selected team by mistake.
Session 9: Smart Composer, Conversations, Message Assets, and History
The promise
The church can send respectful, correctly personalized messages, receive replies, reuse approved language, and see what happened after sending.
Before sending anything
Confirm:
- the church sender identity;
- WhatsApp or other channel configuration;
- recipient consent and communication preference;
- default header image;
- appropriate signature;
- correct smart-data tokens;
- message preview;
- audience count.
Smart Composer
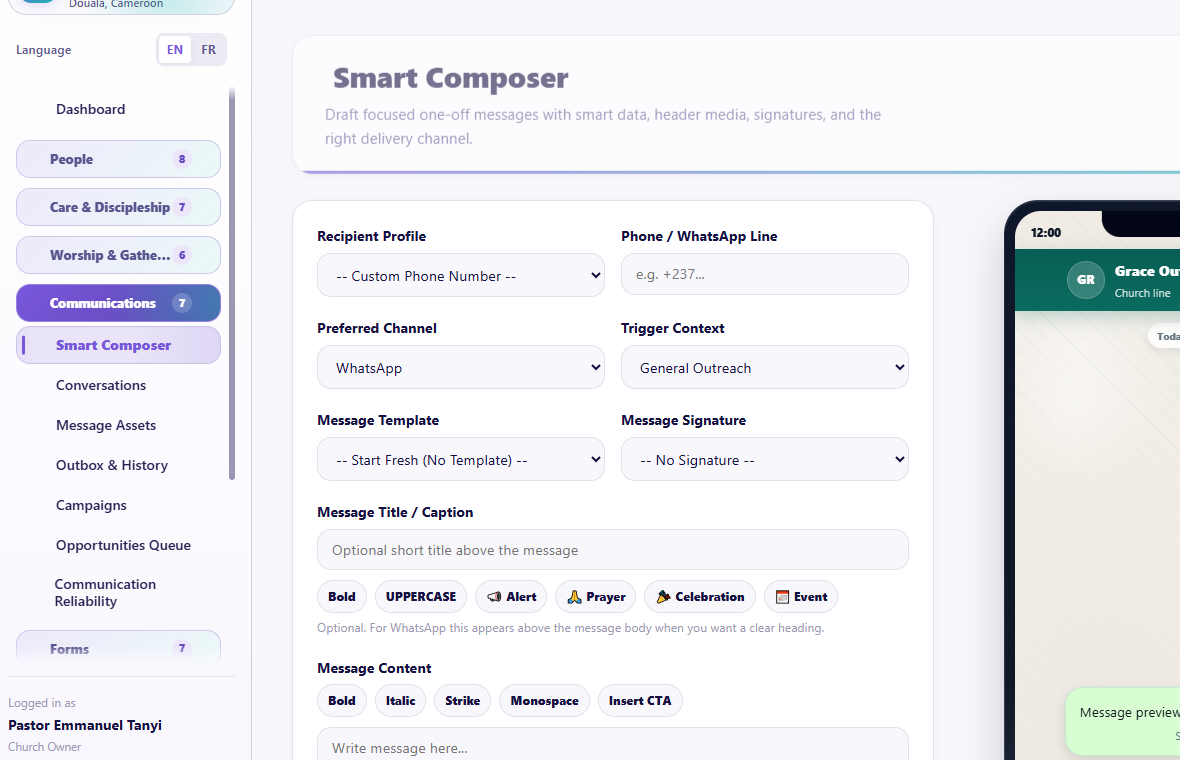
Visual checkpoint: Find audience, channel, message body, smart data helper, signature, preview, and send/schedule controls.
Numbered callouts
- Open Communications.
- Click Smart Composer.
- Choose audience and preferred channel.
- Insert smart data from the helper instead of typing unknown token formats.
- Preview before sending or scheduling.
What you should see The preview should include the intended header image indication, body, CTA where used, and closing signature as the last part of the message.
Try it yourself Send one approved test message to yourself using a supported name token and a closing signature.
Common mistake Mixing old smart-data formats with the current picker can produce raw tokens in messages.
Result check The message should appear in Outbox & History with channel, recipient, status, and failure reason if any.
- Open Communications > Smart Composer.
- Choose one person or selected members/audience.
- Choose the preferred channel.
- Optionally choose a reusable template.
- Write the message body.
- Insert smart data from the supported token picker rather than typing an uncertain token.
- Add a CTA link/button presentation where supported by the channel.
- Choose the closing signature.
- Confirm the church header image indication.
- Review the phone preview.
- Send now or schedule.
WhatsApp formatting may use supported bold, italic, and related syntax. A portal message is rendered for the portal and should not simply display raw WhatsApp markup.
Messages should remain one message unless the provider has a genuine size or media constraint. Do not artificially shorten ordinary WhatsApp messages into several sends.
Conversations
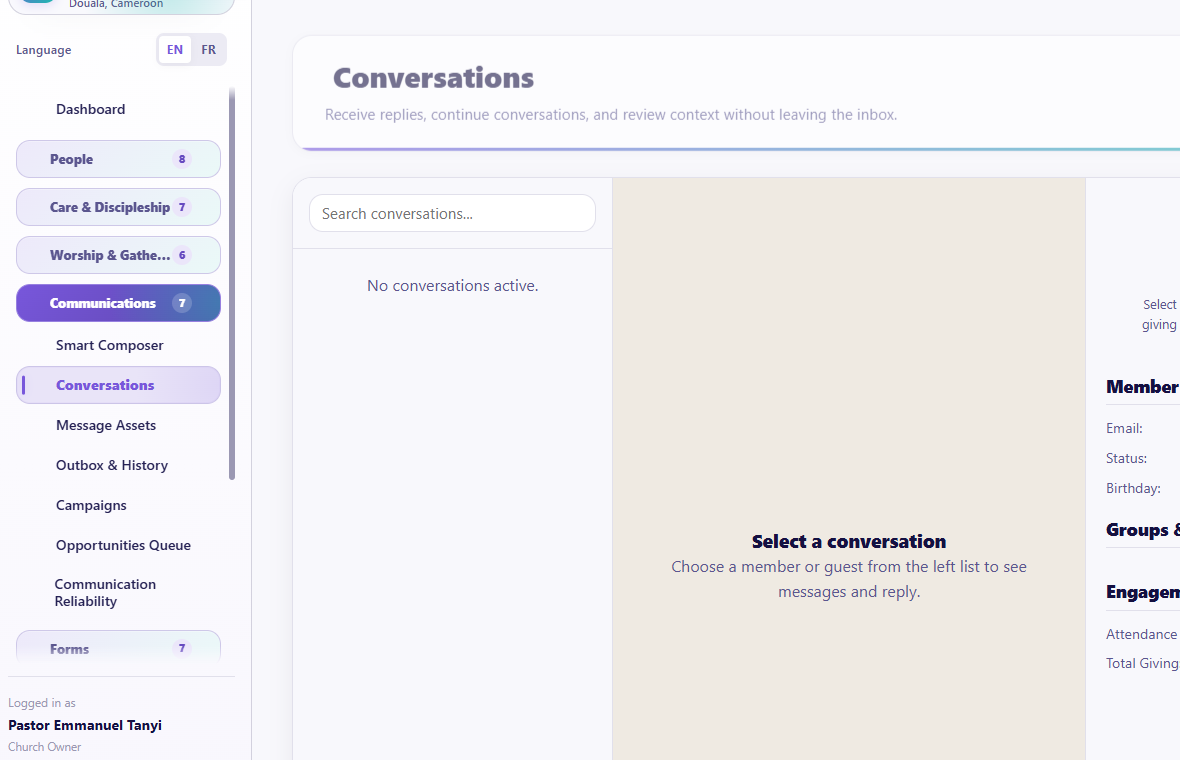
Visual checkpoint: Point to the conversation list, message panel, reply area, status indicators, and refresh/scroll behavior.
The Inbox/Conversations area displays actual communication conversations and received replies where the provider and webhook support them.
- Open a conversation.
- Read the chronological message history.
- Scroll within the message area.
- Reply from the conversation.
- Confirm the reply appears in history.
- If inbound replies are missing, use Communication Reliability rather than repeatedly sending tests.
Message Assets
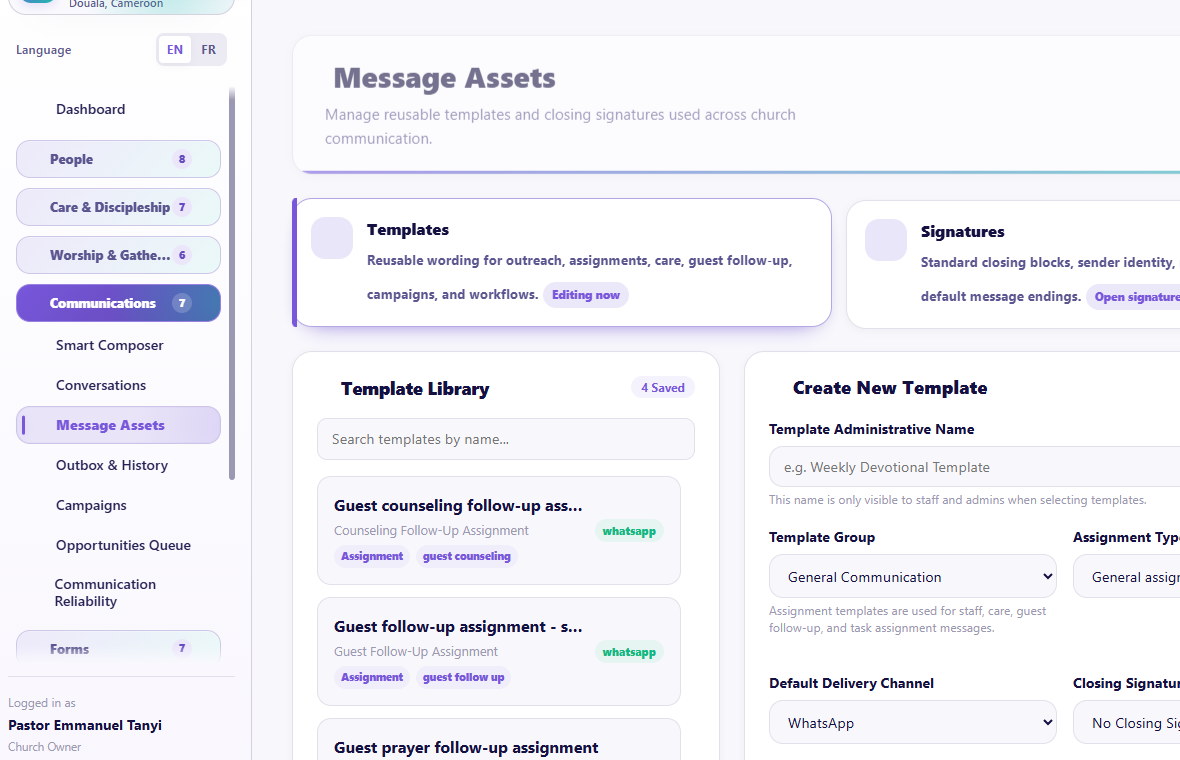
Visual checkpoint: Show the separate areas for reusable templates, signatures, and other reusable communication assets.
Message Assets contains separate working areas for reusable templates and signatures.
Templates
- Search the Template Library.
- Choose a template category, including Assignment templates where relevant.
- Create, edit, preview, duplicate, or archive according to available actions.
- Use the same supported smart-data format shown by the current token picker.
- Add an optional CTA.
- Save and test with a safe recipient.
Signatures
- Create signatures for roles or message types.
- Assign defaults carefully.
- Preview the final message.
- Remember that the signature remains the last part of the message.
Outbox & History
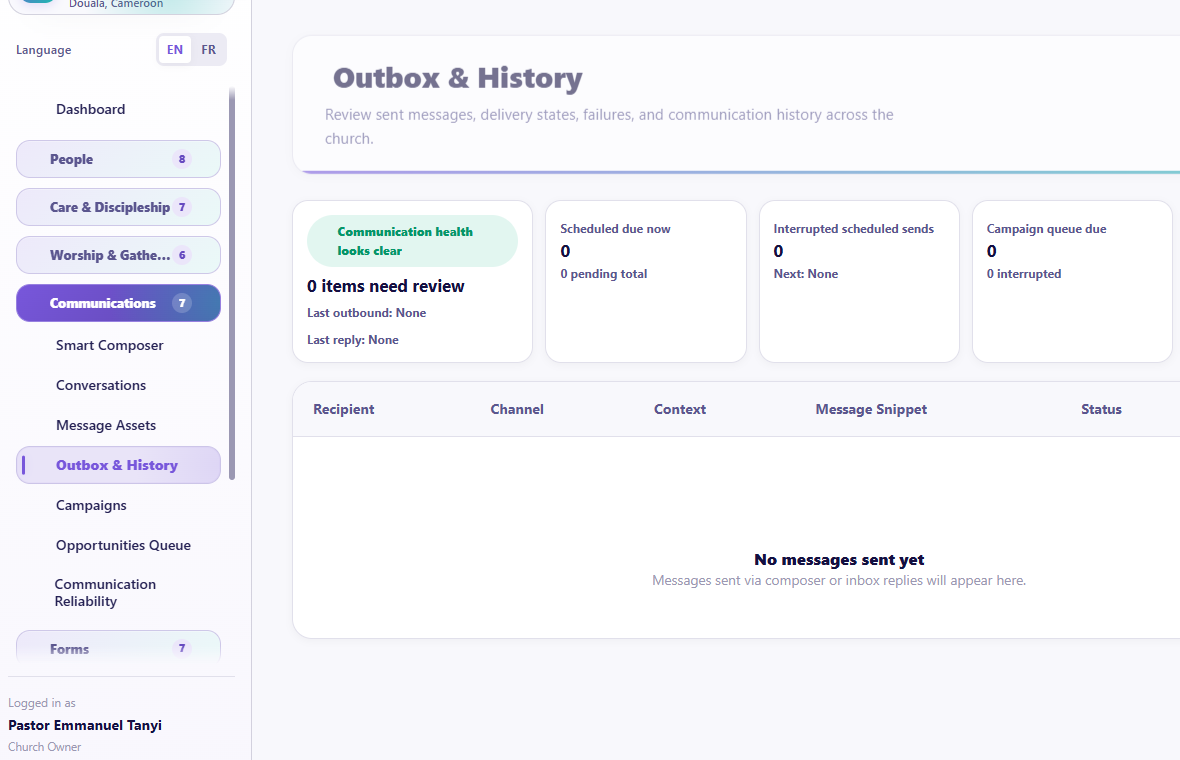
Visual checkpoint: Find delivery status, failure reason, channel, recipient, and history filters.
Use this page to review:
- recipient;
- channel;
- sent time;
- campaign or source;
- Sent, Delivered, Read, or Failed status;
- failure reason where returned by the provider.
A status cannot advance beyond what the provider reports. Use a failure reason to correct the problem rather than resending blindly.
Guided practice
Create a test template, insert a supported name token from the picker, apply a signature, preview the header image, send to one approved test number, open Outbox & History, and find its status.
Completion check
The learner can send one complete, readable message and identify whether it was sent, delivered, read, or failed.
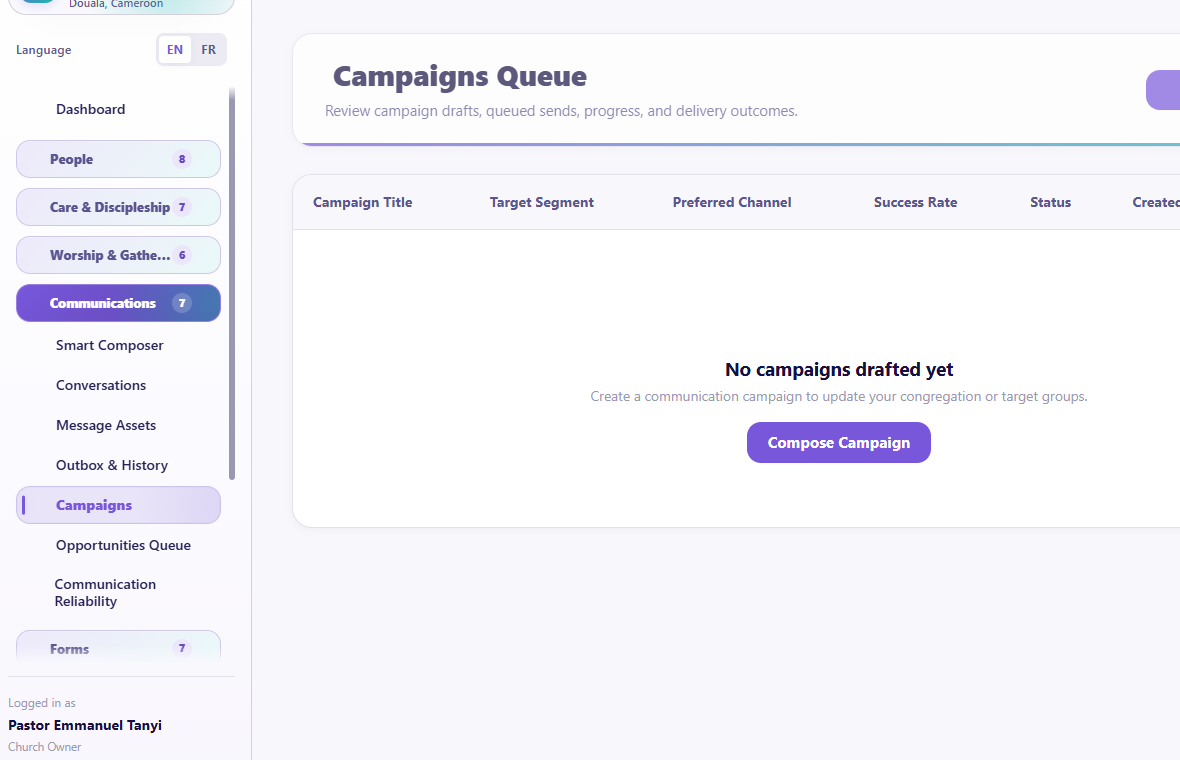
Session 10: Campaigns, Opportunities Queue, and Communication Reliability
The promise
The church can communicate with groups at a safe pace, act on timely ministry opportunities, and diagnose communication problems without creating duplicate sends.
Campaigns
Visual checkpoint: Locate campaign composer, campaign queue, subject styling, audience, channel, signature, and pacing controls.
Numbered callouts
- Open Communications.
- Click Campaigns.
- Set subject/title styling.
- Choose reusable campaign or campaign template, then target audience and channel.
- Set pacing and start or schedule the campaign.
What you should see Campaign fields should be grouped clearly: subject and reuse options first, audience/channel next, message body, closing signature, then timing controls.
Try it yourself Create a two-recipient test campaign with a safe delay and confirm that both recipients appear in the campaign queue.
Common mistake Closing the browser does not replace a healthy background worker. If delivery stops, check Communication Reliability instead of creating a duplicate campaign.
Result check The campaign should process each recipient according to pacing and show status in queue, outbox, and history.
Campaigns are for planned communication to an audience, not for a single quick reply.
Campaign flow
- Open Communications > Campaigns.
- Create a campaign.
- Set the subject/title and available subject styling.
- Choose Reuse Campaign or Campaign Template when helpful.
- Choose Target Audience and Preferred Channel.
- Write and format the message body.
- Add header media/CTA where supported.
- Choose the closing signature after the message body.
- Set pacing and delay.
- Preview the exact phone presentation.
- Schedule or start.
The campaign worker should continue until the final queued recipient has been processed according to pacing. Do not close a browser and assume an unconfigured background worker will finish; Communication Reliability should show whether the worker is healthy.
Opportunities Queue
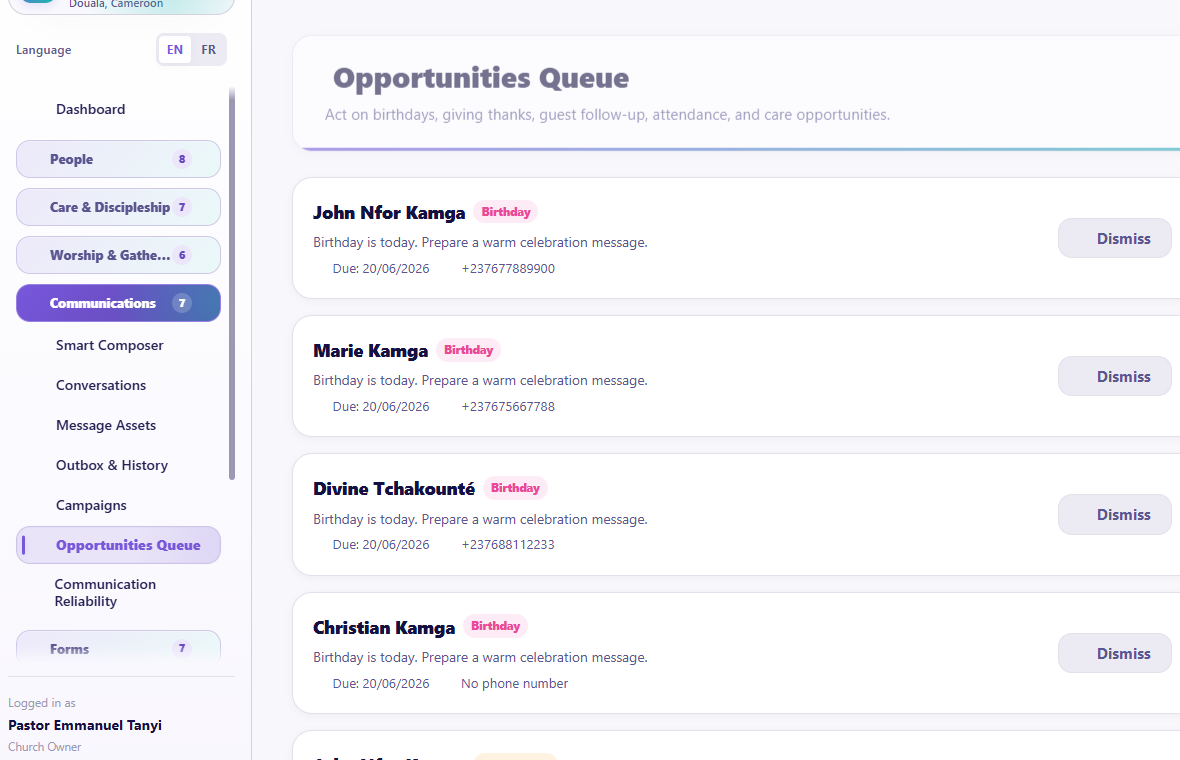
Visual checkpoint: Show what generated the opportunity, who it concerns, the recommended action, and the send/assign path.
The queue surfaces outreach moments from church activity, such as guests, celebrations, giving appreciation, absences, care, and other configured events.
- Review why the opportunity exists.
- Confirm it is current and not already handled.
- Choose or edit a suitable message.
- Confirm recipient, privacy, and channel.
- Send, schedule, assign, dismiss, or resolve as appropriate.
Do not treat every opportunity as permission to send a message. Pastoral judgment and communication consent still apply.
Communication Reliability
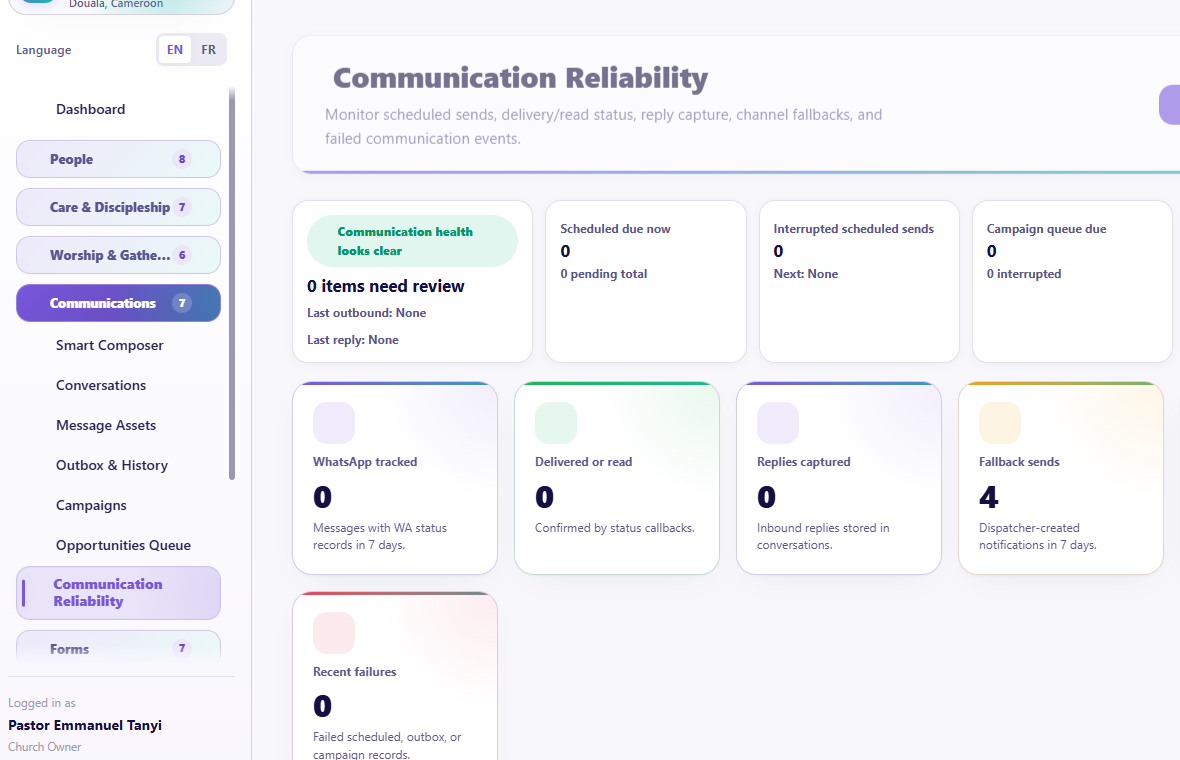
Visual checkpoint: Find stuck messages, failed deliveries, provider health, scheduling health, and retry controls.
Use this page for provider readiness, scheduled-message health, queue/worker status, webhooks, reply capture, failures, and diagnostics.
When a scheduled message does not send:
- Do not create a duplicate schedule immediately.
- Check its state in Scheduled Messages or History.
- Check worker health.
- Check channel readiness and credentials.
- Read the latest failure reason.
- Retry only after the cause is understood.
Guided practice
Build a two-recipient test campaign with a safe delay, inspect its queue and history, resolve one test opportunity, then locate the reliability status that would explain a stuck schedule.
Completion check
The learner can distinguish a message, campaign, opportunity, scheduled job, and provider failure.
Session 11: Forms from Building to Follow-Up
The promise
The church can collect clean information without asking members to understand codes, publish a beautiful church-branded form, and turn every response into accountable ministry action.
Forms pages
- Forms Dashboard
- All Forms / Forms Library
- Form Builder
- Templates Library
- Form Settings
- Responses and response details
- Approval requests
- Form Workflows
- Form Analytics
- Public Forms
- Public and member-portal previews
Some workflow and analytics pages require advanced Forms access.
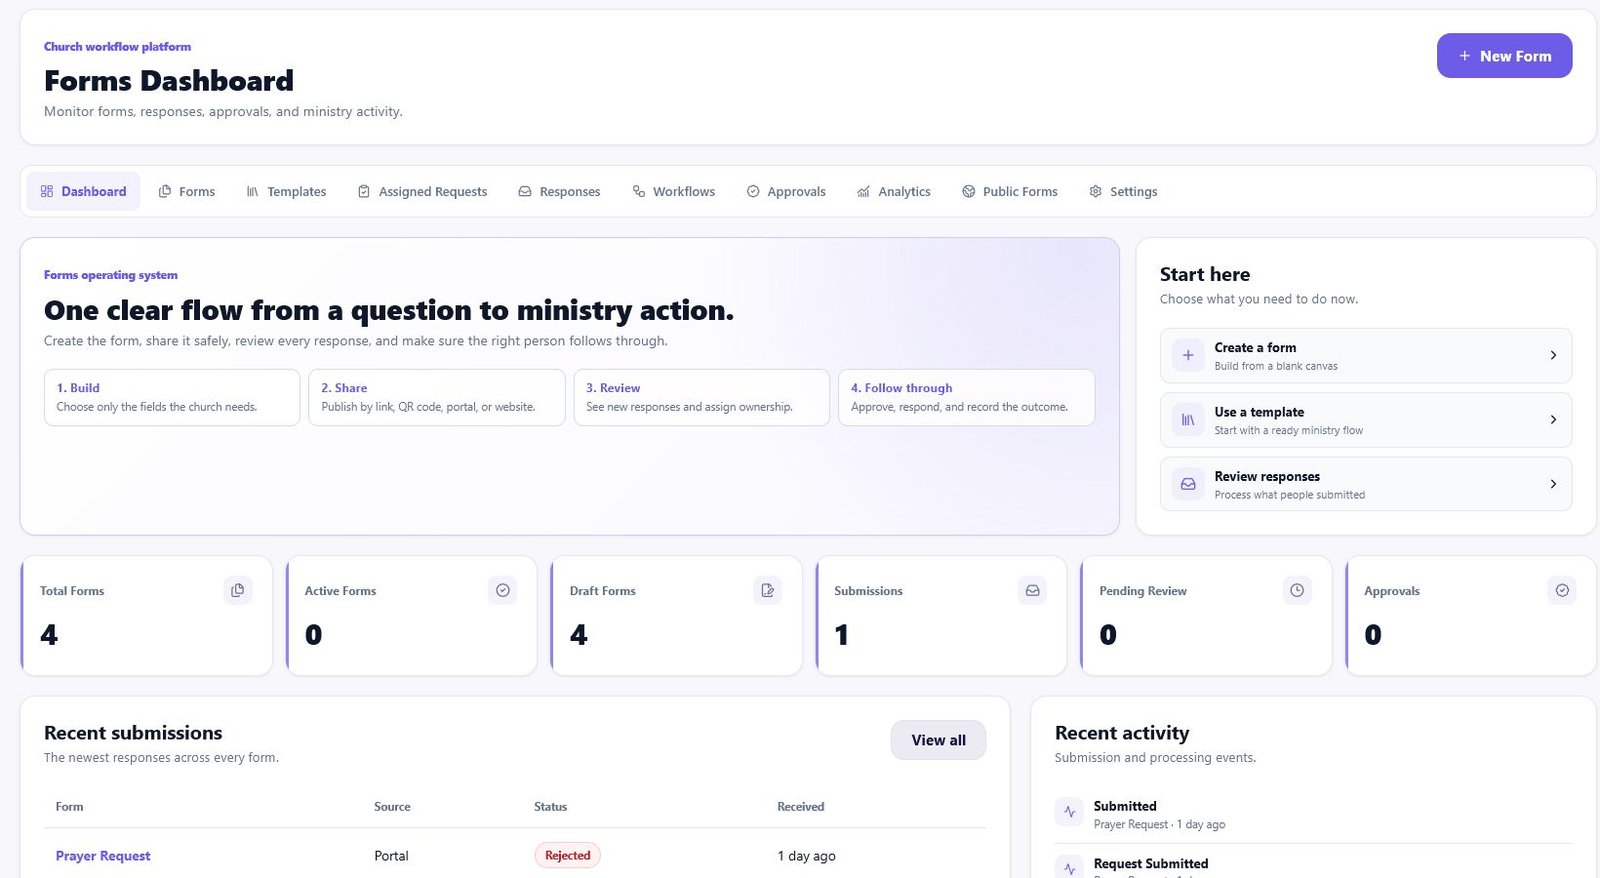
Forms Dashboard
Use the dashboard for totals, active forms, recent submissions, pending review, completion activity, and quick access.
Numbered callouts
- Open Forms.
- Start from the workspace bar, not the main dashboard.
- Use Create form for a blank form or Templates for a complete starter.
- Open Responses after someone submits.
- Use Workflows only after the form itself is correct.
What you should see The page should show the forms workspace, total forms, active forms, recent submissions, and the main tabs for builder, templates, responses, workflows, analytics, public forms, and settings.
What to notice
- The horizontal workspace bar opens Forms, Templates, Responses, Workflows, Analytics, Public Forms, and Settings without returning to the main dashboard.
- Start here gives the three safest next actions: create a form, use a template, or review responses.
- The number cards show the current form workload at a glance.
- Recent submissions and activity help staff see what needs attention without opening every form.
Do this now: Ask the learner to point to the path they would use for a new visitor form, then point to the place they would open after somebody submits it.
Try it yourself Open Templates, preview a visitor or membership form, return to Forms Dashboard, then open Responses.
Common mistake Building a long form from scratch when a complete template already exists wastes time and often misses important fields.
Result check The learner should be able to move from template, to builder, to public preview, to response review without leaving the Forms workspace.
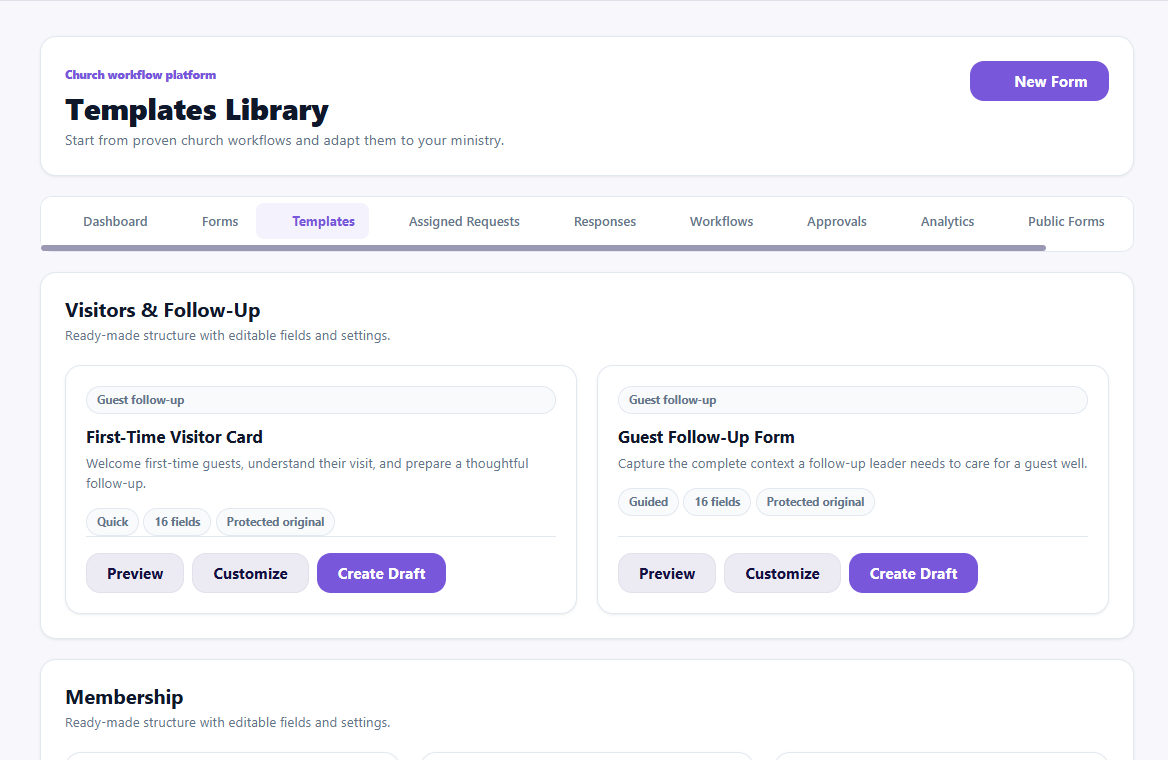
Start a form
Choose one of two paths:
- Template: start with a complete church use case and customize it.
- Create from scratch: build only what the church needs.
Templates should be reviewed in Preview before use. Preview must represent what a member or public visitor will actually see.
All Forms / Forms Library
Numbered callouts
- Open Forms > All Forms or use the Forms workspace list.
- Search before creating a new form.
- Check status, module, responses, last activity, and available actions.
- Open the form before editing, archiving, duplicating, or sharing.
What you should see All Forms should answer one question quickly: "What forms already exist, what are they for, and what needs action?"
Try it yourself Search for a visitor or prayer form, open its actions, then return to the Forms Dashboard without creating a duplicate.
Common mistake Creating another form with the same purpose makes responses harder to find and can confuse members.
Use All Forms as the church's form inventory. It is the safest place to check whether a form already exists, whether it is active, and where it is published.
Form Builder
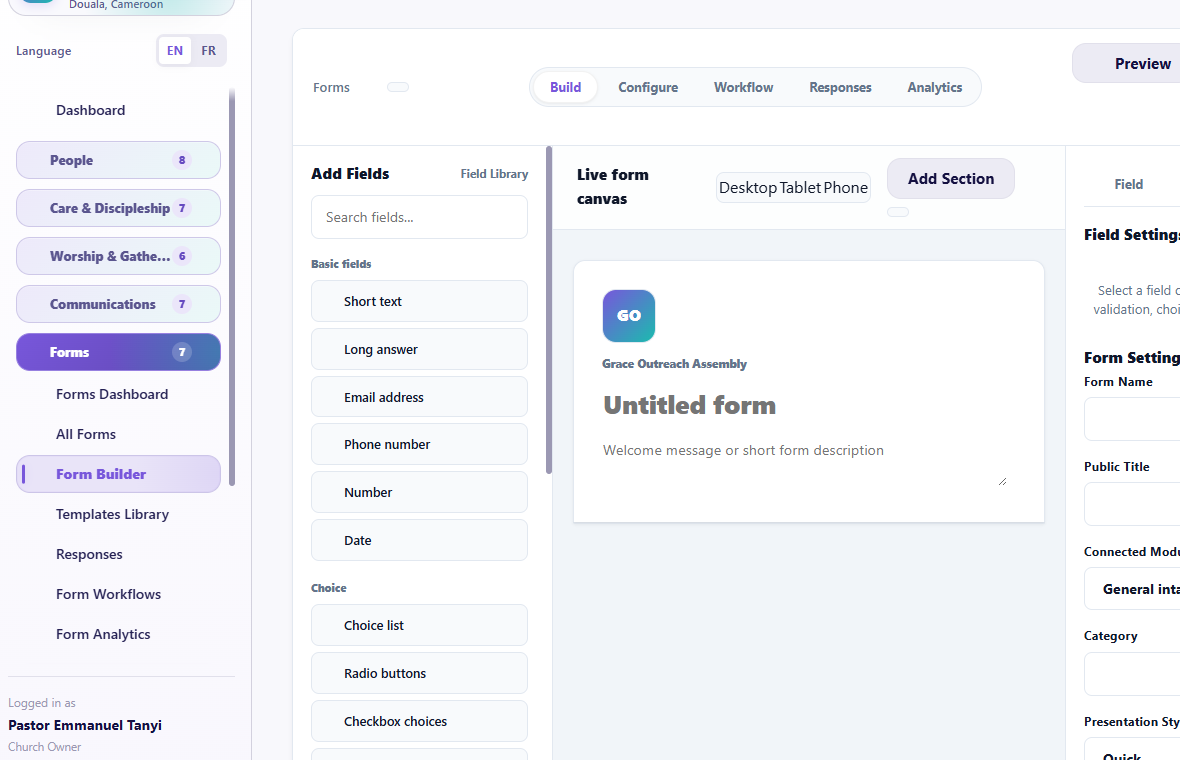
Visual checkpoint: Point to field library, live canvas, field settings, preview, and publish controls.
Numbered callouts
- Choose a field from the field library.
- Place it in the live canvas.
- Edit label, placeholder, help text, required state, and validation in field settings.
- Switch desktop/tablet/phone preview.
- Publish only after the form reads well on mobile.
What you should see The builder should feel like a live form, with fields arranged in sections and settings tied to the selected field.
Try it yourself Add a phone field and an audio input field to a safe test form, then preview it on phone size.
Common mistake Making every field required creates abandoned forms and frustrated visitors.
Result check The public preview should look like the actual member or visitor form, not like an admin builder screen.
The builder has:
- a searchable Field Library;
- the live form canvas;
- field properties;
- form properties;
- conditional logic;
- desktop, tablet, and phone previews.
Add fields
Use supported field types such as short answer, long answer, email, phone, number, date, choices, checkboxes, yes/no, file, audio, signature, section, divider, columns, page break, and Church-Ops connected fields where available.
- Add a section with a clear purpose.
- Add only necessary fields.
- Give every field a plain-language label.
- Add a placeholder or help text only when it prevents confusion.
- Mark Required only when the ministry genuinely cannot proceed without the answer.
- Use a field key generated or managed by the builder; users should not have to write code.
- Configure visibility/conditional logic carefully.
- Preview on phone.
Audio input remains available for forms that need a spoken response.
Form Settings
Visual checkpoint: Use the templates screen to show how a complete starter form can be previewed, copied, and customized before publishing.
Configure:
- public title and description;
- status;
- submit label and success message;
- publication to admin, member portal, church website, or standalone public link;
- confirmation and redirect;
- permissions and response handling;
- notifications, integrations, or advanced behavior where available.
Share link and QR code
Published forms can provide a shareable link and QR code for administrators. Members filling the form do not need admin sharing controls.
- Publish to the intended surface.
- Copy the link.
- Download or display the QR code.
- Test it in a private browser or on another phone.
- Confirm the form belongs to the correct church and does not require the wrong login.
Responses
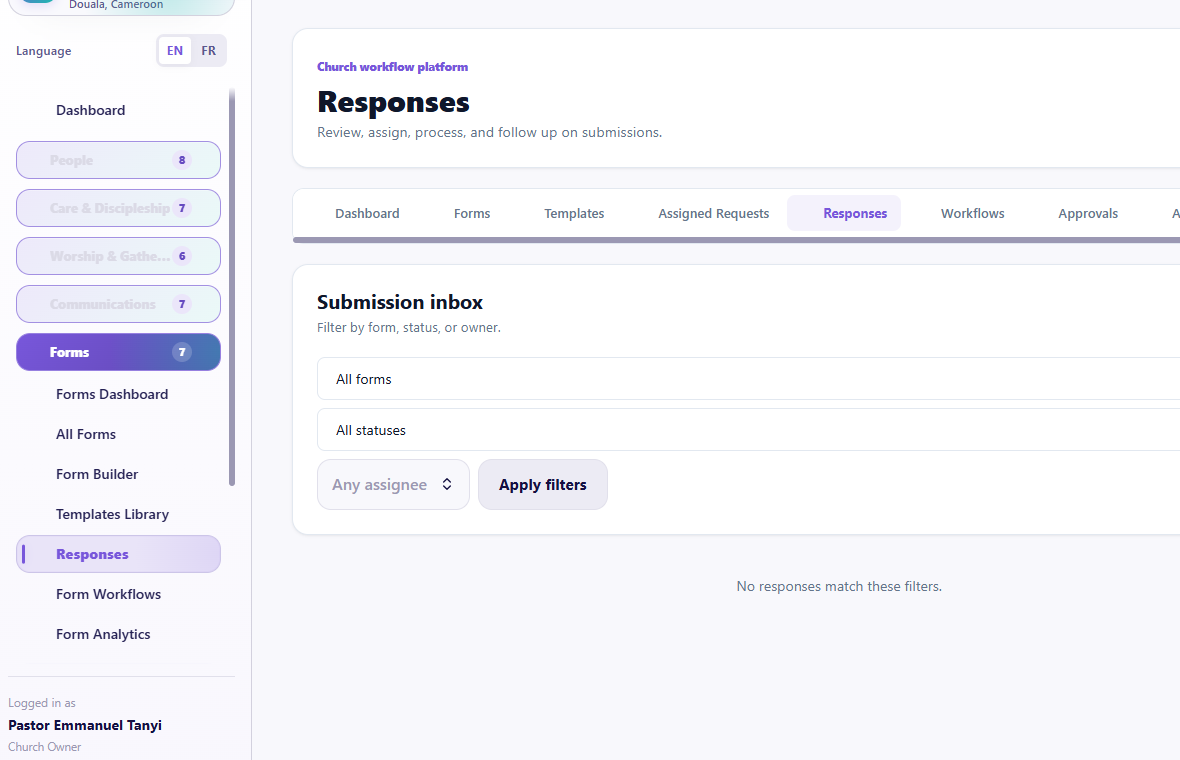
Visual checkpoint: Locate submitter details, review state, response actions, and export/reporting controls.
Numbered callouts
- Open Responses.
- Filter by form or status.
- Open one response detail.
- Review answers and attachments.
- Assign, approve, export, or start follow-up only when appropriate.
What you should see A response should show who submitted, when it was submitted, what form it belongs to, review state, answers, and available actions.
Try it yourself Submit a safe test response, open it from Responses, add an internal note, and mark the next action.
Common mistake Exporting responses before reviewing privacy and permission can expose unnecessary personal information.
Result check The response should be visible in the response list, response detail, analytics where applicable, and workflow history if a workflow ran.
- Open Responses.
- Filter by form, status, source, or review state where available.
- Open one response detail page.
- Read the submitted answers.
- Assign an owner, add internal notes, update status, request approval, or start follow-up as supported.
- Export only when permitted.
Form Workflows
Visual checkpoint: Show triggers, conditions, actions, assignment outcomes, and where automations can be paused.
Use workflows to define what should happen after submission or approval. Examples:
- notify a ministry leader;
- create a task;
- route a prayer request;
- start guest follow-up;
- record a membership application for review.
Do not automate sending or publishing sensitive information without review.
Form Analytics

Visual checkpoint: Find submission totals, completion trends, and fields that may be causing friction.
Use analytics for response volume, reach, source, completion, and processing patterns. Analytics should improve the form, not pressure people to provide unnecessary data.
Guided practice
Start from a Visitor Connection template, remove one unnecessary field, add a phone field and prayer section, add a safe conditional field, preview on phone, publish to a test surface, open the share link, submit one response, and process it from Responses.
Completion check
The learner can build, preview, publish, share, receive, and process a form without entering code or exposing admin controls.
Session 12: Stewardship and Finance
The promise
Authorized finance workers can record money accurately, keep income and expenses separate, prepare budgets, generate readable reports, and preserve a clear audit trail.
Permission rule
Finance pages are for finance-approved roles. A pastor, administrator, volunteer, or member does not automatically need access to giving amounts, expenses, reports, or signatories.
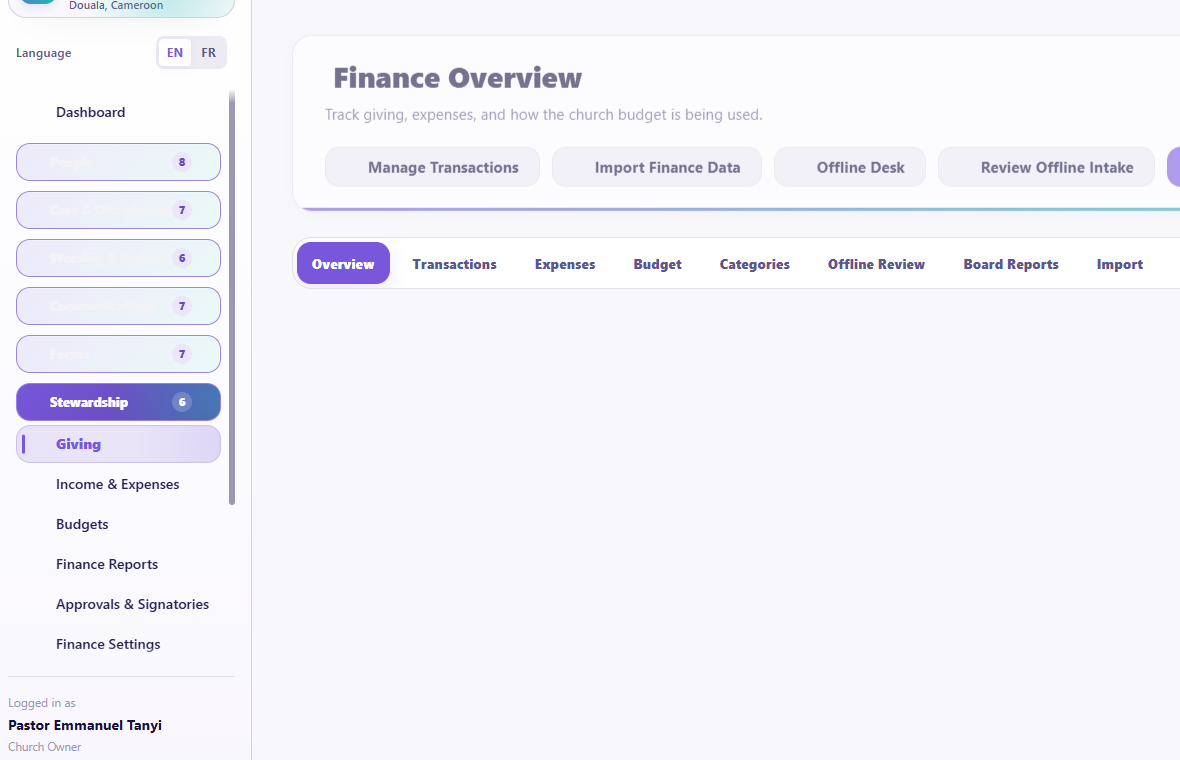
Pages
- Giving
- Income & Expenses / Finance Transactions
- Expenses
- Finance Categories
- Budgets
- Offline Finance Review
- Finance Reports and report history
- Approvals & Signatories
- Finance Settings
Advanced budgets and reporting may require the relevant plan capability.
Categories
- Review existing categories before adding one.
- Choose the correct line type: income or expense.
- Assign an account code.
- Keep account codes unique and meaningful.
- Categories should display by account code, not merely alphabetically.
An expense category must not appear as an income category.
Record giving or income
Visual checkpoint: Point to giving totals, contribution records, payment state, and receipt/report controls.
- Choose the date in
DD/MM/YYYYformat. - Choose the member or anonymous source according to policy.
- Choose an income category.
- Enter the amount using decimal-safe values.
- Add payment method, reference, fund, notes, or receipt information as required.
- Save.
- Confirm the transaction and totals.
Record expenses
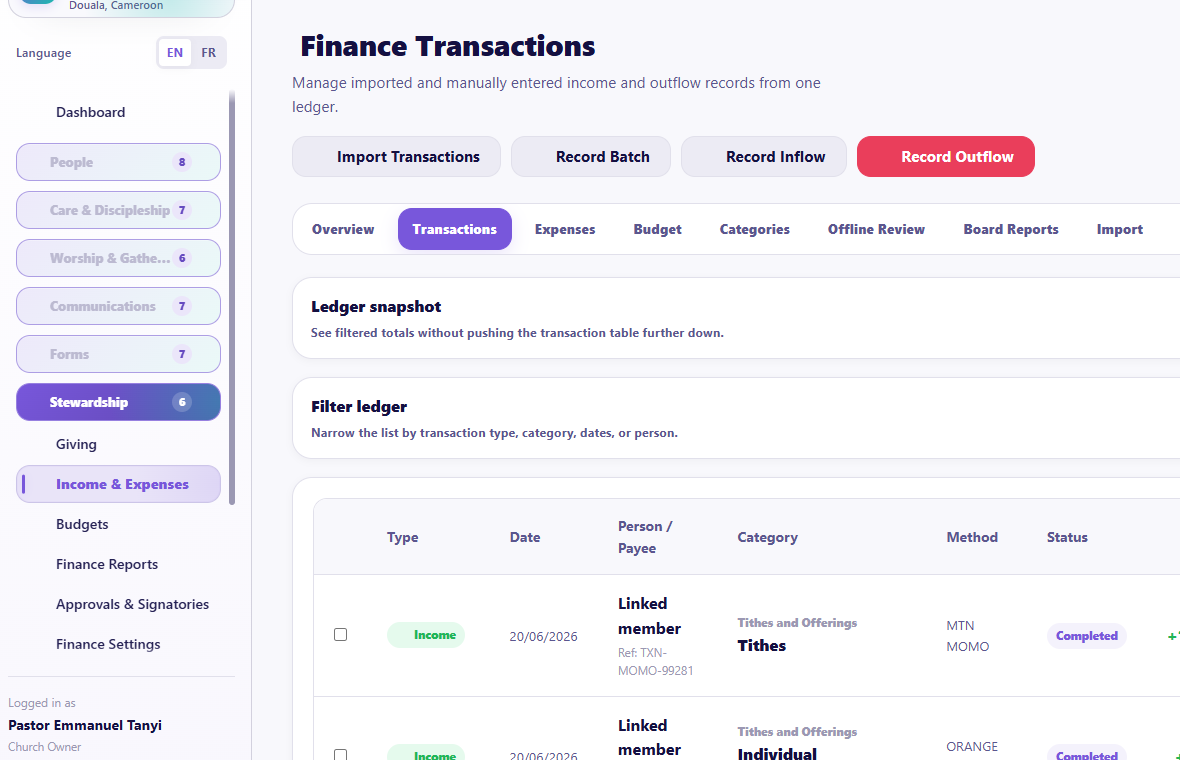
Visual checkpoint: Show the separate income and expense areas, category dropdowns, dates, totals, and transaction actions.
- Choose the date.
- Choose an expense category.
- Enter amount, payee, method, reference, purpose, fund, receipt, and approval context as required.
- Save and verify.
Multiple transactions for one date
Use the bulk transaction form to add several entries for the same date. Enter income first, then expenses. Review separate income and expense totals before saving.
Budgets
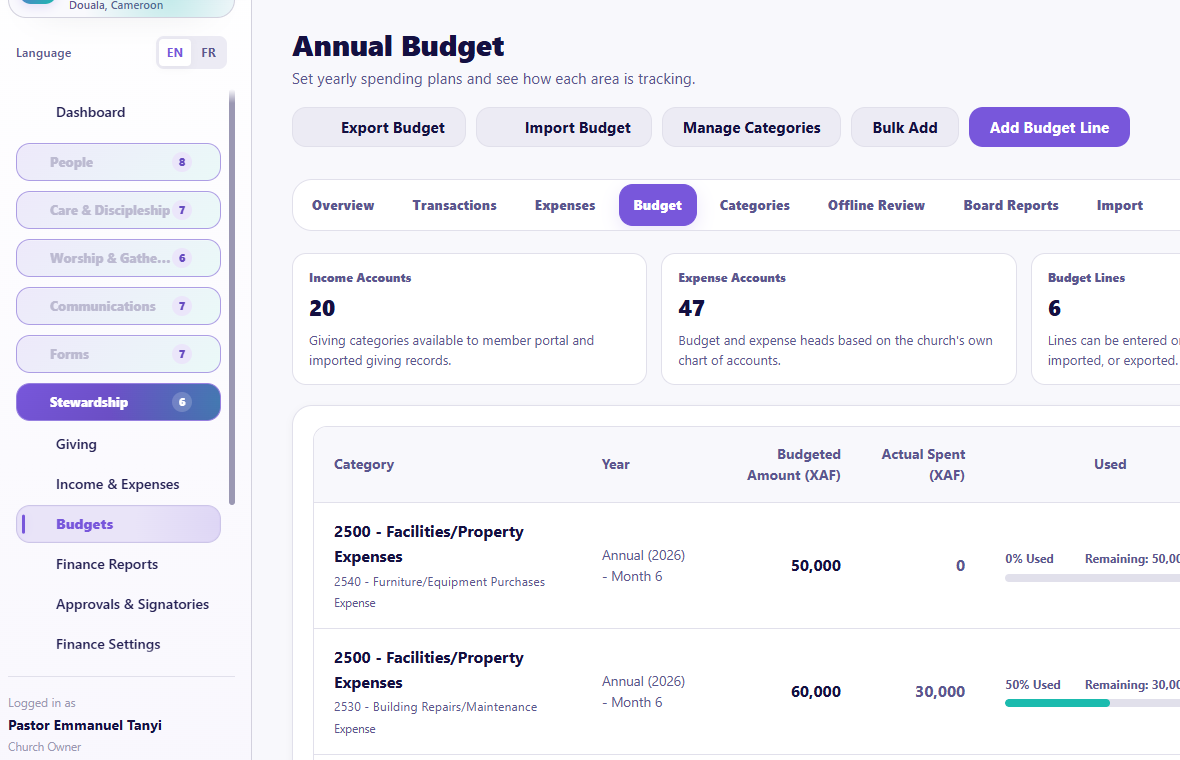
Visual checkpoint: Identify fiscal year, line type, account code/category order, bulk form, and budget totals.
- Choose fiscal year and line type.
- Use the true bulk budget form rather than pasting unstructured text.
- Add categories and amounts.
- Confirm no category is duplicated for the same budget context.
- Compare annual, year-to-date, actual, and variance values.
Imports
Budget imports require valid fiscal year, line type, account/category mapping, and values. Always preview. Never import the same file repeatedly because the first result is slow to appear.
Finance Reports
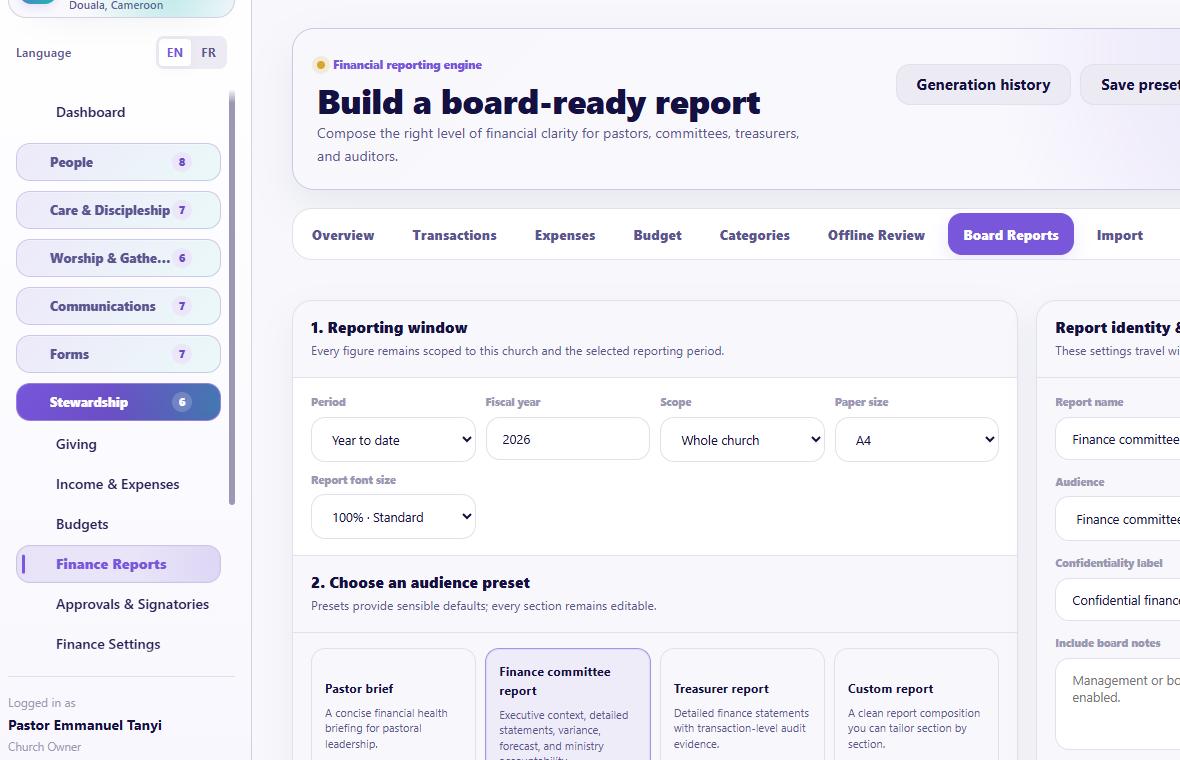
Visual checkpoint: Find report type, audience, font-size controls, print-ready output, and signatory options.
Numbered callouts
- Open Stewardship.
- Click Finance Reports.
- Choose report type, date range, audience, sections, and font size.
- Preview before downloading.
- Open the print-ready version and inspect page breaks.
What you should see The report should show a compact header, readable tables, black print gridlines, correct church logo, correct currency context, and signatory sections when selected.
Try it yourself Generate an income-only report and an expense-only report for a safe period, then compare the totals to the transaction list.
Common mistake Downloading before previewing can hide wrong date ranges, missing logo, or unreadable print scaling.
Result check The printable report should be legible, scoped to the church, and match the source finance records.
The report builder supports income, expense, summaries, detail, executive, analysis, trends/forecasting, variance, department, audit, and approval/signatory sections where configured.
- Choose report type, date range, audience, sections, font size, density, and print settings.
- Preview.
- Check logo, church name, currency, totals, category order, gridlines, page breaks, and signatories.
- Use print-ready PDF or browser print.
- Download only after checking the preview.
Currency belongs in headers and context where possible, not repeated so often that the table becomes hard to read.
Approvals & Signatories

Visual checkpoint: Show prepared-by fields, signatory names, roles/capacity, and signature spaces.
- Set Prepared By.
- Add each signatory.
- Edit the Role/Capacity.
- Arrange the order.
- Confirm the report shows names and signature space.
Finance Settings
Use Administration > Church Settings > Finance & Payments for currency, giving language, receipts, contact lines, online payment configuration, and related church details.
Numbered callouts
- Open Stewardship > Finance Settings or Administration > Church Settings > Finance & Payments.
- Confirm currency, receipt language, giving labels, and payment configuration.
- Review category behavior before importing or recording transactions.
- Save settings only after confirming they match church policy.
What you should see Finance Settings should control how money-related pages behave. It should not be used casually because it affects giving, receipts, reports, and payment readiness.
Try it yourself Review the currency and receipt settings, then explain what would happen if the wrong currency were saved.
Common mistake Do not change finance settings to solve a one-time report issue. Fix the report/filter/category instead unless the church policy has truly changed.
Guided practice
Create one test income and one test expense on the same date, verify separate totals, create one budget line, produce an income-only report and an expense-only report, preview the combined summary, and identify the audit trail.
Completion check
The learner can reconcile category, amount, date, report, and permission context without mixing income and expense.
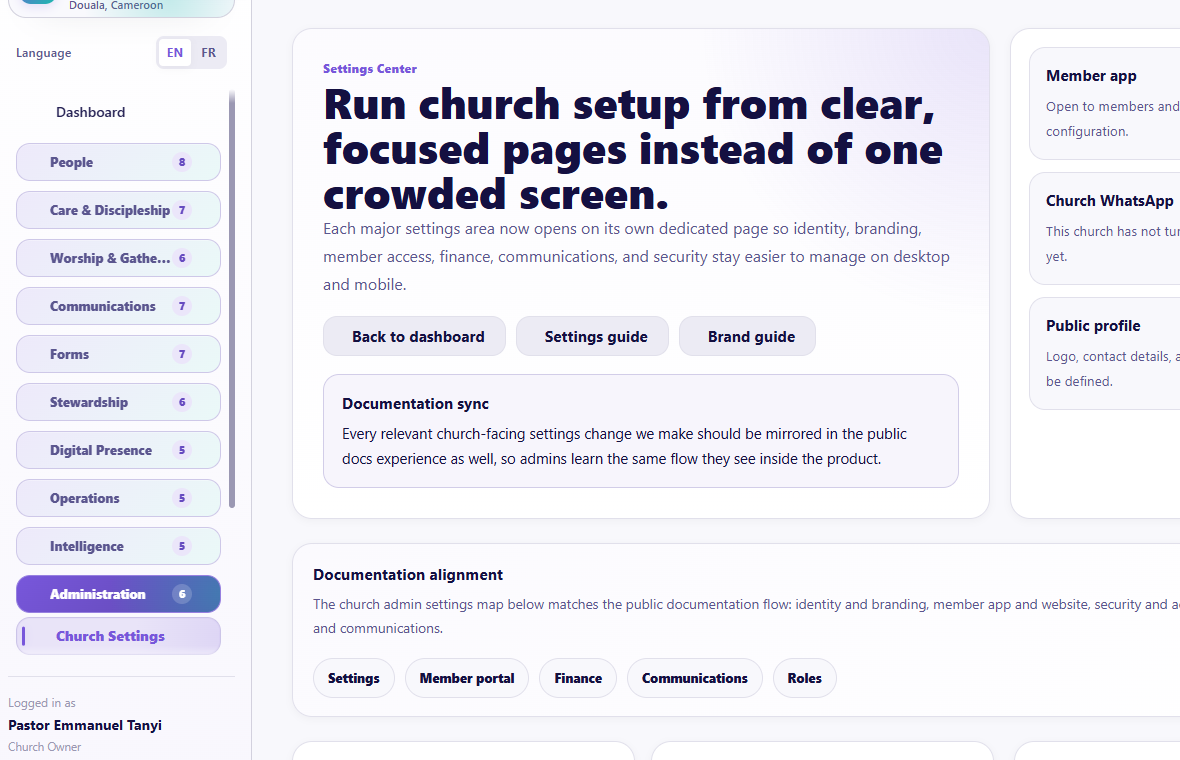
Session 13: Digital Presence
The promise
The church can offer a branded member app and public website without needing a separate technical team for every update.
Member Portal workspace
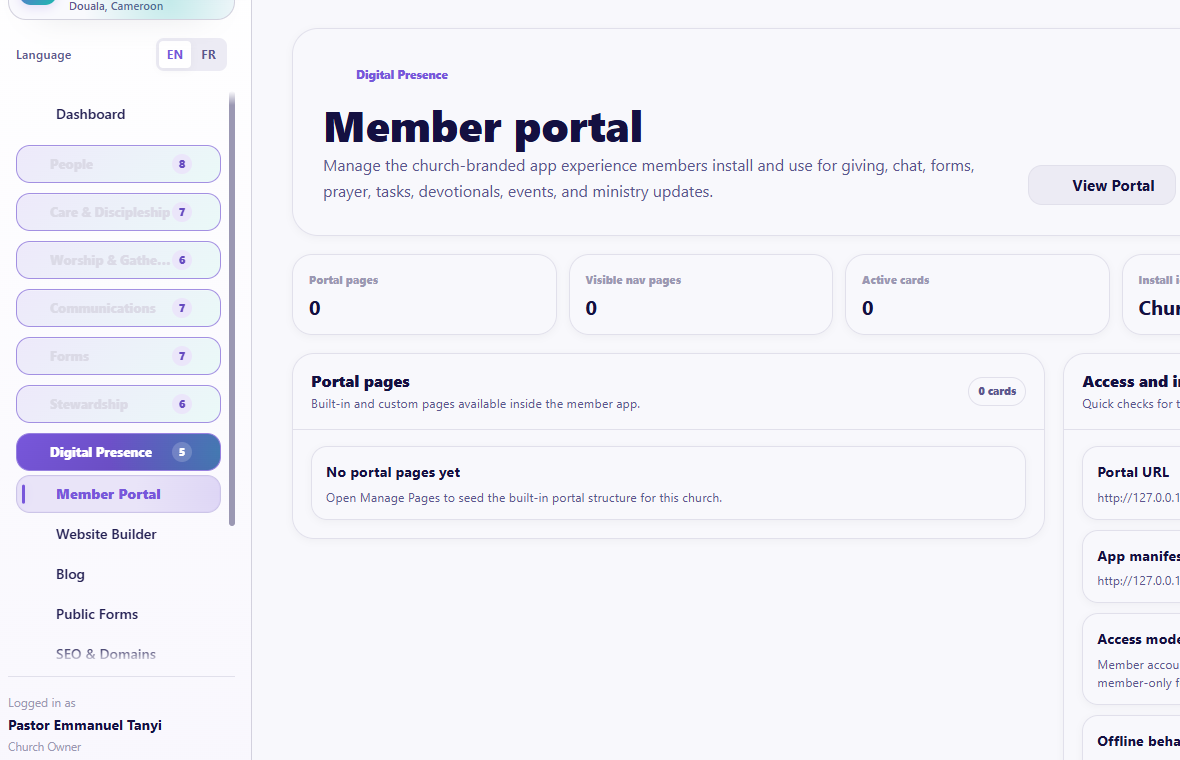
Visual checkpoint: Find member-home content, branded header, bottom navigation, offline behavior, and member-only actions.
Numbered callouts
- Open Digital Presence.
- Click Member Portal.
- Review portal cards and navigation.
- Preview on mobile.
- Confirm member-only areas request sign-in while public portal areas remain safe.
What you should see The portal should look like the church's app: church logo, church color, sticky header, clear bottom navigation, and no admin-only controls.
Try it yourself Preview the portal on phone size, open one public-safe page, then open one member-only action and confirm the access behavior.
Common mistake Publishing public portal content that accidentally exposes member, child, giving, care, or private communication data.
Result check The member portal preview should match what members see on phone, including spacing above the bottom navigation and stable branding after refresh.
The admin Member Portal page controls the church-branded member experience.
Pages and tools
- Member Portal workspace
- Portal Builder
- portal pages
- portal cards and shortcuts
- access and registration settings
- install branding
- custom widget/embed settings where authorized
Workflow
- Open Digital Presence > Member Portal.
- Review whether the portal is enabled.
- Open the builder.
- Arrange supported cards, shortcuts, pages, and content.
- Create or edit a custom page.
- Preview on mobile.
- Publish.
Portal content can connect to sermons, events, prayer, giving, forms, devotionals, chat, tasks, and other enabled features.
Public portal access
Where enabled, a church may publish a public portal experience that does not require sign-in, while member-only features still request authentication. Never expose member, child, care, giving, or private communication data on a public page.
Third-party widgets
Only authorized administrators should add approved embed code. Use the designated portal container and position controls. Treat external scripts as a security and privacy decision, not decoration.
Website Builder
Visual checkpoint: Point to page sections, live preview, publish controls, domain settings, and SEO fields.
Pages
- Website dashboard
- Website Studio/editor
- template library, preview, and setup
- public page preview
- media and section controls
Workflow
- Choose a template or open the existing site.
- Choose the page.
- Add, edit, reorder, or remove sections.
- Configure text, media, buttons, service times, events, sermons, blog, leaders, giving, or forms as supported.
- Preview desktop, tablet, and mobile.
- Save.
- Open the live page and test every link.
Blog
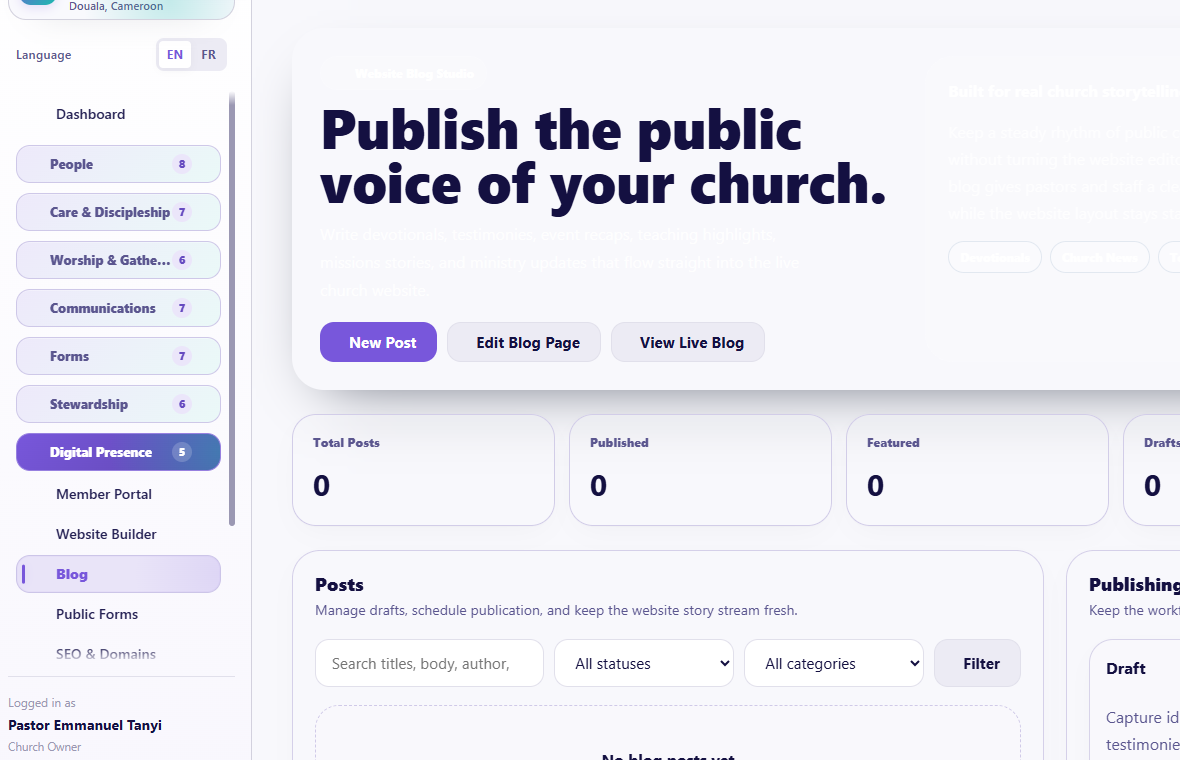
Visual checkpoint: Show post list, title, publish state, featured image, and public visibility controls.
Use Blog Studio for church news, teaching, stories, ministry updates, and approved public content.
- Create a post.
- Add title, summary, body, image, author/date, SEO details, and publication state.
- Preview.
- Publish or schedule.
- Edit or unpublish when needed.
Do not publish private care, child, giving, or member information without explicit authorization.
Public Forms
Public Forms shows forms intentionally available to the public website. Manage the form in Forms, then test the public destination here.
Numbered callouts
- Start in Forms and confirm the form is published to the public surface.
- Open Digital Presence > Public Forms to verify what visitors can access.
- Test the public link or QR code outside an admin session.
- Confirm the form shows the right church branding and does not expose admin-only controls.
What you should see Public Forms should look like a church-facing intake path, not an internal admin table. Visitors should see the form title, church identity, fields, and submit button only.
Try it yourself Open one public form link in a private browser or phone, submit a safe test response, then confirm it appears under Forms > Responses.
Common mistake Do not assume a form is public just because it exists. It must be published to the correct surface and tested from a non-admin view.
SEO & Domains
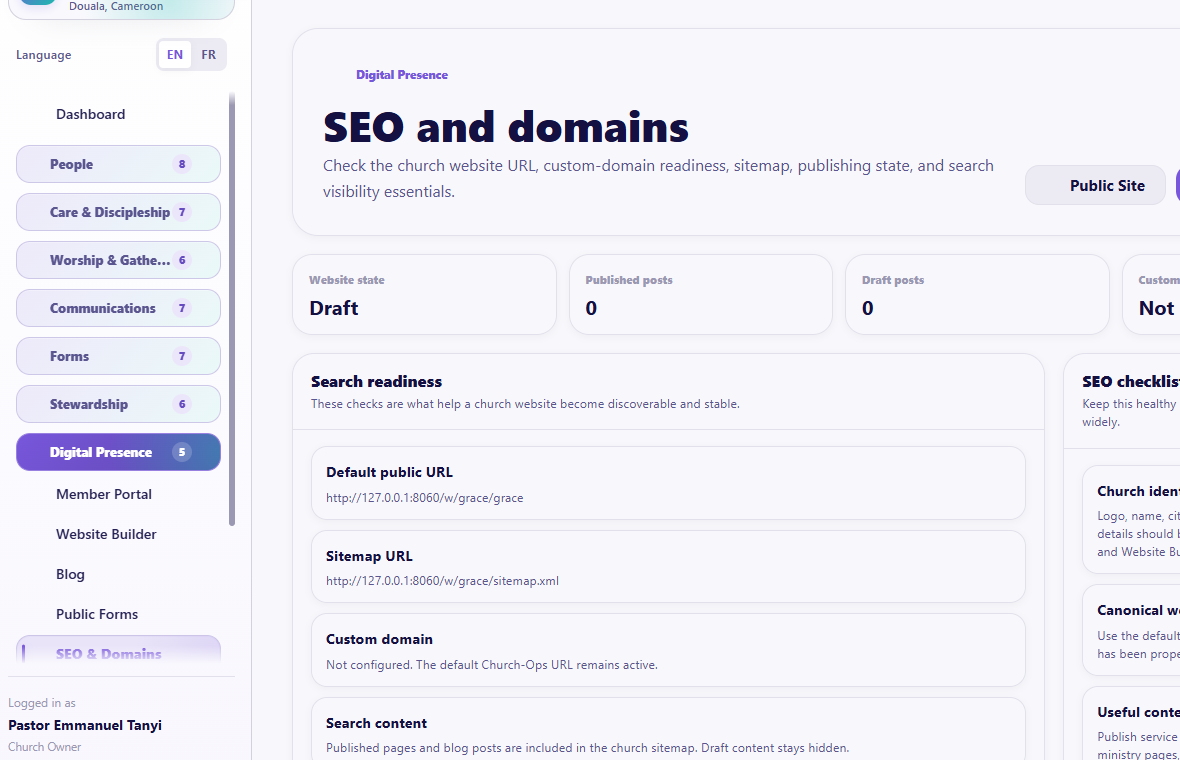
Visual checkpoint: Locate default church URL, custom-domain settings, SEO title/description, and publish state.
Use this page for church site title, description, social preview, indexing, sitemap, default Church-Ops URL, and custom-domain status where available.
- Keep the default URL working before adding a custom domain.
- Add clear page titles and descriptions.
- Use one canonical public address.
- Confirm sitemap and index settings.
- Test the site without a signed-in session.
Search visibility is improved by sound SEO and consistent public content, but no system can promise immediate ranking.
Guided practice
Edit one portal card, preview a portal page on phone, update one website section, create a draft blog post, open one public form, and explain the difference between the default URL and a custom domain.
Completion check
The learner can publish a branded experience without exposing private church records.
Session 14: Operations
The promise
The church can automate repeated work, protect important documents, track physical resources, move data safely, and continue supported work during weak connectivity.
Automations, Smart Lists, and Workflows
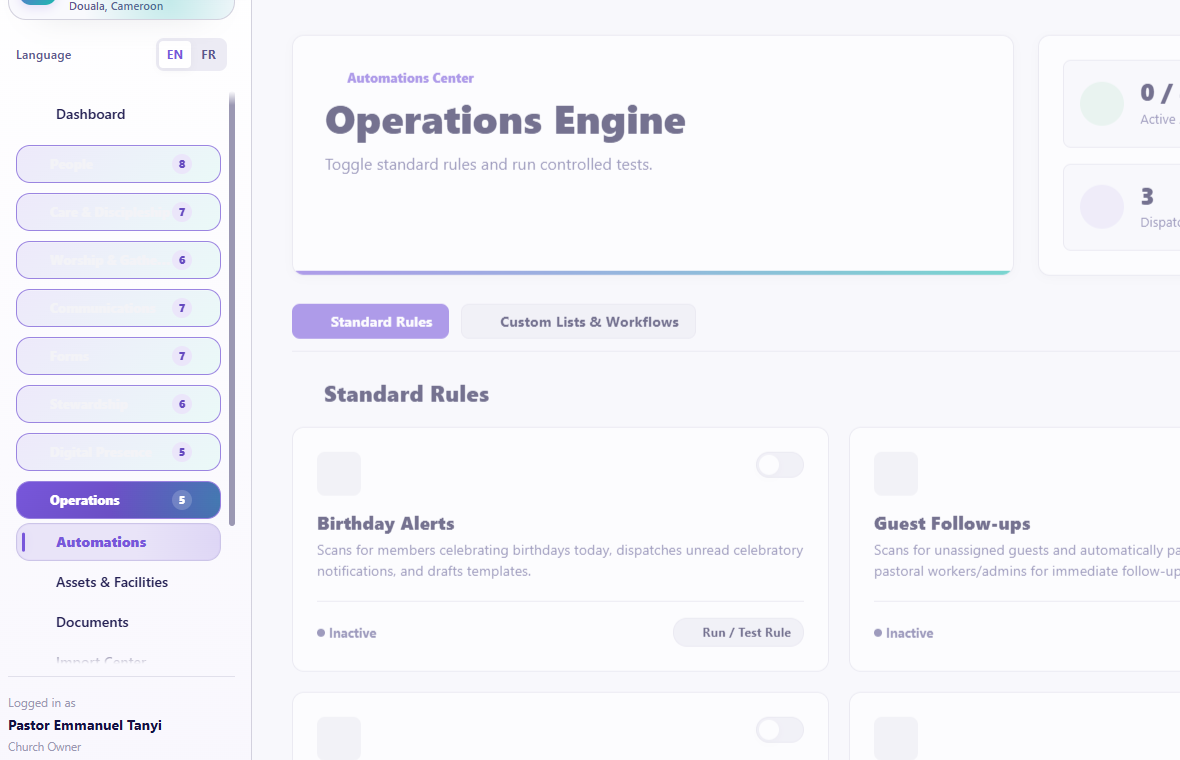
Visual checkpoint: Find smart lists, workflow triggers, conditions, actions, and activation status.
Pages
- Automations Center
- Custom Lists
- Smart List members
- Create Custom Workflow
- workflow details/test actions
Smart Lists
Smart Lists are dynamic member segments based on criteria. Examples include birthday today, absent for a period, membership status, location, ministry, household, giving or attendance context where permitted.
- Name the list by its ministry purpose.
- Add criteria and use the correct operator.
- Use relative date criteria for needs such as Birthday Is Today rather than entering a fixed birthdate.
- Preview matching members.
- Save and refresh.
- Review who entered or left the list.
Workflows
Current trigger families include:
- people and membership;
- guest activity;
- attendance and events;
- giving and expenses;
- prayer and pastoral care;
- tasks;
- forms;
- children check-in;
- service plans and volunteer shifts;
- entering or leaving a Custom List.
Actions may create tasks, send context-aware notifications or communications, use templates, add/remove people from groups or ministries, and perform other supported member connections.
- Choose one clear trigger.
- Add conditions.
- Add the smallest necessary action.
- Choose a template and channel when communicating.
- Save inactive first.
- Test with a safe recent record or test member.
- Review the run result.
- Activate only after the output is correct.
Prevent loops. For example, a task-created workflow should not create another identical task without a stopping condition.
Assets & Facilities
Visual checkpoint: Show asset records, facility assignment, custody fields, maintenance/service dates, and status.
- Add facilities such as sanctuary, office, classroom, store, or vehicle area.
- Add assets with name, tag, quantity, category, condition, status, facility, custodian, serial number, purchase details, current value, service dates, and notes.
- Assign staff or member custody where appropriate.
- Record maintenance.
- Update condition and next service.
- Archive instead of deleting history casually.
Documents

Visual checkpoint: Locate document folders, access restrictions, upload controls, and download actions.
Use Documents for approved minutes, policies, forms, finance documents, legal records, and other church archives.
- Choose a category.
- Upload an allowed file.
- Add title, description, date, and access context.
- Search and download when authorized.
- Delete only according to church retention policy.
Documents used as Intelligence knowledge sources require appropriate permissions and should not contain secrets or unnecessarily sensitive data.
Import Center
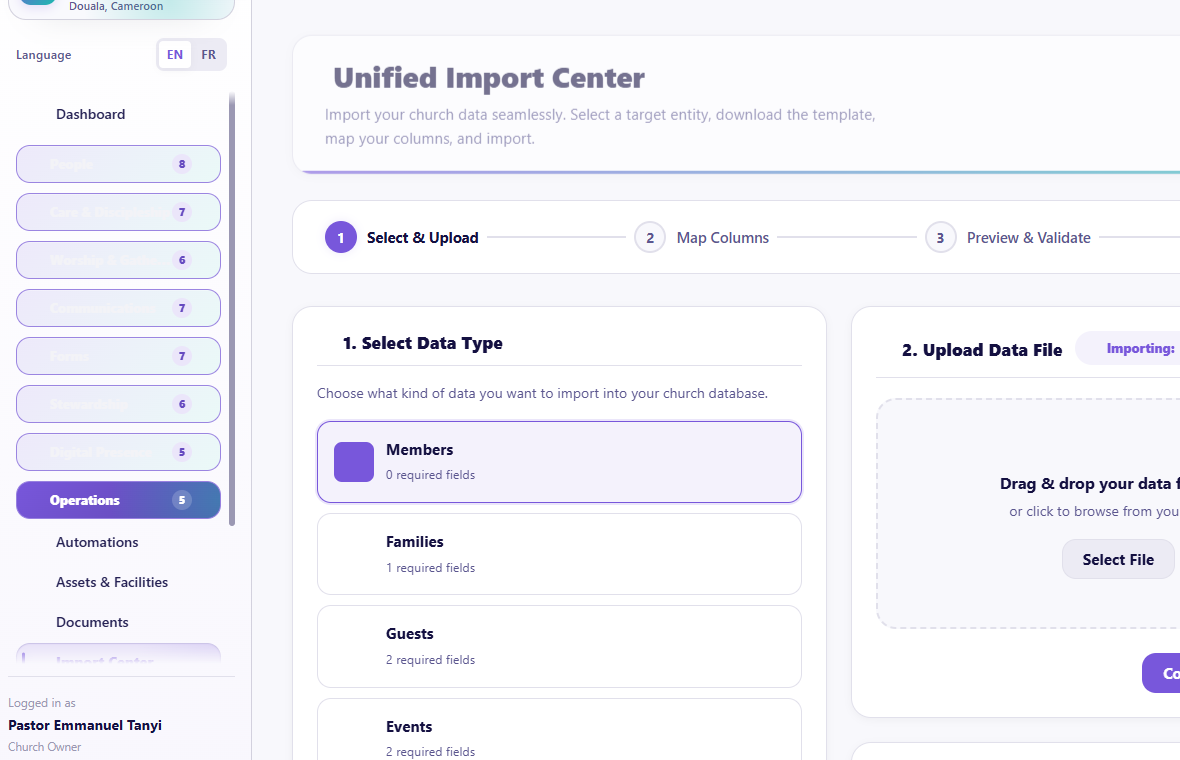
Visual checkpoint: Point to data type selection, upload area, mapping step, validation preview, and import status.
Numbered callouts
- Open Operations.
- Click Import Center.
- Select the data type before uploading.
- Map columns and preserve approved extra fields.
- Preview, fix blocking errors, then import.
What you should see The import flow should move through Select & Upload, Map Columns, Preview & Validate, then Import. Data type selection should work without refreshing the page.
Try it yourself Upload a tiny safe test file, map one extra column to a custom field where supported, preview the rows, then cancel before importing if it is only practice.
Common mistake Re-uploading the same file repeatedly after a slow response can create duplicate jobs or confusion.
Result check Imported records should appear in the destination module, with duplicates flagged and extra approved fields preserved.
Safe import flow
- Choose the data type before uploading.
- Upload the supported file.
- Map source columns to Church-Ops fields.
- Let the adaptive mapping preserve extra columns as approved custom fields where supported.
- Preview rows and validation.
- Review duplicates.
- Correct blocking errors.
- Import.
- Open the destination module and verify several records.
Forms with existing submissions, membership databases, finance records, budgets, and events may need specialized import flows. An import should not silently overwrite existing data.
Offline Desk
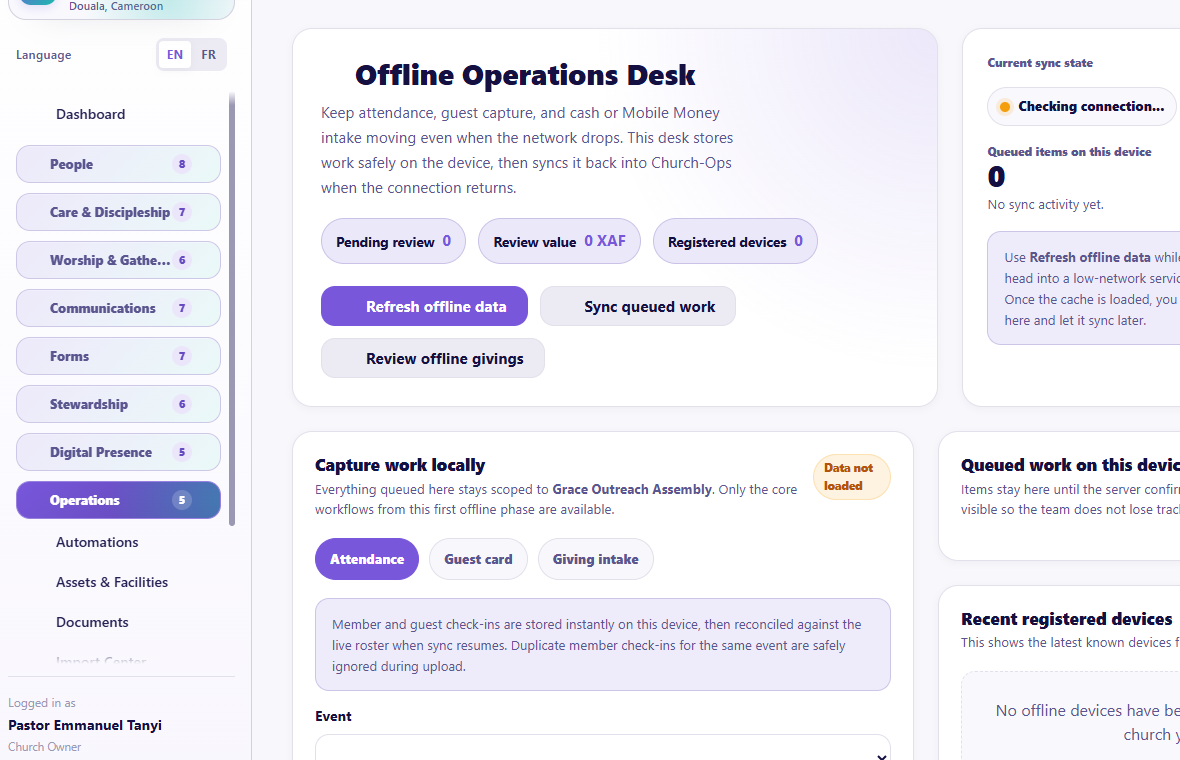
Visual checkpoint: Show cached areas, queued actions, sync state, and what still requires internet.
- Refresh offline data while connected.
- Confirm the correct church and latest refresh time.
- Use supported offline attendance, giving, guest, member, or other actions shown by the page.
- Review the local queue.
- Reconnect.
- Sync.
- Resolve rejected or duplicate items in review.
Offline mode is not a replacement for internet-dependent payments, live messaging, or server authorization.
Guided practice
Create a Smart List using a relative criterion, build an inactive one-action workflow, add a test asset and maintenance note, upload a harmless document, preview a small import, and explain the Offline Desk sync cycle.
Completion check
The learner can reduce repeated work without creating automation loops, data duplicates, unsafe imports, or untracked physical assets.
Session 15: Intelligence, Insights, Reports, and Knowledge Sources
The promise
Authorized leaders can ask better questions of church information, review evidence, and turn suggestions into reviewed actions without letting AI become the final authority.
Intelligence Overview
Open Intelligence > Intelligence Overview first when you want the current state rather than a conversation. This page separates monitoring from chat and shows:
- operational signals the assistant may use when your permissions allow them;
- provider and safe-fallback health;
- ready and indexed knowledge sources;
- recent conversations that can be continued.
Use Open Assistant only when you are ready to ask a question. Use Knowledge Sources or Assistant Settings when the issue is source readiness or assistant configuration rather than the answer itself.
Church Assistant

Visual checkpoint: Identify the searchable chat list, assistant room header, message bubbles, bottom message composer, citation controls, and safe-review boundaries. On mobile, use the back arrow to move from the open conversation to the chat list.
The assistant has a dedicated, focused page for church-aware conversations using permitted church context and approved knowledge sources. Dashboard statistics no longer compete with the conversation workspace.
Current conversation tools
- create a conversation;
- choose an assistant mode where available;
- search recent conversations without reloading the page;
- use suggested prompts;
- continue contextual chat;
- view citations and source details;
- rename, pin, archive, or restore a conversation;
- regenerate a response;
- mark a response helpful or not helpful;
- copy an answer;
- prepare reviewed actions such as tasks, devotionals, sermon drafts, or confidential notes where supported.
Choose the right assistant mode
- Church Knowledge: prioritizes uploaded church sources and authorized live records.
- Scripture Study: separates biblical text, interpretation, church teaching, and application.
- Sermon Preparation: supports pastor-reviewed outlines, context, gospel connection, and application.
- Discipleship Care: gives privacy-aware pastoral follow-up guidance without replacing professional care.
- Administrative Reporting: organizes verified operational information into leadership briefings and next actions.
- Content Drafting: creates review-ready drafts from supplied facts without inventing missing details.
The description beneath the mode selector explains the selected behavior before the conversation starts. Modes change emphasis and answer structure; they never increase the user's permissions.
Ask like a conversation
The assistant should answer the exact question, not only return a generic dashboard summary. For example, ask "What needs my attention right now?" to combine Care Command, urgent care signals, overdue tasks, and near-term events. After an answer, short follow-ups such as "What about the second one?" should keep the previous topic and focus on the referenced item.
Safe use
- Open Intelligence > Church Assistant.
- Start a new chat or continue a recent conversation.
- Ask a clear question.
- Read the answer and citations.
- Check whether the answer uses church records, church documents, Scripture, or general guidance.
- Correct unsupported assumptions.
- Review any proposed action before saving or sending.
AI must not be treated as the final authority for doctrine, Scripture interpretation, counseling, finance, law, medicine, or safeguarding.
Knowledge Sources
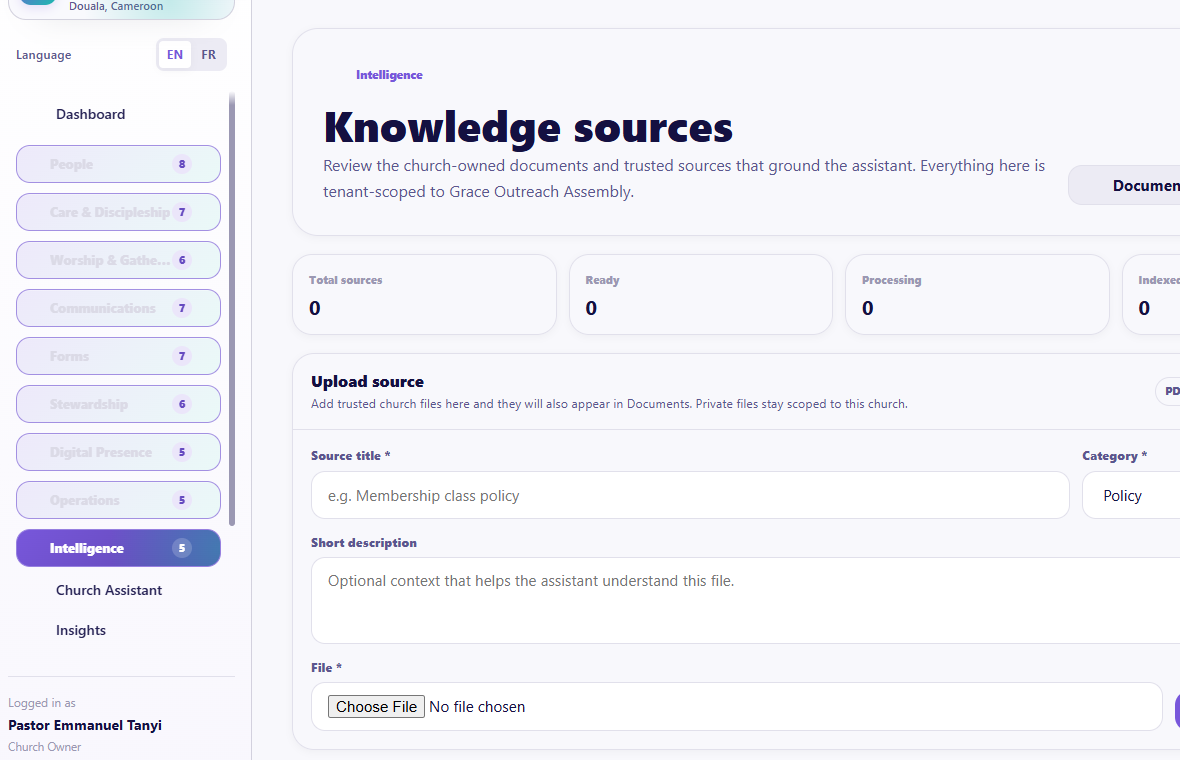
Visual checkpoint: Show upload controls, source list, processing status, and permission boundaries.
Knowledge Sources is a full page for adding and maintaining material the assistant may use.
- Upload an approved source or connect an eligible document.
- Add clear source details.
- Wait for processing.
- Review readiness or failure state.
- Reprocess when appropriate.
- Download the underlying document when authorized.
- Remove a source that should no longer guide the assistant.
Ready sources are split into searchable passages. Relevant passages can supplement authorized live-data answers and are shown as citations. This is retrieval-based grounding, not uncontrolled model training: the original church source remains reviewable, tenant-scoped, and removable.
Never upload passwords, API keys, private messages, unrestricted child data, confidential counseling records, or another church's documents.
Assistant Settings
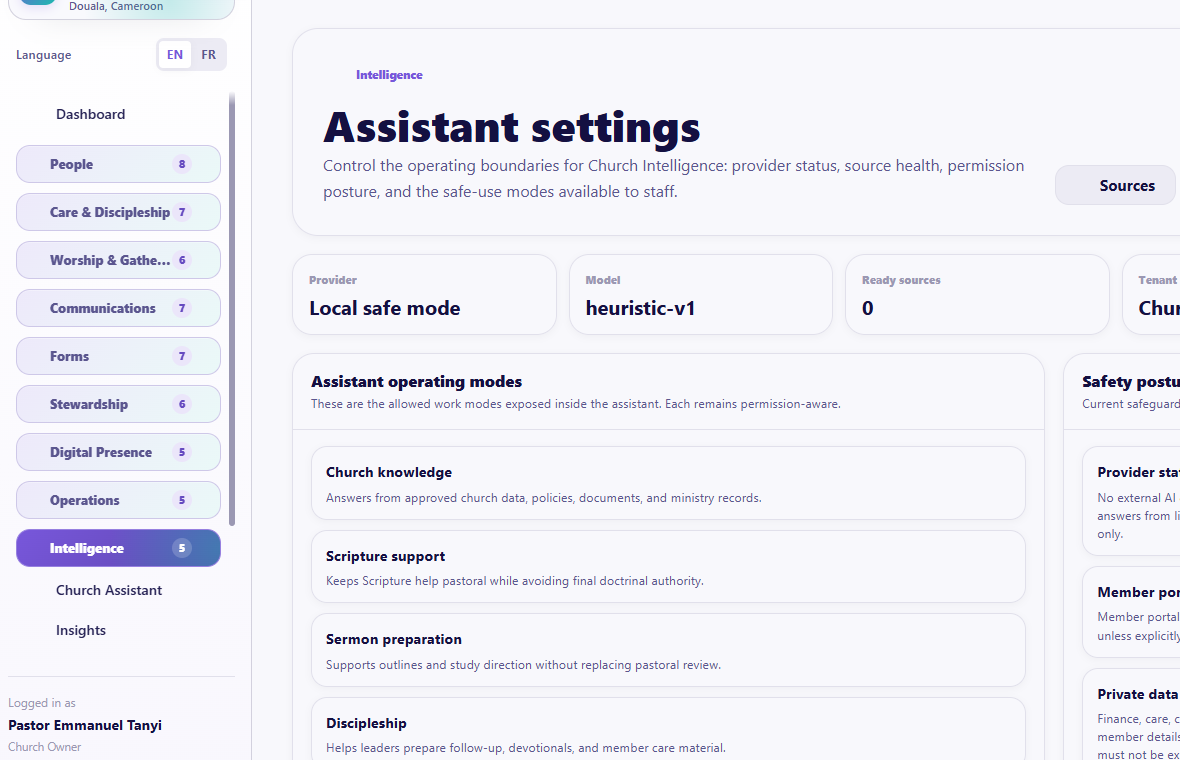
Visual checkpoint: Find enabled features, safety settings, theological/context controls, and assistant visibility options.
Use this page for assistant identity, church/denominational context, doctrine or policy guidance, modes, safety, provider readiness, and other configured controls. Changes affect how the assistant responds; they do not replace human review.
Insights and Operational Reports
Visual checkpoint: Point to reports, filters, export/print controls, and privacy-sensitive report areas.
Use Insights for higher-level patterns and Operational Reports for structured member, giving, attendance, and other authorized reports.
Insights
Numbered callouts
- Open Intelligence > Insights when you need patterns, not raw lists.
- Confirm the date range, module, and population before interpreting any number.
- Treat insights as decision support, not automatic instruction.
- Follow the insight with a human ministry decision.
What you should see Insights should help leaders notice patterns such as care needs, attendance movement, ministry workload, communication outcomes, and follow-up pressure.
Try it yourself Choose one non-sensitive insight and explain what action a pastor, admin, or ministry leader might take.
Common mistake Do not act on an insight without checking the date range and whether the underlying records are complete.
Operational Reports
- Choose the report or insight.
- Set filters and date range.
- Confirm the population and church context.
- Read totals together with definitions.
- Export only authorized data.
- Record the ministry decision that follows.
Guided practice
Ask the assistant one factual question that can cite an approved church source, inspect the citation, mark the answer helpful or not helpful, upload or identify a safe knowledge source, and run one non-sensitive operational report.
Completion check
The learner can distinguish an AI suggestion from a verified church fact and knows that every saved or sent action requires human responsibility.
Session 16: Administration
The promise
Church owners can configure one trustworthy workspace, give each person the right access, preserve accountability, and understand what the church's plan includes.
Church Settings Center
Visual checkpoint: Show the settings categories and explain that sensitive settings are permission-protected.
The Settings Center groups current settings into dedicated pages:
Identity & Branding
- church profile;
- welcome language and tagline;
- logo and app-icon appearance;
- colors;
- contacts and public links;
- respectful-title and related identity options where configured.
Member App & Website
- portal enablement;
- member entry and self-registration;
- install branding;
- portal and website handoffs;
- member/public experience settings.
Access & 2FA
- role-based two-factor requirements;
- security posture;
- handoff to Access Control.
Finance & Payments
- currency and money context;
- giving title and receipt wording;
- finance contact lines;
- online payment settings and readiness.
Communications & WhatsApp
- sender identity;
- message styling and header image;
- church WhatsApp/WA Bridge configuration;
- bulk pacing and communication settings.
Save one section at a time and read the success or validation message.
Branding
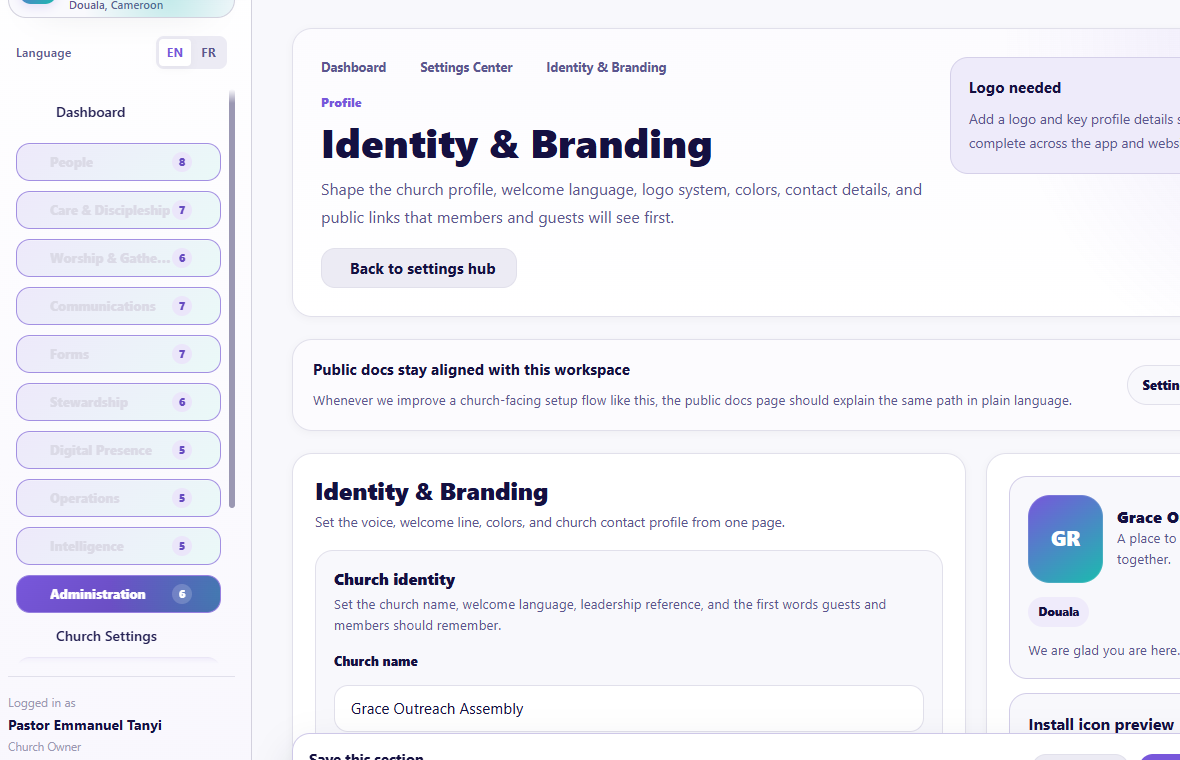
Visual checkpoint: Find church logo, app icon, colors, portal branding, and live preview behavior.
Branding is the dedicated identity view for consistent church logo, colors, portal icon, public presentation, and related assets. Use high-quality images and preview light/dark and mobile contexts.
Users & Roles / Access Control

Visual checkpoint: Show roles, permissions, user status, invitations, and least-privilege access choices.
- Invite a person using their own email.
- Choose the smallest appropriate role.
- Add only the permissions required for their responsibility.
- Check sensitive finance, children, care, communication, export, and settings permissions separately.
- Save.
- Test with the user's account rather than assuming the sidebar proves backend access.
- Remove or reduce access promptly when responsibilities change.
Security
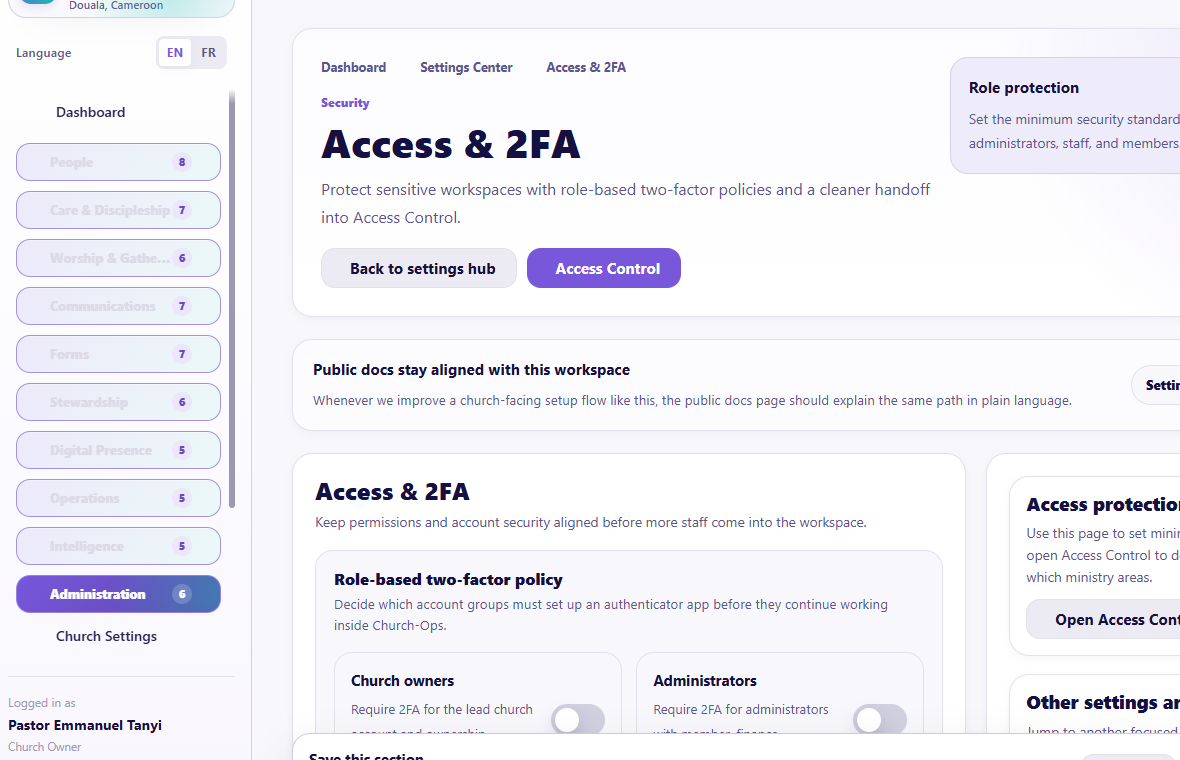
Visual checkpoint: Find two-factor settings, sensitive-area restrictions, session/security controls, and audit-related notices.
Use the Security page to review two-factor requirements and account protection. Owners and high-privilege users should complete security setup before accessing sensitive areas.
Audit Logs
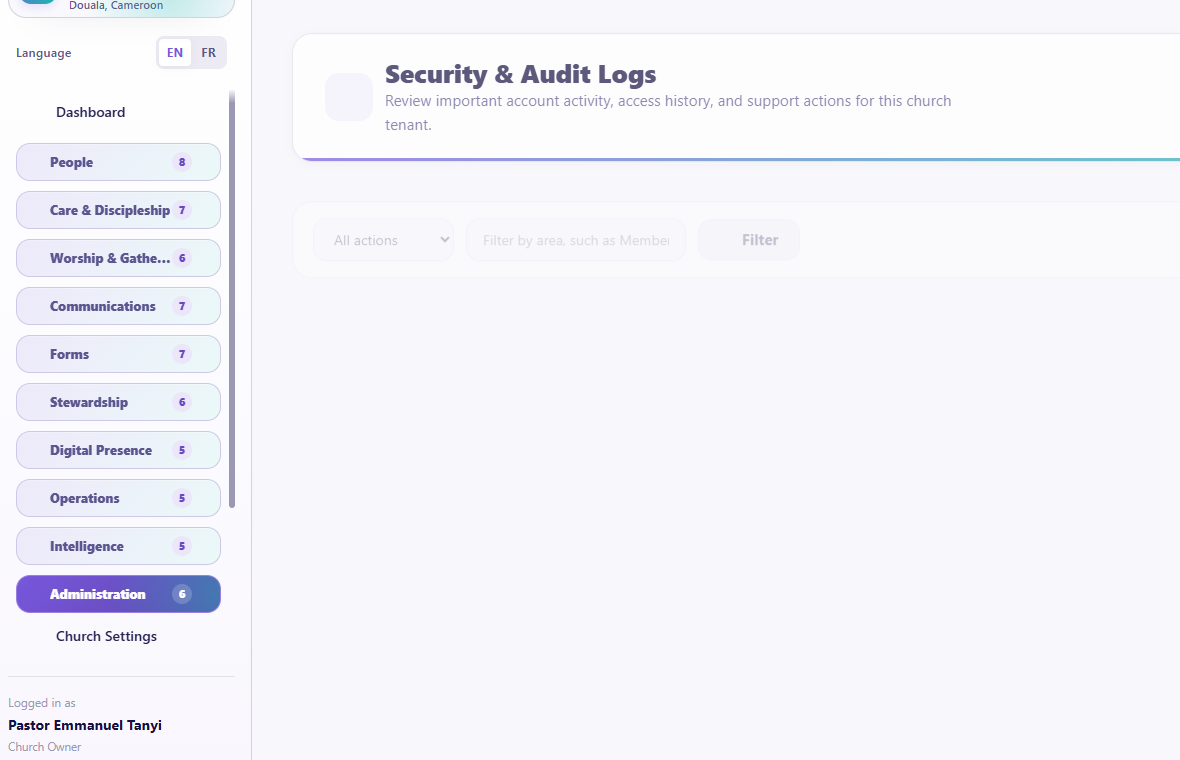
Visual checkpoint: Show actor, action, record, timestamp, filters, and why logs should not be casually deleted.
Audit Logs show who performed important actions, what record changed, and when.
Use filters to investigate:
- membership changes;
- finance actions;
- permissions;
- imports and exports;
- bulk actions;
- communication actions;
- settings;
- AI-assisted actions where logged.
Audit history is not a place for public blame. It is a trust and troubleshooting tool.
Billing & Plan
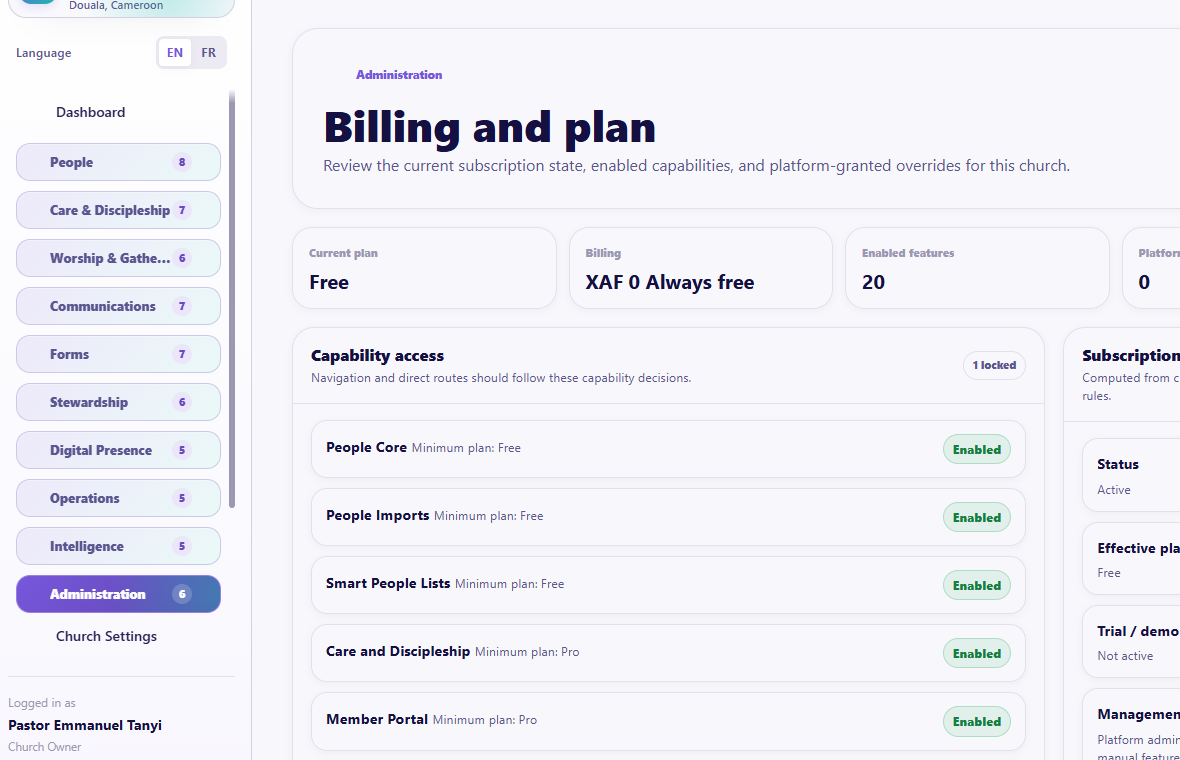
Visual checkpoint: Identify the active plan, enabled capabilities, overrides, and upgrade/support paths.
Use this page to see the church's current plan, enabled capabilities, billing state, and upgrade path. Platform-approved feature overrides may add a capability to a lower plan.
Current plan families are:
- Free: People Core, people imports, and people segments.
- Pro: Adds care, member portal, worship and gatherings, communications, core forms, finance, documents, and offline operations.
- Max: Adds children, campaigns/opportunities, advanced forms, advanced finance, automations, Intelligence, digital-presence builders, assets/facilities, and advanced insights.
- Network: Adds scoped multi-church/network administration outside this church-workspace course.
Always follow the actual capability list shown to the church; plan definitions may evolve.
Guided practice
Update one harmless branding field, review the member-experience status, inspect 2FA requirements, create a test low-privilege role or review one existing role, find one audit entry, and identify the current plan/capabilities.
Completion check
The learner can explain why role, capability, and security checks protect the church better than giving everyone administrator access.
Session 17: Connected Workflows and the Member/Staff Experience
The promise
The learner understands that Church-Ops modules are connected and can follow a ministry action from the first record to the member portal, notification, outcome, and report.
Member portal areas to demonstrate
Depending on configuration and access, members may use:
- Home;
- Chat and group chat;
- Giving;
- Alerts;
- Events;
- Sermons;
- Prayer;
- Devotionals and reading plans;
- Forms;
- Appointments;
- My Tasks;
- profile and More pages;
- offline cached experiences.
Staff and volunteers use My Tasks to accept, decline with reason, update progress, submit completion reports, and receive returned or closed outcomes.
Before/after visual handoffs
These paired screenshots help learners understand that Church-Ops is not a collection of isolated pages. A good action starts somewhere, then proves itself somewhere else.
Form handoff: builder to response
Before callouts
- Build the form fields.
- Preview the form as a visitor or member.
- Publish only when the form is clear on phone.
After result check The submitted response should appear in Responses with review state, submitter context, answers, and follow-up actions.
Assignment handoff: task list to member/staff action
Before callouts
- Create the task.
- Assign the right person or team.
- Set due date, priority, privacy, and channel.
Mobile-focused result check On phone, the assignee should use the member portal or installed app to open My Tasks, accept or decline, submit progress, and send the completion report. If the task cannot be opened from the phone, the assignment flow is not complete.
Worship handoff: service planning to volunteer response
Before callouts
- Build the service order.
- Add songs to the relevant song folder.
- Assign only volunteers from the selected team.
After result check The volunteer should receive only the assignment details and song folder relevant to their role. The run sheet stays clean and shows the service moment without exposing the full song list.
Import handoff: upload to destination module
Before callouts
- Choose the data type.
- Upload the file.
- Map columns and preserve approved extra fields.
- Preview and fix errors.
After result check Imported people should appear in the correct People pages, while missing data, duplicates, and household issues surface in People Operations for cleanup.
Finance handoff: records to printable report
Before callouts
- Record income and expenses separately.
- Use the right category line type.
- Confirm totals before reporting.
After result check The report should match source transactions, show readable tables, include approved signatory sections when selected, and print cleanly.
Mobile workflow screenshots to rehearse live
Some workflows are usually completed on a phone. The facilitator should rehearse these from a real phone or browser mobile preview during training.
Member portal phone flow

Annotated callouts
- Check the church logo and page title in the sticky branded header.
- Confirm the bottom navigation stays visible without covering page actions.
- Use the notification access card as the recovery path when the browser blocks push alerts.
What you should see The portal should feel like the church's own mobile app: branded header, clear welcome card, quick actions, and bottom navigation for Home, Chat, Give, Alerts, and More.
Try it yourself Open the member portal, move between Home and More, then return Home without losing the branded app frame.
Common mistake Do not tell members to reinstall the app first when notifications are blocked. Ask them to use the notification access prompt or browser site settings, then check again.
Assignment phone flow

Annotated callouts
- Open More and choose My Tasks.
- Review the task status cards before opening an individual assignment.
- Teach assignees to accept, decline with reason, update progress, and submit completion reports from the task detail page.
What you should see My Tasks should show assignments in one place so volunteers and staff know what is open, active, pending, and completed.
Try it yourself Give one safe sample task to a demo member, open it from the portal, then walk through accept, progress update, and completion report.
Common mistake Do not send sensitive assignment details before acceptance when the workflow is privacy-protected. The assignee should first accept before seeing protected details.
Public forms and prayer phone flow
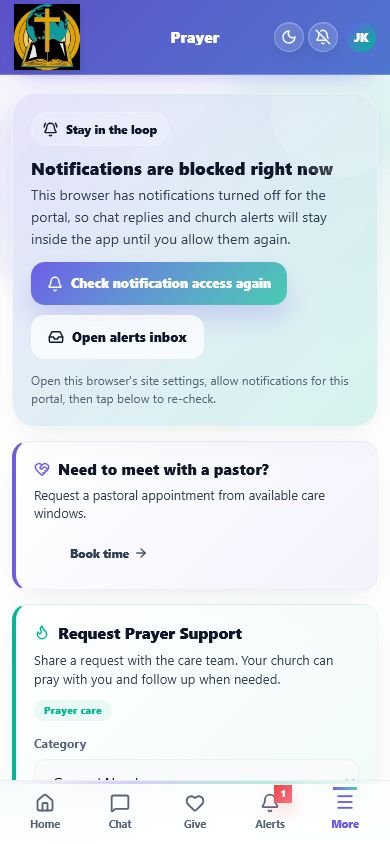
Annotated callouts
- Use Requests & Reports for member-facing forms.
- Use Prayer for prayer support and pastoral appointment requests.
- Check that long forms scroll naturally and remain usable above the bottom navigation.
What you should see Forms should be simple enough for a member to complete on a phone, and prayer requests should clearly explain what the church will do next.
Try it yourself Open one available form and one prayer request flow on mobile preview, then confirm that the submit button is reachable without horizontal scrolling.
Common mistake Do not ask members to type internal codes. Member-facing forms should use clear labels, choices, and church-friendly language.
Alerts phone flow
Annotated callouts
- Open Alerts from the bottom navigation.
- Tap an alert to read the full notification page.
- Use Mark all as read after reviewing church updates.
What you should see Alerts should separate church updates from chat notifications and provide clear next steps.
Try it yourself Open the first alert, return to the list, then mark all alerts as read.
Common mistake Do not treat Alerts as the chat inbox. Chat messages belong in Chat; church announcements, assignments, and system notices belong in Alerts.
Run sheet phone flow
Annotated callouts
- Open the shared run sheet on phone.
- Confirm actual service times are visible.
- Confirm song lists are not exposed in the run sheet.
- Test offline viewing before sending to the service team.
What you should see The run sheet should show the service order clearly while keeping song folders available only to the relevant volunteers.
Try it yourself Share one demo run sheet, open it on a phone, then turn network off briefly to confirm offline access.
Common mistake Do not paste song lists into the run sheet. Song folders should be shared only with the people who need them.
Connected workflow 1: Guest to follow-up
- Admin records guest.
- Admin creates assignment with channel and due time.
- Assignee receives a privacy-safe alert.
- Assignee opens My Tasks.
- Assignee accepts.
- Protected guest details unlock.
- Assignee follows up and submits report.
- Admin acknowledges, closes, or returns the task.
- Care and guest history remain traceable.
Connected workflow 2: Prayer to team care
- Member or admin submits request.
- Admin confirms audience and privacy.
- Admin assigns a person or prayer team.
- Approved summary reaches individuals or group chat.
- Leader handles protected follow-up details.
- Request is updated, followed up, answered, or converted to testimony.
Connected workflow 3: Event to attendance and care
- Admin creates/imports event.
- Event appears on the portal/public site according to visibility.
- Reminders go to the intended audience.
- Ushers record attendance.
- Attendance reports reveal follow-up patterns.
- Smart Lists, Care Command, or workflows create appropriate next steps.
Connected workflow 4: Form to ministry action
- Admin publishes form.
- Person submits through public site or portal.
- Response appears in Responses.
- Workflow notifies the right team or creates a task.
- Staff process, approve, or follow up.
- History and analytics record the outcome.
Connected workflow 5: Service plan to volunteer response
- Worship leader prepares plan.
- Volunteer receives role assignment and relevant song folder.
- Volunteer accepts or declines.
- Admin reassigns when necessary.
- Volunteer uses offline-friendly run sheet.
- Service history remains available without exposing song resources publicly.
Guided practice
Choose one connected workflow and follow it on both admin and member/staff screens. The learner must identify the owner, private information, notification, action page, outcome, and audit/report destination.
Completion check
The learner no longer sees Church-Ops as separate boxes. They can explain how one correct record removes repeated entry across the church.
Session 18: Capstone - Run One Complete Church Week
The promise
The team proves it can use Church-Ops as a calm weekly operating rhythm.
Scenario
During one training week, the church will:
- add or update one member and household;
- record one guest and assign follow-up;
- review one Care Command signal;
- create one task and complete its review cycle;
- create one event and reminder;
- prepare one short service plan and volunteer assignment;
- record attendance;
- send one approved message;
- publish one small form and process a response;
- record one test income and expense;
- publish one portal or website update;
- sync one supported offline action or explain the sync process;
- run one operational report;
- review one audit entry.
Team roles
Assign learners realistic roles:
- church owner or lead administrator;
- secretary/people administrator;
- care leader;
- worship or events leader;
- communications worker;
- finance officer;
- volunteer using the member portal.
No learner should perform a sensitive action merely to finish the exercise if their assigned role should not have access.
Final review questions
Each learner should answer:
- What burden does your module remove?
- What record must be accurate before your work begins?
- What information is private?
- Who receives the next action?
- Where can you confirm that the action happened?
- What should you do when something fails?
- Which report or history shows the outcome?
Graduation standard
The learner is ready when they can complete their responsibility without:
- creating duplicate people;
- exposing private information;
- giving themselves broader access;
- sending an unreviewed bulk message;
- importing without preview;
- deleting finance, child, care, or audit history casually;
- treating an AI suggestion as a final decision;
- assuming a notification proves the underlying task is complete.
Part Two: Quick Page-by-Page Reference
This reference follows the current church sidebar. Availability depends on plan, role, settings, and platform-approved overrides.
Dashboard
| Page | What it is for | First action |
|---|---|---|
| Dashboard | Daily church summary and shortcuts | Read attention items, then choose one real next action |
People
| Page | What it is for | First action |
|---|---|---|
| People Operations | Data health, incomplete records, households, and import follow-up | Open one issue and verify the source record |
| Members | Search, add, edit, filter, bulk process, and open member profiles | Search before adding |
| Households | Family relationships and Household 360 | Search before creating |
| Guests | Visitor intake, decisions, care, and follow-up assignments | Record only known details |
| Ministries | Ministry roster and leadership | Add existing members |
| Small Groups | Group roster, leaders, and meeting context | Set leaders and meeting details |
| Children | Protected child profiles and check-in workflows | Confirm guardian and permission |
| Profile Shares | Approved public member/household stories or profiles | Preview privacy before sharing |
Care & Discipleship
| Page | What it is for | First action |
|---|---|---|
| Care Command | Unified care-signal queue | Filter open or overdue needs |
| Pastoral Care | Cases, visits, appointments, care tasks, and timelines | Search the person first |
| Prayer Wall | Requests, team prayer, follow-up, and testimonies | Confirm audience/privacy |
| Tasks | Assignments and recurring schedules | Write a clear action and due date |
| Devotionals | Church-reviewed portal devotionals | Preview before publishing |
| Reading Plans | Church or platform plan availability and daily readings | Choose the preferred active plan |
| Care Reports | Care response and accountability reporting | Review overdue and workload patterns |
Worship & Gatherings
| Page | What it is for | First action |
|---|---|---|
| Events | Upcoming/past events, recurrence, reminders, and resources | Set exact date and time |
| Attendance | Event-linked member and guest check-in | Select the correct event |
| Sermons | Sermon media and portal library | Confirm media source and publication |
| Service Planning | Service flow and assignments | Build the plan in service order |
| Song Library | Songs, categories, presets, links, and attachments | Search before adding |
| Volunteer Teams | Teams, roles, rosters, and shift context | Add existing members to a team |
Communications
| Page | What it is for | First action |
|---|---|---|
| Smart Composer | One-time or selected-recipient messages | Confirm audience and preview |
| Conversations | Inbound/outbound conversation history and replies | Open the real conversation |
| Message Assets | Template Studio and Signature Studio | Use the supported token picker |
| Outbox & History | Delivery and failure status | Read the latest provider status |
| Campaigns | Audience campaigns, pacing, scheduling, and composer | Confirm target and queue duration |
| Opportunities Queue | Timely outreach opportunities | Confirm it is current and appropriate |
| Communication Reliability | Worker, provider, webhook, queue, and schedule health | Diagnose before retrying |
Forms
| Page | What it is for | First action |
|---|---|---|
| Forms Dashboard | Overview and recent activity | Review submissions needing action |
| All Forms | Form lifecycle and sharing | Search before creating |
| Form Builder | Fields, sections, layout, and logic | Start with a purpose or template |
| Templates Library | Full church-use templates | Preview, then customize |
| Responses | Submission review and follow-up | Open one response detail |
| Form Workflows | Post-submission actions | Start inactive and test |
| Form Analytics | Volume and completion insight | Choose one question to answer |
| Public Forms | Publicly available form destinations | Test the public link |
Stewardship
| Page | What it is for | First action |
|---|---|---|
| Giving | Contributions and donor-linked records | Confirm date, person, category, amount |
| Income & Expenses | Transaction entry and totals | Keep line types separate |
| Budgets | Fiscal-year planning and comparison | Confirm fiscal year and category |
| Finance Reports | Board-ready reports and PDF/print | Preview totals and layout |
| Approvals & Signatories | Prepared-by and sign-off structure | Add names and capacities |
| Finance Settings | Money, receipt, and payment configuration | Confirm currency and payment readiness |
Digital Presence
| Page | What it is for | First action |
|---|---|---|
| Member Portal | Church-branded member app workspace | Review access and mobile preview |
| Website Builder | Public website templates and page studio | Open the current live page first |
| Blog | Public posts and ministry updates | Create a draft before publishing |
| Public Forms | Website-facing forms | Verify publication and link |
| SEO & Domains | Search metadata and domain setup | Keep default URL working |
Operations
| Page | What it is for | First action |
|---|---|---|
| Automations | Smart Lists and event workflows | Define one outcome, then test |
| Assets & Facilities | Buildings, rooms, equipment, custody, maintenance | Add facility before related assets |
| Documents | Protected church archives | Choose category and access context |
| Import Center | Mapping, preview, validation, and import | Select data type and preview |
| Offline Desk | Cached datasets, queued work, sync, and review | Refresh while online |
Intelligence
| Page | What it is for | First action |
|---|---|---|
| Church Assistant | Contextual, cited assistance | Ask a clear, reviewable question |
| Insights | Higher-level church patterns | Confirm date and population |
| Operational Reports | Structured authorized reports | Choose a report and filters |
| Knowledge Sources | Upload and manage assistant sources | Use approved documents only |
| Assistant Settings | Identity, policy, doctrine, modes, and safety | Review before changing behavior |
Administration
| Page | What it is for | First action |
|---|---|---|
| Church Settings | Identity, portal, security, finance, and communication sections | Open one focused section |
| Branding | Church visual identity | Preview on mobile and dark mode |
| Users & Roles | Accounts and least-privilege access | Give only needed permission |
| Security | Two-factor and account protection | Secure high-privilege accounts |
| Audit Logs | Who changed what and when | Filter by action or record |
| Billing & Plan | Current plan and enabled capabilities | Read actual capability access |
Part Three: Troubleshooting Without Panic
A page is missing
Check role, plan capability, church setting, and whether setup is complete.
A page returns 403
The account is authenticated but not permitted, the plan does not include the capability, or tenant ownership validation rejected the request. Do not bypass it with another person's account.
A page returns 404
Check the church slug, record link, route, publication state, and whether the record belongs to the same church.
A page returns 405
The action used the wrong request method or an old/cached form. Refresh once, reopen the page from the sidebar, and report the exact action if it continues.
A page returns 500
Stop repeating the action. Record the time, page, church, account role, and exact button used. An authorized support person should review current production logs without exposing sensitive data.
A modal will not scroll
Try scrolling inside the form area, not the dark backdrop. On mobile, use one finger inside the sheet. If Save remains unreachable, report the page and modal name rather than zooming until controls disappear.
A message is stuck or scheduled work did not run
Check Scheduled Messages, Outbox & History, and Communication Reliability. Do not schedule duplicates before reading the failure state.
A notification is duplicated
Do not repeatedly click the originating action. Record notification titles and times, mark reviewed items as read, and report the originating workflow.
A record appears twice
Stop creating more. Search by name, phone, email, household, source, or reference. Use the approved merge or duplicate-review flow.
The system feels slow
Use filters and pagination, avoid loading multiple heavy tabs, allow current sync to finish, and check connection quality. A persistent problem should be reported with the specific page and time.
Offline changes are missing
Open Offline Desk, review the queue, reconnect, sync, and inspect rejected/duplicate items.
Part Four: Trainer Sign-Off
Use this after each learner's assigned sessions.
| Skill | Demonstrated | Needs practice |
|---|---|---|
| Signs in securely and uses their own account | [ ] | [ ] |
| Finds permitted pages without guessing URLs | [ ] | [ ] |
| Searches before creating a person or record | [ ] | [ ] |
| Understands role and plan restrictions | [ ] | [ ] |
| Protects member, child, care, and finance data | [ ] | [ ] |
| Completes their module's basic workflow | [ ] | [ ] |
| Can verify the result in detail/history/report | [ ] | [ ] |
| Can recover from a simple validation error | [ ] | [ ] |
| Knows when to stop and ask an authorized person | [ ] | [ ] |
| Can explain how Church-Ops reduces their workload | [ ] | [ ] |
Final message to learners
Church-Ops is not asking the church to become a software company.
It gives the church one dependable place for the work it is already doing: knowing people, caring for families, planning worship, communicating clearly, stewarding resources, supporting volunteers, and remembering what must happen next.
Use only the parts connected to your responsibility. Keep records accurate. Protect people. Finish the next action. Let the system remember the details so the church can stay present with people.